Invoice Summary
| Related Pages |
| Related Categories |
Text here
Contents
Before You Begin
Access to the Invoice Summary requires the current operator to have Security System: AR -> Print Statement -> View and Entry access.
![]() See: Security System for more information.
See: Security System for more information.
Invoice Summary Report
A new client accounting report is available to summarize invoices in a given period. The Invoice Summary Report provides a way to combine multiple invoices on a client, or multiple invoices on a policy in a single easy-to-read report, rather than printing individual invoices or installment invoices on full sheets of paper.
Invoice Summary vs. Client Statement
The invoice summary is similar to the Client Statement with a few key differences:
- Invoice Summary does not include a balance forward amount. Any transactions prior to the report start date are ignored.
- On account payments are not included.
- Payments created in the current period applied to invoices outside the report period are not included.
- Invoice Summary does not include age buckets, age date column, and client balance filter options.
- The Invoice Summary is a filtered view of the client's accounting transaction while the Client Statement always includes a true balance as of the report end date.
Creating Invoice Summary Report
How to Access
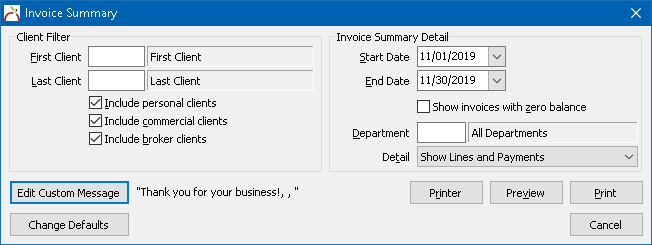
- From the Main Menu, select Client -> Invoice Summary. This will open the Invoice Summary Report window which can be run for all clients.
- From the client accounting tab, select Client Statement -> Preview Invoice Summary. This will produce a print preview using the report defaults without an option to change filters.
- From the client accounting tab, select Client Statement -> Invoice Summary (Custom). This will open the Invoice Summary report window with the client number pre-filled.
- From Policy & Billing, select Invoice -> Invoice Summary. This will produce a print preview for only the selected policy using the report defaults without an option to change filters.
- From Policy & Billing, select Invoice -> Invoice Summary (Custom). This will open the Invoice Summary report window with the client number pre-filled.
- From Batch Send, select Other -> Invoice Summary, All Policies. This will include details for all policies on the client using the report defaults.
- From Batch Send, select Other -> Invoice Summary, This Policy Only. This will include details for only the selected policy using the report defaults.
Print or Electronic Delivery
To begin, set a default client statement delivery for the agency. To set a unique default for a specific client, edit that client's profile and select a statement delivery default. (Contact Newton Sales to add Access My Insurance (AMI) for more information on pricing and features).
- Selecting Print from the Invoice Summary (or Client Statements), displays a screen based on agency (or client's unique) delivery method.
- Emailed Statements will go to any contact with accounting checked on the client.
- AMI-Delivered Statements will only go to the accounting contact if they are enrolled in AMI.
- Select Email Message Text to add Subject Line and Email Body. (Optionally, use Save Template and Load Template to set defaults).
- Select AMI Message Text to add Subject Line and Email Body. (Optionally, use Save Template and Load Template to set defaults).
Invoice Summary Report Defaults
The Invoice Summary Report defaults can be modified similar to options available to the retail client statement. Changing the defaults is not necessary for a one-off report, as the Invoice Summary Report filters can be customized when opened from the Main Menu, or from the client accounting tab. Modifying the Invoice Summary Report defaults will not change the Client Statement defaults.
From the Main Menu, select Client -> Invoice Summary.
- Select Edit Custom Message. Enter up to three lines of text to include below the total amount on the report. Select Make This Text The Default to save changes.
- Select Change Defaults. Change the start date, end date, report options, or detail level. Select OK to save changes.
