Difference between revisions of "Client Tab"
| Line 54: | Line 54: | ||
[[File:Ic_info_black_24dp.png]] See: [[Client Keyword Search]] for more information. | [[File:Ic_info_black_24dp.png]] See: [[Client Keyword Search]] for more information. | ||
#From the '''[[Main Menu and Tab Navigation|Main Menu]]''', select '''Find Client''' or press '''<F3>''' to open the Client Keyword Search. | #From the '''[[Main Menu and Tab Navigation|Main Menu]]''', select '''Find Client''' or press '''<F3>''' to open the Client Keyword Search. | ||
| + | #:[[File:Newton-mainmenu-lcrop.png]] | ||
#Enter the search text and press '''<Enter>''' or select '''Search''' to list any matches. | #Enter the search text and press '''<Enter>''' or select '''Search''' to list any matches. | ||
#'''Left-Click''' to view additional information for the client, or press the '''<Up Arrow>''' and '''<Down Arrow>''' to scroll through the list. | #'''Left-Click''' to view additional information for the client, or press the '''<Up Arrow>''' and '''<Down Arrow>''' to scroll through the list. | ||
| Line 63: | Line 64: | ||
=== Policy Keyword Search === | === Policy Keyword Search === | ||
{{#ev:youtube|2SNA8JpjWsg|300|right|Enhanced Policy Keyword Search}} | {{#ev:youtube|2SNA8JpjWsg|300|right|Enhanced Policy Keyword Search}} | ||
| − | + | [[File:Ic_info_black_24dp.png]] See: [[Policy Keyword Search]] for more information. | |
| − | + | #From the '''[[Main Menu and Tab Navigation|Main Menu]]''', select '''Find Policy''' or press '''<Shift + F3>''' to open the Policy Keyword Search. | |
| − | [[File: | + | #:[[File:Newton-mainmenu-lcrop.png]] |
| + | #Enter the search text and press '''<Enter>''' or select '''Search''' to list any matches. | ||
| + | #The Policy Keyword Search displays possible matches while the policy number is entered, and can even locate partial policy numbers and close matches. | ||
| + | #:[[File:Policy-keyword-suggestions.png]] | ||
| + | #'''Left-Click''' to view additional information for the policy, or press the '''<Up Arrow>''' and '''<Down Arrow>''' to scroll through the list. | ||
| + | #'''Double-click''' to load the desired result, select '''Load Client''', or press '''<Enter>''' if selected. | ||
| + | #A [[Client Tab]] will be created for the selected client. | ||
| + | #:Optionally select '''Load Policy''' to create both the [[Client Tab]] and automatically load the [[Policy Dashboard]]. | ||
| + | #Multiple client tabs can be opened at the same time, similar to tabs in a browser. | ||
| + | #When a task is completed, select '''Exit''' or the 'X' on the [[Client Tab]] to close the client file. | ||
=== Named Insured Keyword Search === | === Named Insured Keyword Search === | ||
Revision as of 13:57, 10 April 2017
| Related Pages |
| Related Categories |
The Dashboard Tab (User), Client Tab, Company Tab, Vendor Tab, Management Tab and Policy Express are the primary dashboards within Agency Systems.
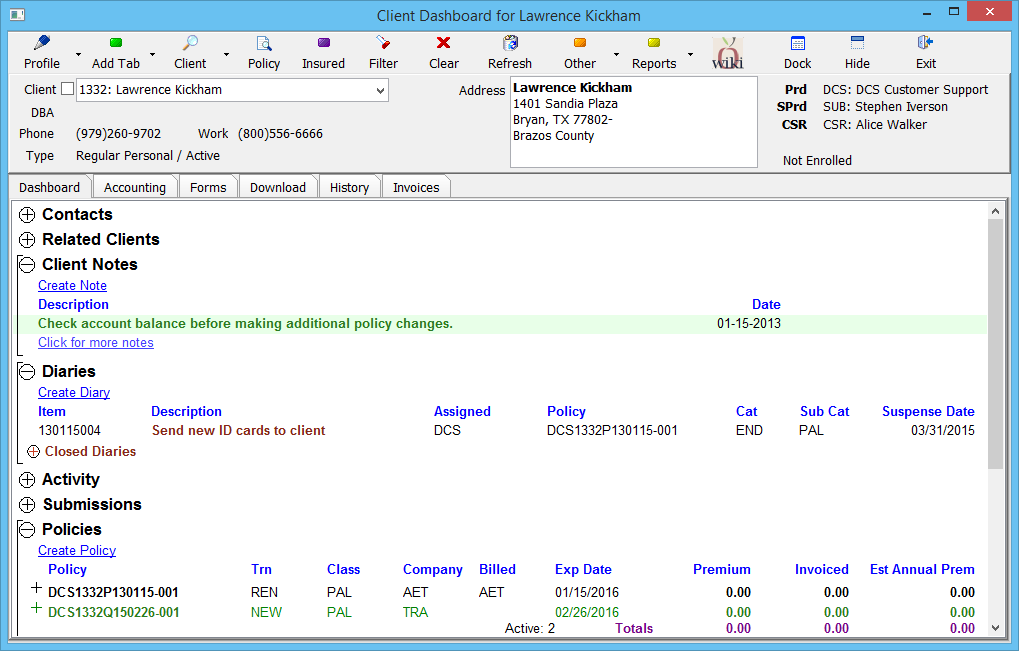
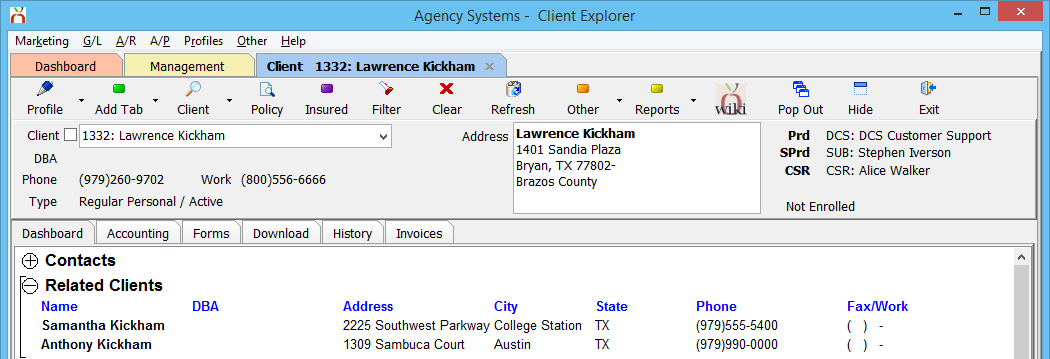
The client tab contains a top toolbar of global client options, client information such as contact numbers and client type, and data tabs for different data types. The client sub-tabs are Client Dashboard, Accounting, Forms, Download, History, and Invoices.
Contents
Frequently Asked Questions (FAQ)
- How do I recover a deleted client?
- How do I export client addresses for Christmas cards?
- How do I correct the county for a client?
- How do I assign more than two clients to a related client group?
- How do I delete a duplicate client?
Find a Client
Multiple client tabs can be opened at the same time, similar to tabs in a browser. When an operator is finished with a client, the current tab can be switched to a new client profile, or the client tab can be closed entirely.
A Client Tab is created by using one of the following methods
- Client Keyword Search.
- Policy Keyword Search.
- Named Insured Keyword Search (GA).
- Add Tab -> Client.
- Dashboard Tab (User): Right-Click -> Open client.
- Client Dashboard -> Related Clients.
Client Keyword Search
![]() See: Client Keyword Search for more information.
See: Client Keyword Search for more information.
- From the Main Menu, select Find Client or press <F3> to open the Client Keyword Search.
- Enter the search text and press <Enter> or select Search to list any matches.
- Left-Click to view additional information for the client, or press the <Up Arrow> and <Down Arrow> to scroll through the list.
- Double-click to load the desired result, or press <Enter> if selected.
- A Client Tab will be created for the selected client.
- Multiple client tabs can be opened at the same time, similar to tabs in a browser.
- When a task is completed, select Exit or the 'X' on the Client Tab to close the client file.
Policy Keyword Search
![]() See: Policy Keyword Search for more information.
See: Policy Keyword Search for more information.
- From the Main Menu, select Find Policy or press <Shift + F3> to open the Policy Keyword Search.
- Enter the search text and press <Enter> or select Search to list any matches.
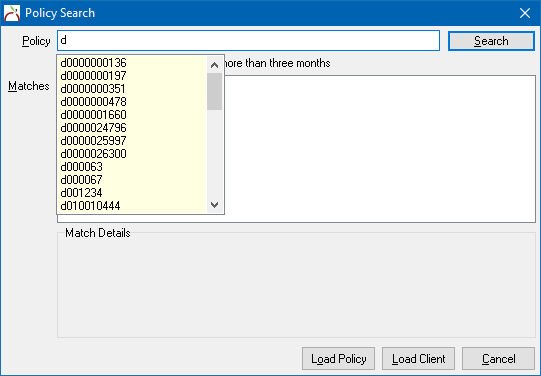
- The Policy Keyword Search displays possible matches while the policy number is entered, and can even locate partial policy numbers and close matches.
- Left-Click to view additional information for the policy, or press the <Up Arrow> and <Down Arrow> to scroll through the list.
- Double-click to load the desired result, select Load Client, or press <Enter> if selected.
- A Client Tab will be created for the selected client.
- Optionally select Load Policy to create both the Client Tab and automatically load the Policy Dashboard.
- Multiple client tabs can be opened at the same time, similar to tabs in a browser.
- When a task is completed, select Exit or the 'X' on the Client Tab to close the client file.
Named Insured Keyword Search
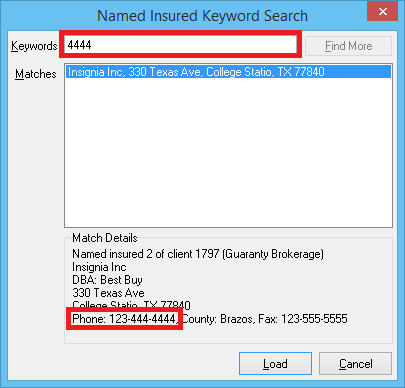
Clients who are saved as brokers can also be found by Named Insured. Like the Client Keyword Search, the Named Insured Keyword Search displays possible matches as each character is entered.
When a search term is entered, the Named Insured Keyword Search automatically includes matches for a number of fields, such as the phone number.
The Named Insured Keyword Search button is only visible for agencies configured as General Agencies, or if the option to always show the named insured is enabled.
Client Tab: Toolbar
The client toolbar is always available for each of the client sub-tabs.
- Profile: Edit the client profile for the current client. Select the drop down to create a new client.
- Add Tab: Create an additional Client, Company, or Vendor tab.
- Client: Perform a Client Keyword Search. The resulting client will replace the current tab with the new client details. Select the drop down to create a new client.
- Policy: Perform a Policy Keyword Search. The resulting client will replace the current tab with the new client details.
- Insured: Perform a Named Insured Keyword Search. The resulting client will replace the current tab with the new client details. The Named Insured filter will be applied to the Diary, Submissions, Policies, and Attachment bands. This button is only visible if the agency type is a GA, or if the option to show the insured search is enabled.
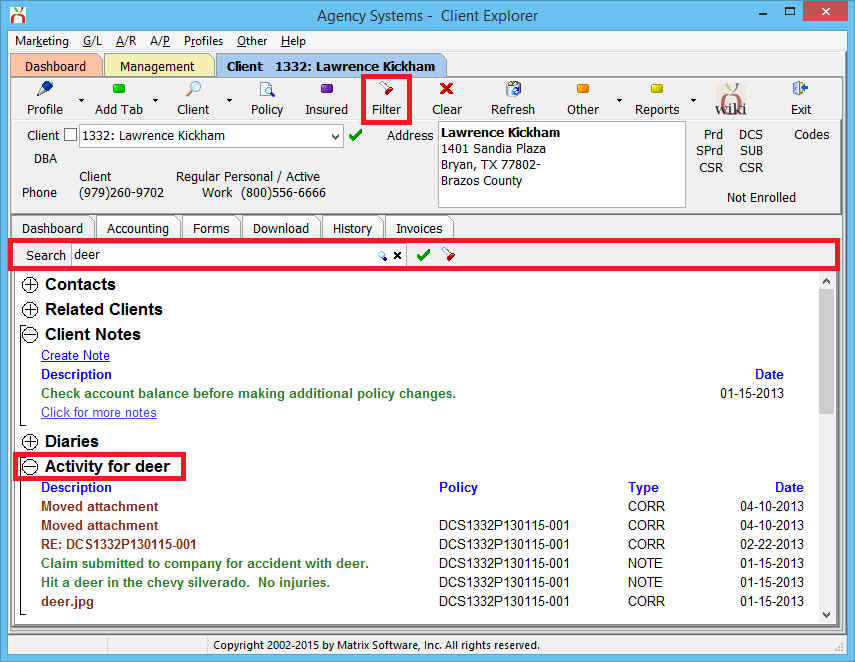
- Filter: Displays the filter toolbar on the Client Dashboard to enter an activity search string. The activity search will filter the Activity, Emails, and Attachments bands on the client dashboard. When the activity filter is applied, the band names will include the search string.
- Clear: Removes any filters, and refreshes the client with the default values.
- Refresh: Refreshes the currently selected client tab, without removing any applied filters.
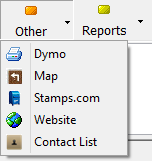
- Other: Provides access to the DYMO Printer integration, a map to the client address, Stamps.com integration, a link for the client website, or a pop up window for client contacts.
- Reports: Provides a subset of client-specific reports for easy access.
- Wiki: Opens the help documentation on the Newton Wiki for the client tab.
- Pop Out: Opens the client tab as a window and renames the button to "Dock". Select again to reload the client window as a client tab.
- Hide: Collapses the client summary panel from view and renames the button to "Show". Select again to expand the summary panel.
- Exit: Closes the client tab.
Client Tab: Summary Panel
The client summary panel is below the client toolbar. The summary panel includes the client selection drop-down box, and client details.
The client details include the following:
- Client name and number.
- Client DBA name.
- Client phone and fax for commercial lines, or phone1 and phone2 for personal lines.
- Client Type of Regular Personal, Regular Commercial, or Broker Billed and if the client status is a Prospect.
- Client Address.
- Client Producer, Sub Producer and CSR, including both the code and profile name for each.
- Client User Code 1-3 ,Territory, and Source of Business, including both the code and profile name for each.
- Client website address.
- My Insurance Dashboard enrollment status (if enabled).
Client Tab: Summary Panel - Select a Client
The client selection drop-down box provides a quick search feature which automatically searches client names for partial or complete matches.
Example: Enter a portion of the client’s name, “kick”. Three results are displayed in the drop-list, which is automatically updated after each additional character. Scroll through the items by using the arrow keys to view the complete name and address information. After the correct client is highlighted, press <enter> to load the full client dashboard.
If the quick search drop-down box does not find a match, the advanced keyword search options are available from the client toolbar. The Client Keyword Search includes results for additional data fields such as client DBA, contacts, phone numbers, or drivers.
In addition, the client profile can be loaded by entering the client number in the client selection drop-down box and pressing <Enter> or <TAB> when finished. By default, inactive clients are not included in the drop-down list. To load an inactive client by number, first select the "Include Inactive Clients" check box, or use the Client Keyword Search.
To step through the previous or next client, left-click in the client selection drop-down box, and use the up and down arrow keys on your keyboard.
Client Tab: View Client as Window
Client, Policy, Diary, Company and Vendor tabs can a be viewed as a window on-the-fly.
Within the top toolbar, select Pop Out to detach the tab, and display the tab as a window.
Select Dock within the toolbar to return the item as a full screen tab.
Client Tab: Create a Client
To enter a new client or prospect into Newton, you should always search existing clients first to avoid creating duplicates. Remember to include inactive clients.
For more information, see: Client Profile.
Client Tab: Dashboard
After searching for and loading a client, the client’s dashboard is displayed below the Summary Panel.
Contacts
Client contacts are listed as the top band on the client dashboard. The contact band can be automatically expanded by enabling the user preference.
![]() For additional information, see: Client: Contacts (Create, Edit, or Delete).
For additional information, see: Client: Contacts (Create, Edit, or Delete).
Related Clients
Related Clients are directly below the Contacts band. The related clients band is only visible if the currently selected client is related to another client.
The list includes the client name, DBA, address, and phone numbers.
Client Notes
Client notes are used for permanent notes about a client. Client notes aren’t indexed for searching and do not display in the activity band.
Only highlighted client notes will display by default. Select Click for more notes to display all client notes within the default filtered date range. (See Other -> Preferences -> User Options -> Default Band Date Range to change the value)
After selecting Click for more notes, select Click to show all notes to remove the default date filter.
Select Create Note to add a client note and choose whether to highlight the note. The text is permanent, and can’t be changed once saved.
Notes can be optionally set as a Popup Notice, and will automatically open when the client is loaded.
Client note text size can be increased and decreased by the Memo Font Size user preference. (Other -> Preferences -> User Options)
Diaries
The diaries band can be automatically expanded by enabling the user preference.
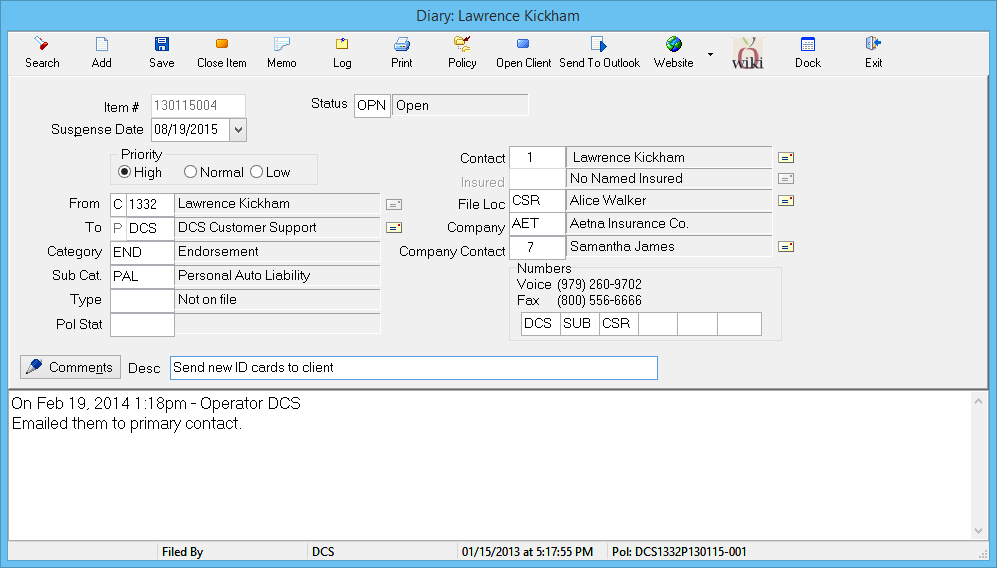
A Diary is a simple follow-up item; for example, a telephone message. A Diary includes a suspense-date for follow-up, description, and notes.
Diaries can be created from the Client Dashboard, or automatically attached to a policy through Policy Express.
The diaries band on the client dashboard also contains a Closed Diaries sub-band. When the band is expanded, all closed diaries for the client will be listed. Each of the sub-band headers can also be selected to sort the list.
The diary comment font size can be adjusted per user.
Activity
Activity shows recent activity within the default filtered date range by default. (See Other -> Preferences -> User Options -> Default Band Date Range to change the value)
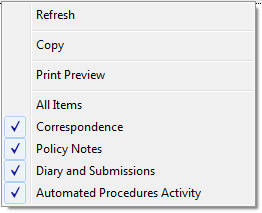
The activity is categorized based on a number of types:
- Correspondence: Emails, Attachments, Printed Memos.
- Policy Notes: Policy activity note added from Policy Express.
- Diaries: Any diary action including creating, editing, and closing diary items.
- Submissions: Any submission action including creating, editing, and closing submission items.
- Automated Procedures Activity (Policy Task): Any Policy Express -> Policy Task activity such as Renew, Endorse, Cancel, Reinstate and more.
- System: All other activity, recorded automatically by the system for E&O.
By default, all activity types other than System are displayed. To edit the default displayed activity types, see Other -> Preferences -> Activity Listing.
The default activity filters can also be changed on-the-fly by right-clicking.
Select Filter to search all activity items for a word or phrase. Click Clear to clear the search filter.
Activity log text size can be increased and decreased by the Memo Font Size user preference. (Other -> Preferences -> User Options)
Submissions
The submissions band can be automatically expanded by enabling the user preference.
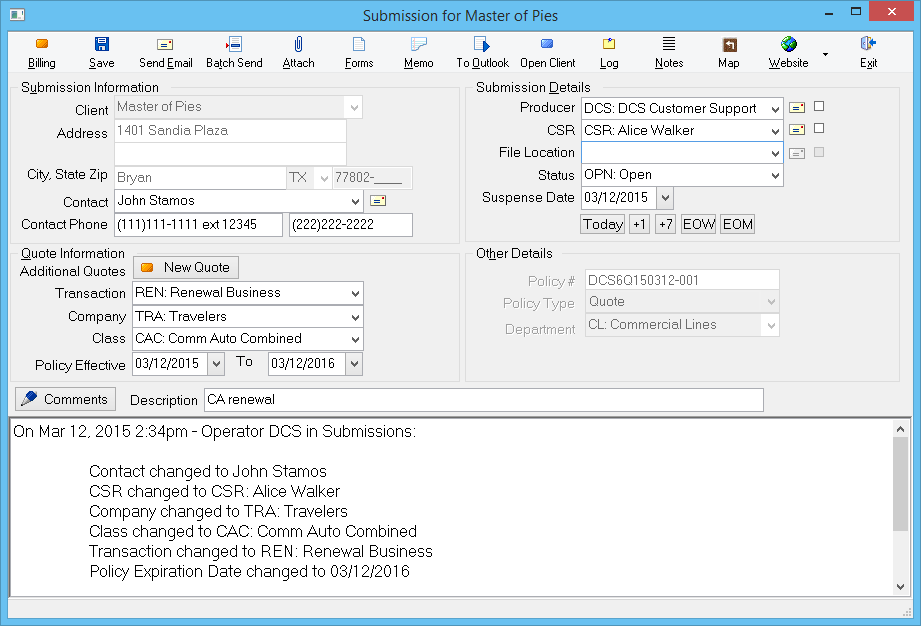
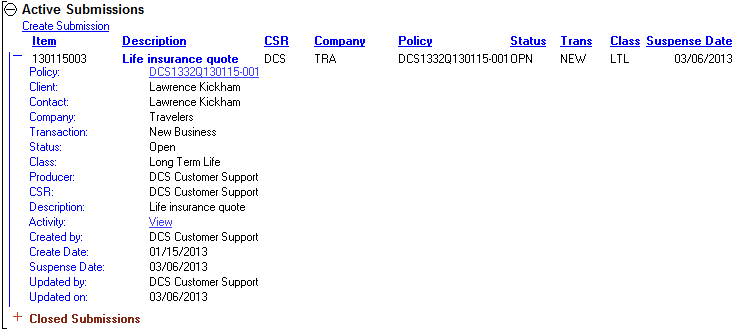
A Submission is a follow-up item that is attached to the task of marketing or writing a specific policy or quote. A submission allows the operator to attach company-specific applications, loss runs, renewal apps, etc. to a quote or policy. Comments added to a submission are permanent, and cannot be changed or erased. All changes to the description, suspense dates, etc. are recorded in activity.
Expand the details band to display additional information about the submission.
The Closed Submissions sub-band will initially only show closed items within the Default Band Date Range (Other -> Preferences -> User Options). Choose Click to show all to remove the date filter and display all closed submissions.
The submission comment font size can be adjusted per user.
Policies
For additional details, see Training 3: Entering Policy Information.
The policies band can be automatically expanded by enabling the user preference.
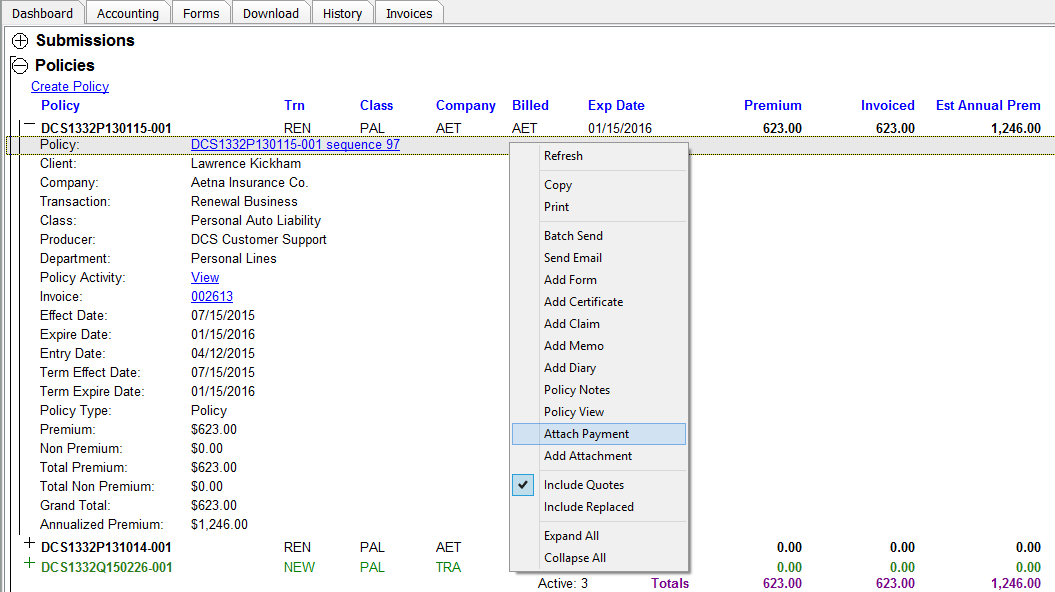
Any policy or quote with a current or future expiration date is displayed. Quotes appear in green, and cancelled policies still in force display in red. Click the policy number to open Policy Express. The premium and invoice totals of all the policies are shown here. Clicking the Premium, Invoiced, or Est Annual Prem amount for any policy record will open Express Billing.
Transaction, Class, and Company columns will only display the code. Holding the mouse pointer over each code will display the full name.
The Billed column displays the company code assigned to first invoice line on the policy. If the current transaction has not been invoiced, the billing company for the most recent invoice is displayed. If the policy has never been invoiced, nothing will be listed.
The details band can be expanded by selecting the (+) at the beginning of each policy record. Additional Right-Click menu options are also available.
A row below all active items will display the number of records and the totals for each of the columns: Premium, Invoiced, and Estimated Annual Premium. If the mouse pointer is held over the policy count, or each column total, a numeric break-down by Policy, Quote, and Binder will display.
The Expired Policies sub-band only displays policies and quotes expired within the previous three years. To show all expired policies, select Click to show all.
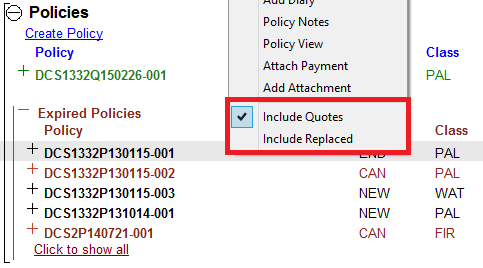
By default, policies and quotes marked as Replaced are hidden from the policy lists. To include replaced policies, Right-Click and select Include Replaced.
Retail Agency Type: By default, quotes are included in both the active and expired policy lists. To hide quotes, Right-Click and de-select Include Quotes.
GA Agency Type: By default, quotes are not included in the active and expired policy lists. To include quotes, Right-Click and select Include Quotes.
Policy Express
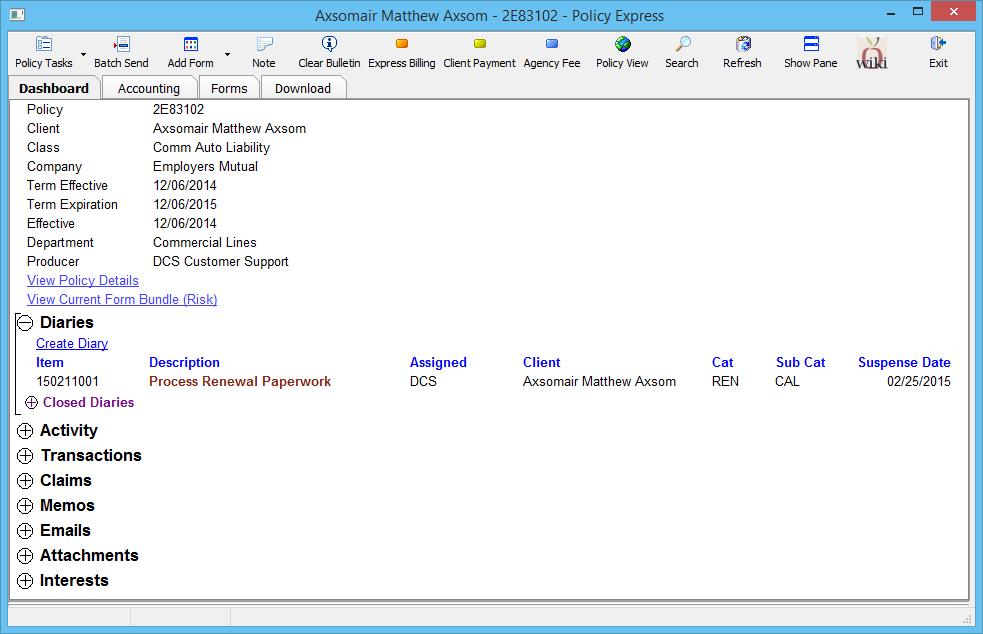
Select a policy number from the Client Tab to open Policy Express. Policy Express is the policy dashboard central to viewing and updating anything associated with a policy including common tasks such as renewals and endorsements.
For more information, see Training 3: Entering Policy Information and Policy Express.
Claims
Select the (+) next to Claims to view all open claims. The claims band also contains a Closed Claims sub-band. When the band is expanded, all closed claims for the client will be listed.
To create a claim, open a policy and create the claim from Policy Express.
For more information on creating, viewing and editing claims, see: Claims.
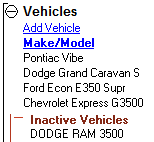
Drivers, Equipment, Vehicles, and Properties
Drivers, Equipment, Vehicles, and Properties are stored into schedules that can be imported into associated ACORD Forms and Form Bundles. These schedules are automatically created by download, or they can be updated by hand. The information is entered once, rather than being retyped into every applicable form, and can easily be seen from the client’s dashboard.
Each of the schedule bands includes a sub band for inactive items.
Expanding the inactive section will list all inactive items for that client. To mark an item as active, select the item from the inactive list, change it to active, and select Save.
Memos
For additional details, see: Training 5: Email, Diary, Activity, Client Notes & Memo Writer and Memo Writer: Create or Delete a Client Memo.
Memos are word-processing documents that range from expiration notices to marketing campaigns created with Memo Writer. Memo Writer provides the ability to create form letter templates that can be used to quickly merge data fields with client or policy information. The memos can be merged individually, or in a batch through a marketing query.
Emails
For additional details, see: Training 5: Email, Diary, Activity, Client Notes & Memo Writer and Email Integration.
Click Emails to show e-mails sent from or attached to Newton. To attach an e-mail to a client, drag and drop it from Outlook onto the client’s dashboard. To attach an e-mail to a policy, drag and drop it into Policy Express.
Only emails within the default filtered date range are initially displayed. Select Click to show all Emails to remove the date filter. (See Other -> Preferences -> User Options -> Default Band Date Range to change the value)
Attachments
For additional details, see: Training 5: Email, Diary, Activity, Client Notes & Memo Writer and Attachment Integration.
Click the (+) next to Attachments to see attachments for the client and policies. Click Add Attachment to add an attachment by browsing, or simply drag and drop a file or photo onto the client’s dashboard or Policy Express.
Only attachments within the default filtered date range are initially displayed. Select Click to show all to remove the date filter. (See Other -> Preferences -> User Options -> Default Band Date Range to change the value)
Insured
An Insured band is listed if the client type is Broker.
To create a new Insured for the broker, select Create Insured. To edit an existing Insured select the insured’s number.
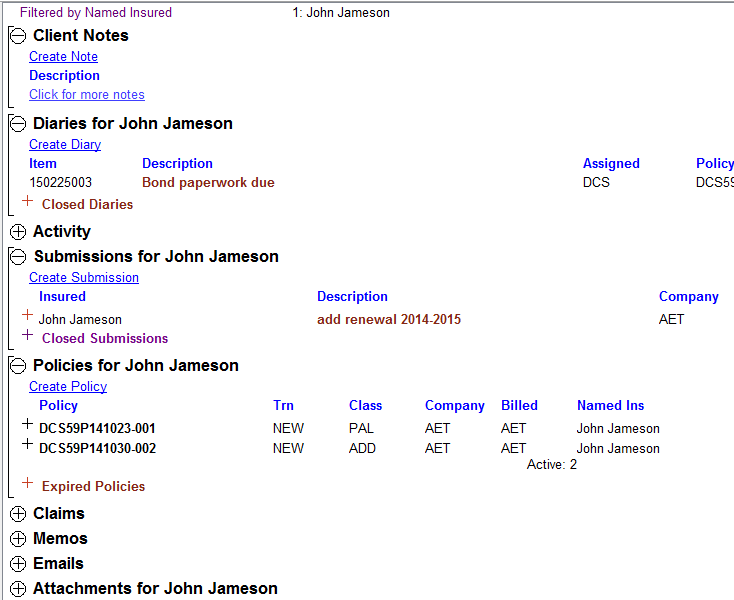
For GA agencies, after performing a keyword search by Named Insured, the client dashboard bands include filtered results for the following bands:
Client Tab: Accounting
See Newton Release Notes: Client Tab - Accounting.
Client Tab: Download
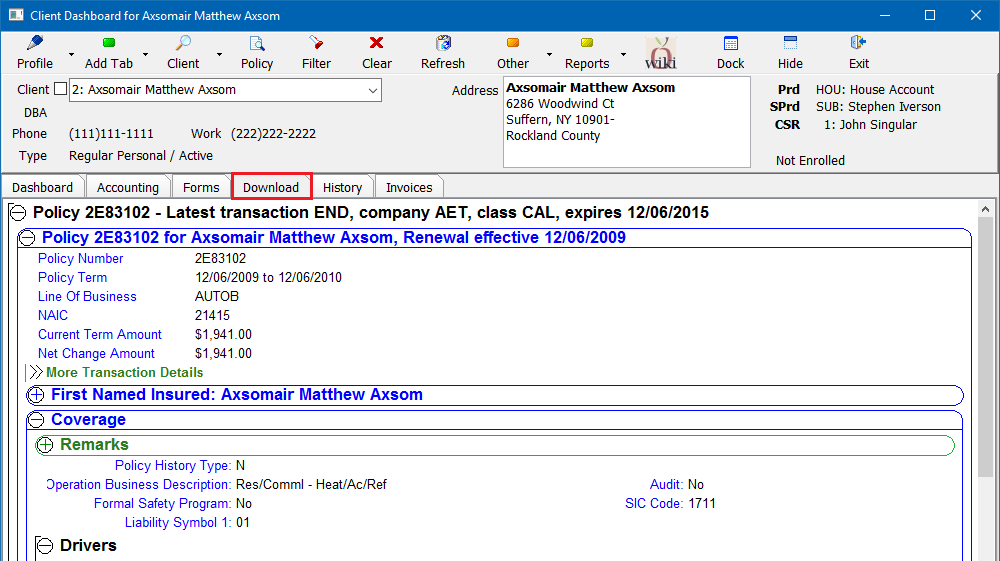
After searching for and loading a client, the client’s Download tab is displayed below the Summary Panel.
The Download tab displays all policy risk information received from companies for both personal and commercial lines. The risk information includes, premium, limits, deductibles, drivers, vehicles, properties, accidents and much more.
The Download tab on the client displays all policies for the client, while the Download tab within Policy Express only displays downloads for as single policy. The Download tab may also contain conversion data from your prior management system.
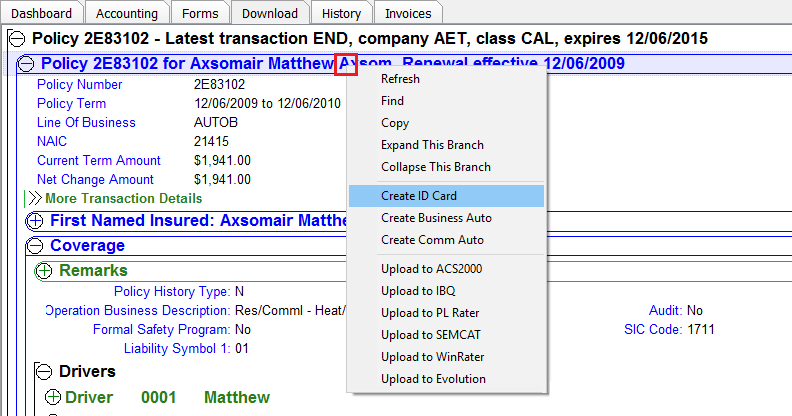
Quick actions are available on the Download tab by right-clicking on a specific download. Easily create new ACORD Forms, or send the downloaded policy risk to a third-party rating application.
Creating a new ACORD form is not necessary if the line type is configured to automatically create the form when the download is received. To locate and view an existing form, select the Forms tab on the client, or the Forms tab within Policy Express.
The Download tab includes recent download activity by default, however the date range can be expanded to show older transactions. After selecting the Download tab, select the Filter button within the top client toolbar. Select Options to modify the date filter, or Print to print the downloaded risk.
For more information, see: Category: Download.
