Policy: Change A Policy Number
| Related Pages |
| Related Categories |
The steps below outline the process of changing the entire transaction history of a policy or quote to a different number. A policy number in Newton can represent a policy, quote or binder, and must be unique.
After changing the policy number, the original policy number can be re-used on a different client.
Contents
Before You Begin
All previous policy terms for the policy will be changed. The original policy number will no longer be listed in Newton.
![]() To leave the existing policy history in place and renew the policy to a new number, see:
Policy: Renew A Policy.
To leave the existing policy history in place and renew the policy to a new number, see:
Policy: Renew A Policy.
![]() To convert a quote to a policy with a new number, see: Policy: Convert A Quote To A Policy.
To convert a quote to a policy with a new number, see: Policy: Convert A Quote To A Policy.
Access to edit Policies or Binders requires the current operator to have Security System: AR -> Policy Transaction -> Edit access.
Access to edit Quotes requires the current operator to have Security System: AR -> Quoted Transaction -> Edit access.
![]() See: Security System for more information.
See: Security System for more information.
Change A Policy Number Using The Policy Dashboard
The Policy Dashboard is typically opened from the Client Dashboard, however it can also be opened directly from the Policy Keyword Search, the User Dashboard Tab, the Company Tab, the Management Tab, or from Policy & Billing.
- Search for and load the client or prospect.
- On the Client Dashboard tab select the (+) next to Policies. (To expand the band by default, see: Preferences)
- Left-Click the desired policy number to open the Policy Dashboard.
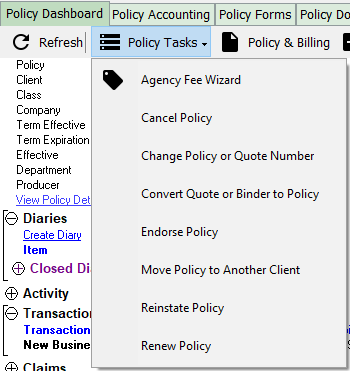
- Select Policy Tasks -> Change Policy or Quote Number.
- Enter the New Policy number.
- Verify the Company Code.
- Enter any activity details in the Policy Log field.
- Optionally select Create Diary and enter a Diary Description to create a diary item on your User Dashboard Tab.
- Optionally enter additional information regarding the change to the Policy Log (Activity).
- Select OK.
When finished, the Policy Dashboard will automatically refresh with the new policy number. The updated policy number will be visible within the Policies band on the Client Tab.
![]() For additional information see: Policy Dashboard
For additional information see: Policy Dashboard
Change A Policy Number Using Policy & Billing
Policy & Billing is typically opened from the Policy Dashboard, however it can also be opened directly from the Client Dashboard, or the Main Menu.
- Search for and load the client or prospect.
- On the Client Dashboard tab select the (+) next to Policies. (To expand the band by default, see: Preferences)
- Left-Click the desired policy number to open the Policy Dashboard.
- Select Policy & Billing within the top toolbar. (To skip the Policy Dashboard, left-click the premium amount on the Client Dashboard.)
- The most recent transaction for the policy will open in Policy & Billing.
- Select Policy -> Change Policy Number.
- Enter the New Policy number.
- Verify the Company Code.
- Select OK.
![]() For additional information see: Policy & Billing
For additional information see: Policy & Billing
Error: Policy Already Exists
During the change policy number process, if the New Policy number matches an existing policy, the message "Error: Policy %PolicyNumber% already exists" will display.
This message can occur if the policy is already in the system under a different client, or the same client. First use the Policy Keyword Search or Policy & Billing to attempt to locate the policy, and determine the entry error.
![]() See: Error: Policy Already Exists if the change policy number process was interrupted and the message "Error: Policy %PolicyNumber% already exists" displays when the change process is attempted a second time.
See: Error: Policy Already Exists if the change policy number process was interrupted and the message "Error: Policy %PolicyNumber% already exists" displays when the change process is attempted a second time.
