Policy: Create A Policy
| Related Pages |
| Related Categories |
A policy number in Newton by Agency Systems can represent a policy, quote or binder, and must be unique.
Many items in Newton are attached to a policy number including:
Contents
Before You Begin
Access to create Policies or Binders requires the current operator to have Security System: AR -> Policy Transaction -> View and Entry access.
Access to create Quotes requires the current operator to have Security System: AR -> Quoted Transaction -> View and Entry access.
![]() See: Security System for more information.
See: Security System for more information.
Create A New Policy, Quote, or Binder
![]() Prior to creating a new policy, the client must already be entered into the system. See Create A Client for more details.
Prior to creating a new policy, the client must already be entered into the system. See Create A Client for more details.
- Search for and load the client or prospect.
- On the Client Dashboard tab select Create Item -> Policy or Quote from the top toolbar.
- Policy & Billing will open.
- Press <TAB> to step through the fields.
- Enter the desired policy number.
- Policy numbers are case-sensitive. Typically, letters are entered as capitals.
- Policy numbers are unique system-wide.
- Press <TAB> to skip past the field and leave the default value of *AUTO*. A unique system-generated number will be created when the record is saved.
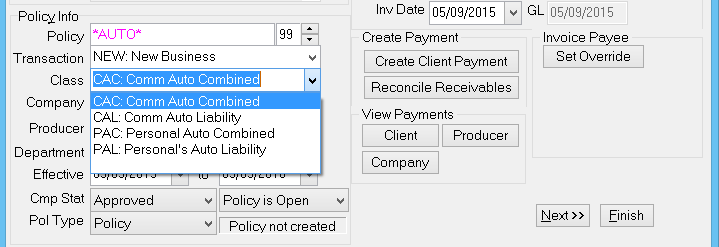
- Enter the following either by typing the code, or simply type the name. Select the correct profile from the list or press <TAB> after each field.
- Enter the Transaction Code
- Enter the Class Code
- Enter the Company Code
- Confirm the default Producer Code or update it if different from the client value.
- Enter the Department Code
- Enter the Effective Date, or select the date from the calendar drop-down. Press <TAB> to advance to the next field.
- Enter the Expiration Date, or select the date from the calendar drop-down.
- Select Pol Type -> Policy/Quote/Binder. (If Policy Type -> Binder is disabled, see Agency Profile)
- Select Save.
![]() To create an invoice, select Next. See Create An Invoice for additional details.
To create an invoice, select Next. See Create An Invoice for additional details.
Edit a Policy, Quote, or Binder
Changes to existing policies are typically processed through the Policy Dashboard including Renewals, Endorsements, Cancellations, Reinstatements and more.
![]() For additional information, see: Policy Tasks.
For additional information, see: Policy Tasks.
Additional Methods Used To Create Policies
Policy & Billing can be opened without first loading a client by selecting Accounting -> Policy & Billing from the Main Menu. Select the correct client by entering the client number.
Many companies offer Download Integration, which is used to create both new policies and add new transactions to existing policies. Download does not require a policy to exist prior to processing daily downloads.
New quotes can also be created automatically when a Submission is created or during the renewal policy task.


