Client Payment: Non-Sufficient Funds (NSF)
| Related Pages |
| Related Categories |
The process below is used when a client's payment is returned from the bank with an additional NSF fee. The agency can charge the client in full for the NSF fee, absorb the fee as an agency expense, or split the fee with the client.
Contents
Enter Returned NSF Payment - Charge Fee To Client
Example: The client's check for $300.00 has been returned by the bank as NSF with a $25.00 NSF fee. The agency will bill the client for the fee amount.
- Load the client on one of the four client tabs.
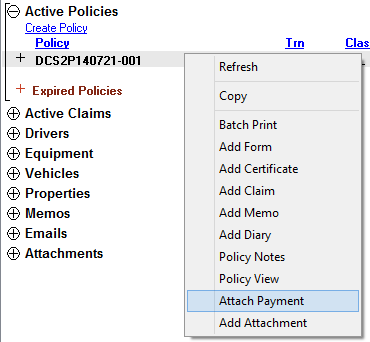
- Right-Click on the policy number and select Attach Payment.
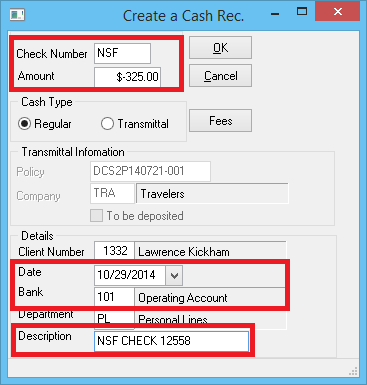
- Enter Check Number -> NSF.
- Enter the amount of the returned check as a (-), plus the NSF fee amount. From Example: $-325.00.
- If the agency will split the NSF fee with the client, only enter the additional amount owed by the client. From Example: 300.00 + Client Portion.)
- Verify Cash Type -> Regular is selected.
- Verify the Bank Code.
- Enter Description -> "NSF CHECK <CHECK NUMBER>".
- Select Ok, then Yes/No to print.
- Select the bottom Account Tab.
- The NSF return amount will be listed.
- To optionally overapply the NSF return amount to an invoice, see the section below.
Enter Returned NSF Payment - Charge Fee To Agency (Expense G/L)
Example: The client's check for $300.00 has been returned by the bank as NSF with a $25.00 NSF fee. The agency will not bill the client for the fee amount.
- Load the client on one of the four client tabs.
- Right-Click on the policy number and select Attach Payment.
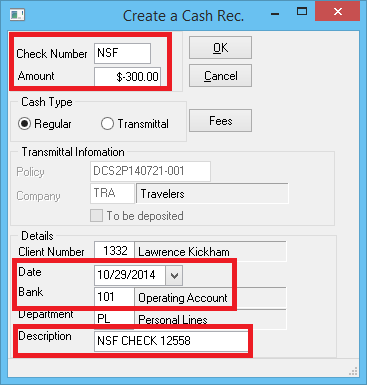
- Enter Check Number -> NSF.
- Enter the amount of the returned check as a (-). From Example: $-300.00.
- Verify Cash Type -> Regular is selected.
- Verify the Bank Code.
- Enter Description -> "NSF CHECK <CHECK NUMBER>".
- Select Ok, then Yes/No to print.
- Select the bottom Account Tab.
- The NSF return amount will be listed.
- To optionally overapply the NSF return amount to an invoice, see the section below.
Enter The NSF Bank Fee Agency Expense
This step will create an expense entry for the NSF fee, and is only necessary if the client is not responsible for the full fee amount.
- Select A/P -> Check Transaction -> Express Checks.
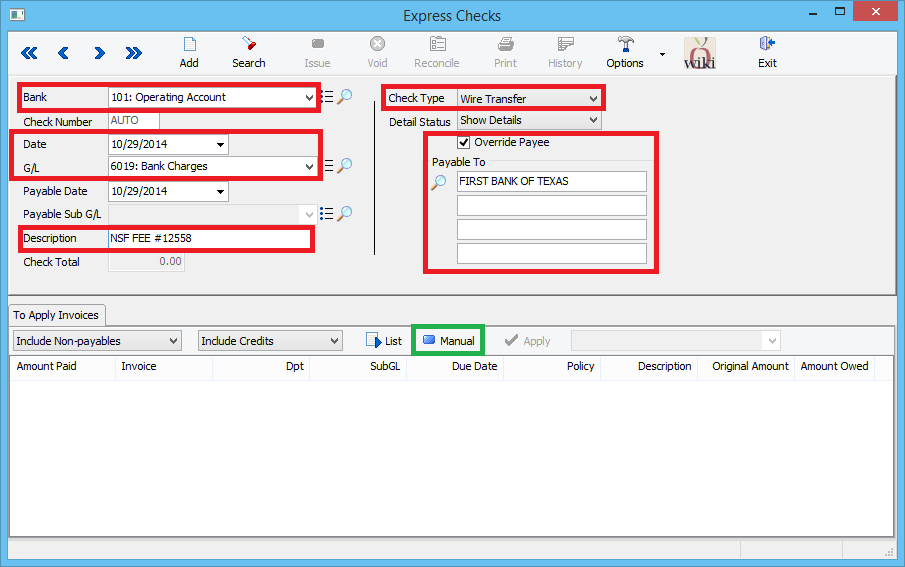
- Select the Bank Code.
- Select the Check date.
- Enter the G/L Code for Bank Charges Expense.
- Enter Description -> "NSF Fee <Check Number>".
- Select Check Type -> Wire Transfer
- Select Override Payee then enter Payable To -> "<Bank Name>". Select Manual to enter the amount.
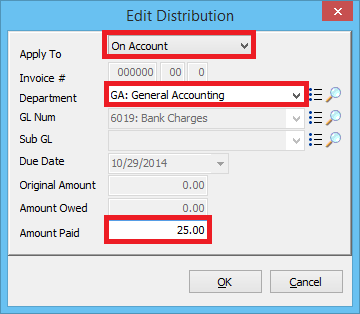
- Select Apply To -> On Account.
- Select the Department Code.
- For Amount Paid, enter the amount of the NSF fee. (If the agency will split the NSF fee with the client, only enter the amount not paid by the client.)
- Select Ok to add the entry, then select the Red X to close.
- Select Exit to close the Express Checks screen.
Overapply The Returned NSF Payment To An Existing Invoice (Optional)
By default, the NSF return amount will not be applied to an invoice. Use the steps below to overapply the on-account amount to an existing invoice.
- Load the client on one of the four client tabs.
- Select the bottom Account Tab.
- The NSF return amount will be listed.
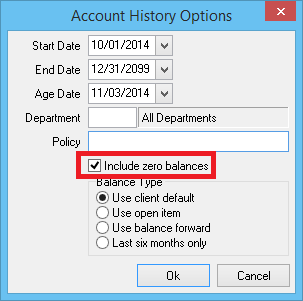
- If zero balance invoices are lot listed by default, select Options -> Include Zero Balances -> Ok.
- After selecting Refresh, both the zero balance invoices and the NSF amount will be listed.
- Double-Click the NSF cash amount to open the Cash Transaction screen.
- Select Apply.
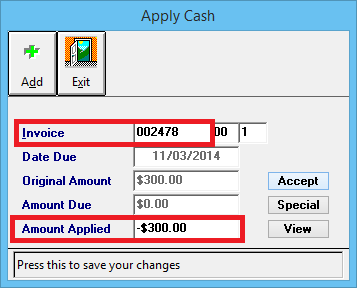
- Enter the Invoice Number displayed on the account tab, and select <TAB> to the Amount Applied field.
- Verify the Amount Applied equals the total amount of the NSF.
- Select Accept then Exit.
- Select Exit to close the Cash Transaction screen.
- After selecting Refresh, the return NSF amount will be overapplied to the invoice creating a receivable balance.
