Newton Release Notes: Spring 2017
| Related Documents |
The Newton development team has been very busy working on a large project converting all of our frameworks and codebase to the latest components. This project is strategically important because it allows us to continually update and upgrade our system on an ongoing basis to ensure a low cost of ownership for our customers.
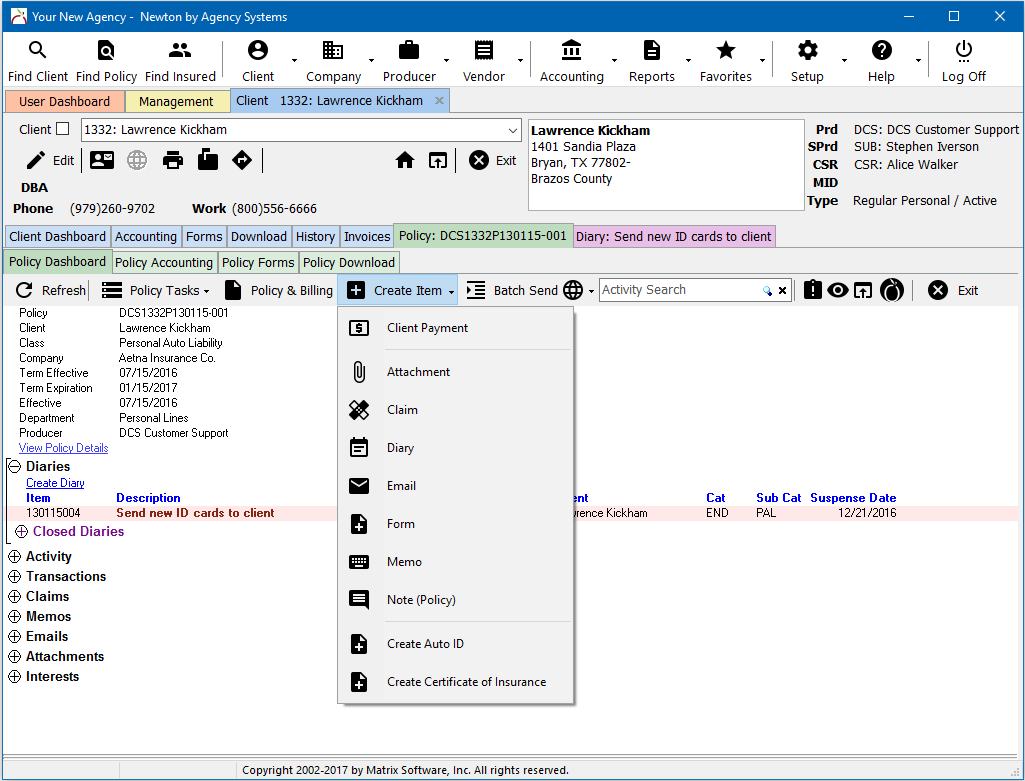
Newton by Agency Systems has been updated with a modern design and a streamlined category-based menu system. The updated interface provides easy access to common functions and leverages informational dashboards as sub-tabs to provide a streamlined multi-tasking environment.
![]() How can I get updated to a newer build? See: Server Update Instructions
How can I get updated to a newer build? See: Server Update Instructions
- Product Highlights
- Category-based main menu system. (See: Newton Main Menu - Quick Start Guide.pdf)
- Report Shortcuts that pre-fill filters providing faster access to common reports.
- Seamless Multitasking: Policies and client diaries will now open as sub-tabs on a client.
- Toolbar updates with standard action menus including new functions.
- Client, Policy, and Named Insured Keyword Search Updates.
- Recent Activity Panel on the Client and Policy Dashboard.
- Additional Interest improvements including Form Bundle integration.
- Custom Form: Truckers Insurance Application and dozens of Updated ACORD Forms.
- Automatic validation and reporting options for reconcile including producer payables.
Contents
- 1 Navigation
- 2 Clients and Policies
- 3 Download
- 4 Forms
- 4.1 Additional Interests
- 4.2 Form Function Updates
- 4.2.1 ACORD Question "Mark All No" Buttons
- 4.2.2 Certificates With Multiple Holders
- 4.2.3 Contact Import
- 4.2.4 Empty Pages With Only A Customer Number
- 4.2.5 Evidence of Property Insurance (ACORD 27)
- 4.2.6 Insert Schedule Item Description
- 4.2.7 NC FS-1 North Carolina Certificate of Liability Insurance
- 4.2.8 Personal Umbrella Application (ACORD 83)
- 4.2.9 Schedule List - Export to Excel (Drivers, Vehicles, Properties, Equipment)
- 4.2.10 Truckers Insurance Application (TruckApp)
- 4.2.11 Years Experience / Year Licensed
- 4.3 Forms Interface
- 4.4 Updated ACORD Forms
- 5 Reconcile
- 6 Vouchers
- 7 Other
![]() See Newton Main Menu - Quick Start Guide.pdf for a printable cheat sheet of main menu changes.
See Newton Main Menu - Quick Start Guide.pdf for a printable cheat sheet of main menu changes.
Main Menu
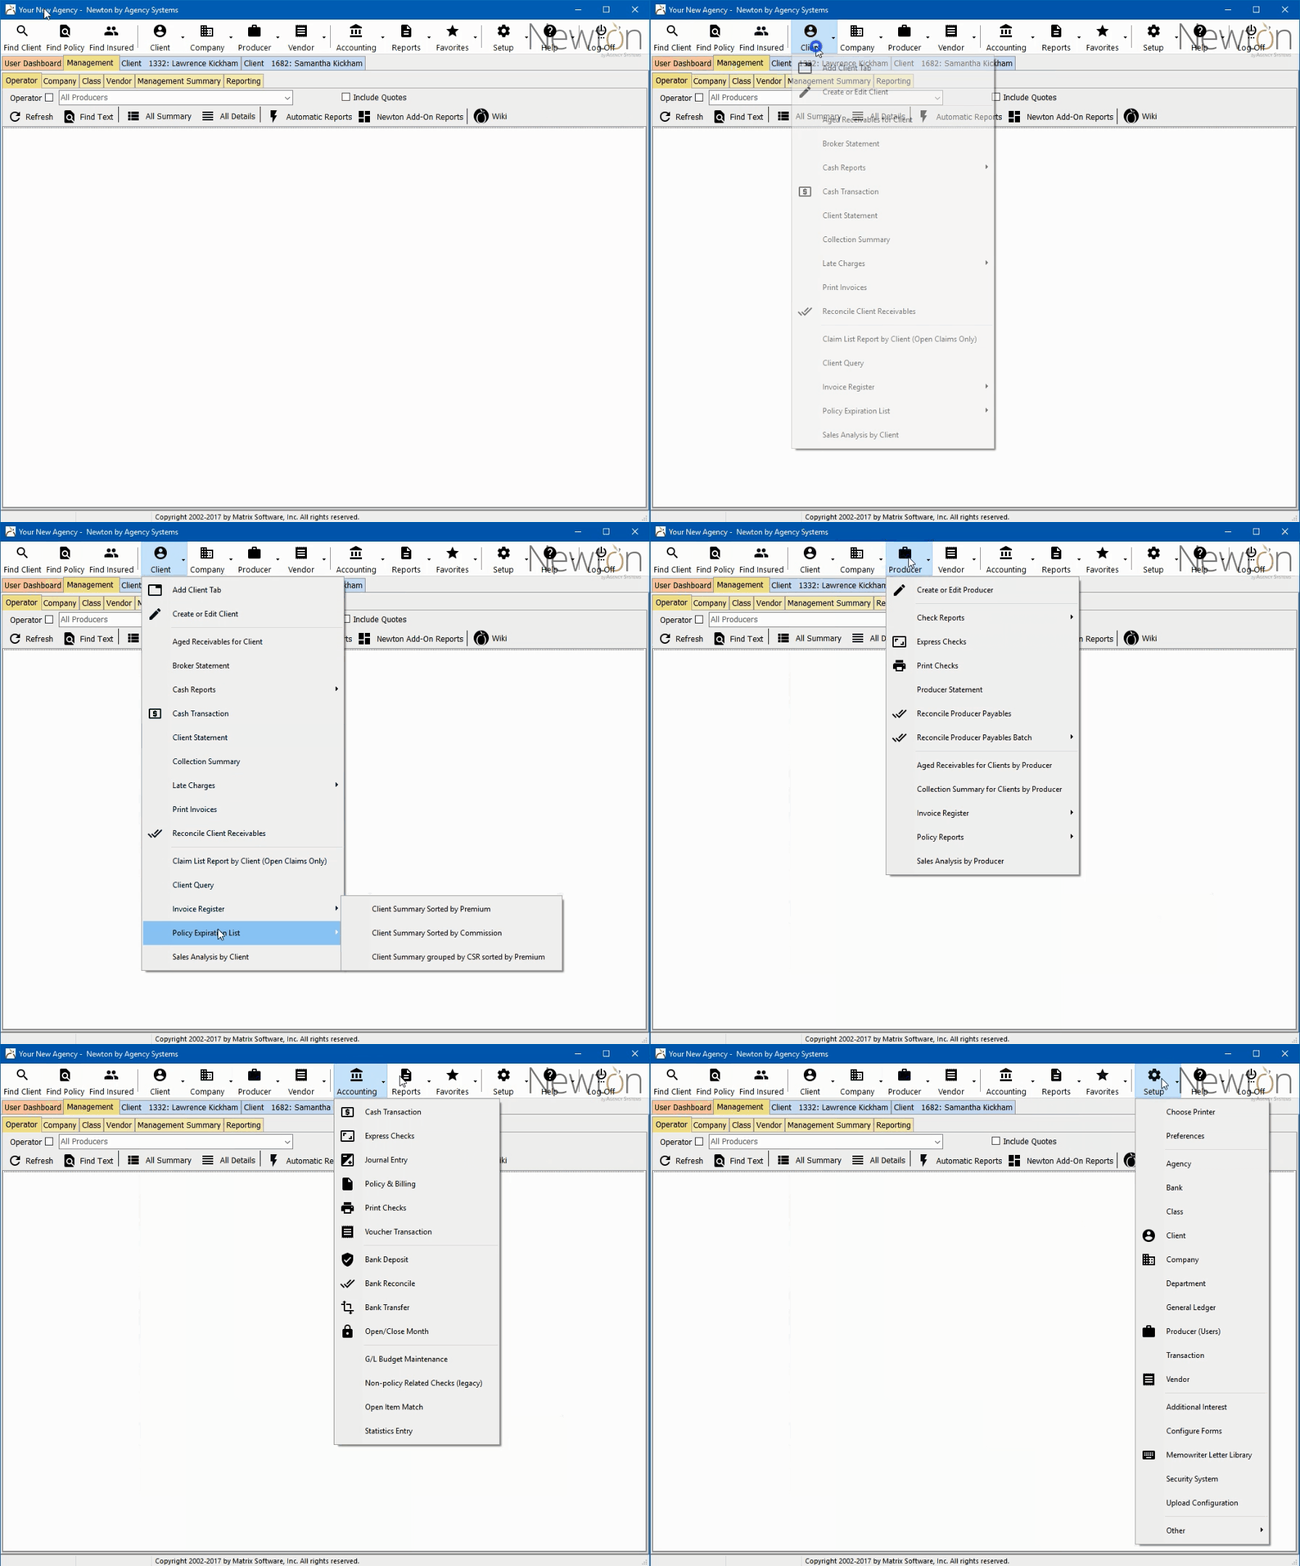
Newton's main menu has been updated with new categories organized by agency functions. The main menu also includes easy access to the user-defined favorites list and each of the powerful keyword search options, available with a single mouse click or a simple keyboard shortcut.
- Find Client: Client Keyword Search - Perform a search for a client. (F3)
- Find Policy: Policy Keyword Search - Perform a search for a policy. (Shift + F3)
- Find Insured: Named Insured Keyword Search - Perform a search for a named insured on an Agent. (Ctrl + F3).
Find Insured is only visible for General Agencies (GAs) or retail agencies with Broker Billed clients who have enabled the user preference.
Policy Express is now labeled as the Policy Dashboard.
Express Billing is now labeled as Policy & Billing
Report Shortcuts
The Client, Company, Producer, and Vendor menus contain new report shortcuts that pre-fill filters providing faster access to common reports.
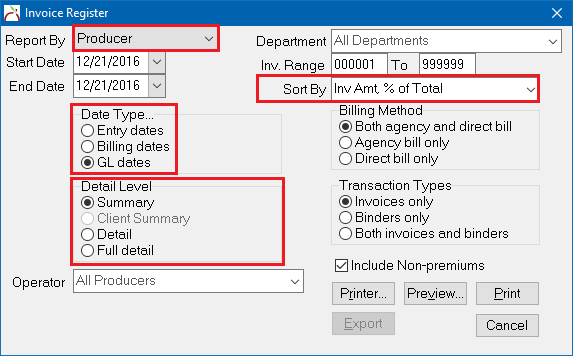
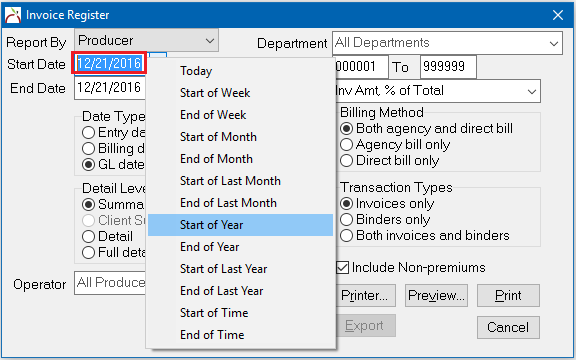
Selecting a report shortcut will display the full reports menu with the required menu items automatically selected. (Pictured below in red.)
Select the desired date range, optionally using the right-click shortcuts within each field to quickly jump to specific days, and run the report.
There are dozens of report shortcuts available for premium production reports, expiration lists, claims reports, client or company cash reports and more.
Tabs and Sub-Tabs
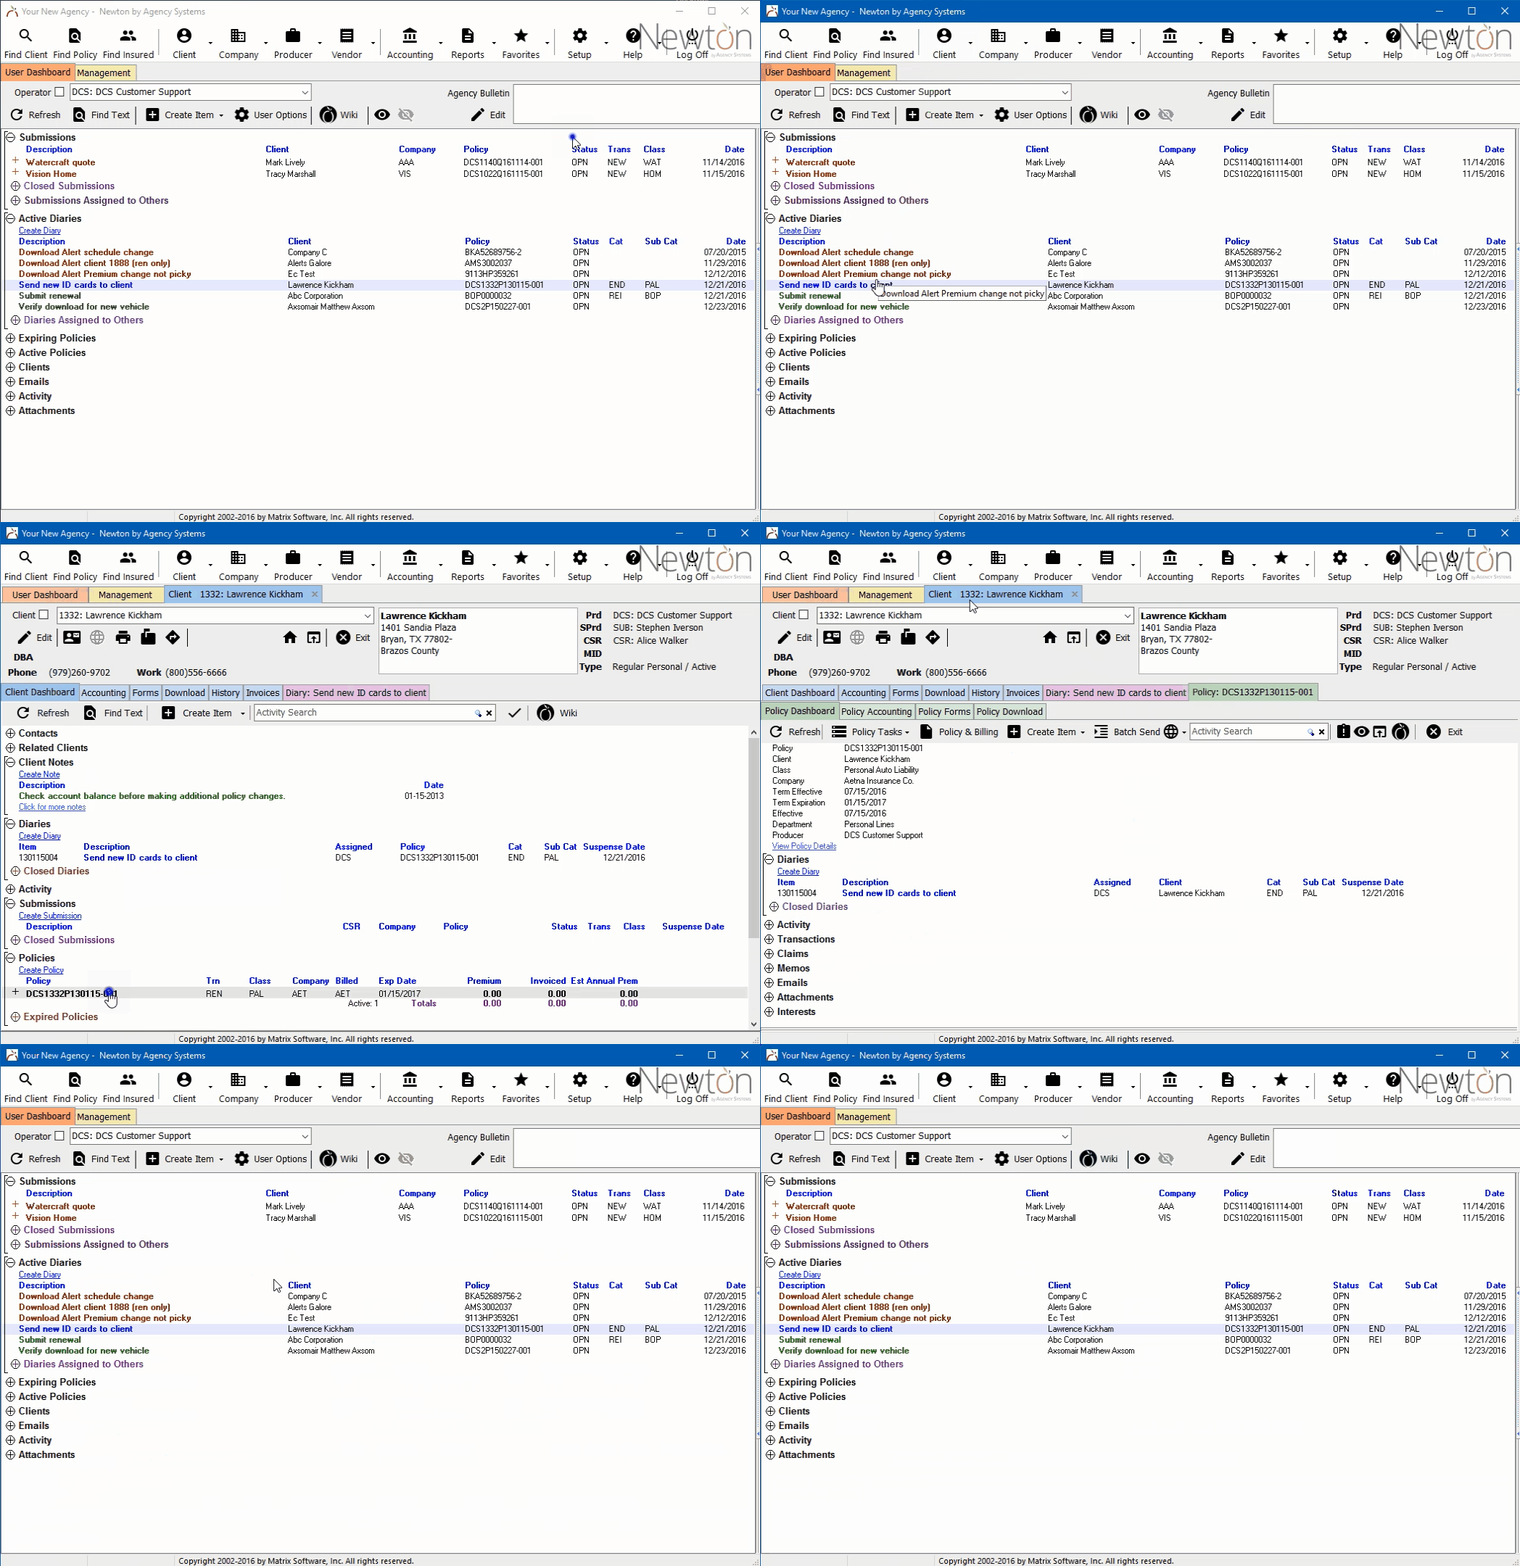
Multitasking between multiple clients, and multiple policies within each client has never been easier. Policies and client diaries will now open as sub-tabs on a client.
If a policy or diary is selected from the User Dashboard, Management Tab, or Company Tab, Newton will automatically load the client tab first, then the selected item as a sub-tab.
- Multiple policies or diaries can be opened on the same client.
- When a Client Tab is closed, all sub-tabs will be automatically closed.
Optionally, the diary and policy dashboard windows can still be configured to open as a window by selecting the user preference within Setup -> Preferences -> User Options.
Closing Tabs
When a tab is closed, the system will automatically switch to the tab to the right. When there are no tabs remaining, the system will automatically switch to the first tab.
To close all open client tabs quickly, select the first client tab and select Exit. Without moving the mouse, continue selecting Exit until all tabs are closed.
Toolbars
User Dashboard: Agency Bulletin
When a user opens the system, the Agency Bulletin is automatically displayed. The Agency Bulletin is the optimal place for office announcements made by an office manager. For example, office lunches, meetings, procedure reminders, outside visitors, or birthday messages.
The agency bulletin will either have an Edit, or an Open button. Selecting either button opens the same window, one as read-only and one with write access.
![]() See Agency Bulletin for additional information.
See Agency Bulletin for additional information.
Clients and Policies
Client, Policy, and Named Insured Keyword Search
The Client, Policy, and Named Insured Keyword Search windows have all been updated to support more customization, and display even more detail than before.
Client Keyword Search
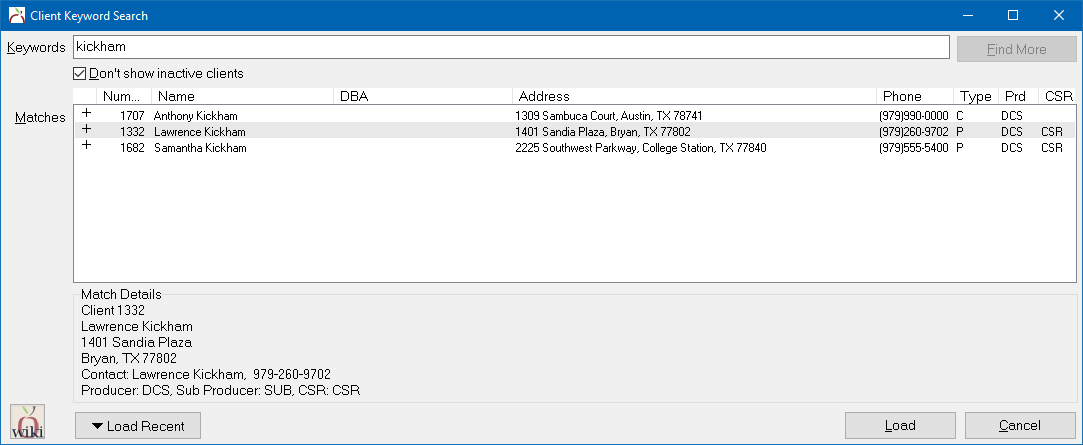
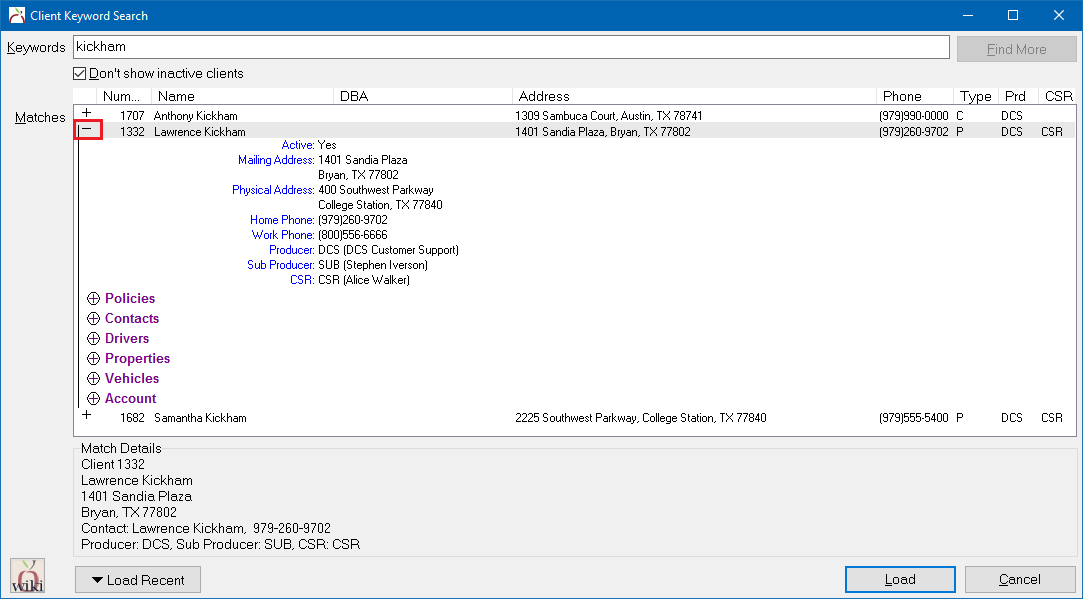
The Client Keyword Search could already search many different fields on a client, including drivers and contacts, all within a single entry field. The interface has been updated to display more information, making it even easier to locate and open the right client.
- The window can now be resized, and the system will retain the modified window size settings.
- The display font size has been increased.
- The results will display the user-defined dashboard color.
- The results now us the same Information Bands used on the client dashboard. The user-defined band font size will apply to the results.
- The results are now separated into sortable columns. The columns can be resized and the system will retain the modified column size settings.
- The client phone number is now listed in a column.
- The client Type is now listed in a column.
- The client Producer is now listed in a column.
- The client CSR is now listed in a column.
- The Keyword Score is now listed as a column. The better the match, the higher the score.
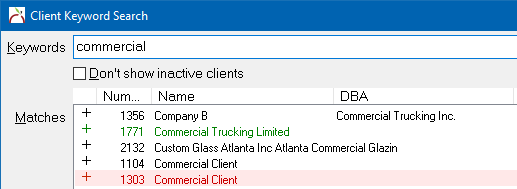
Prospects are listed in green, and inactive clients are listed in red.
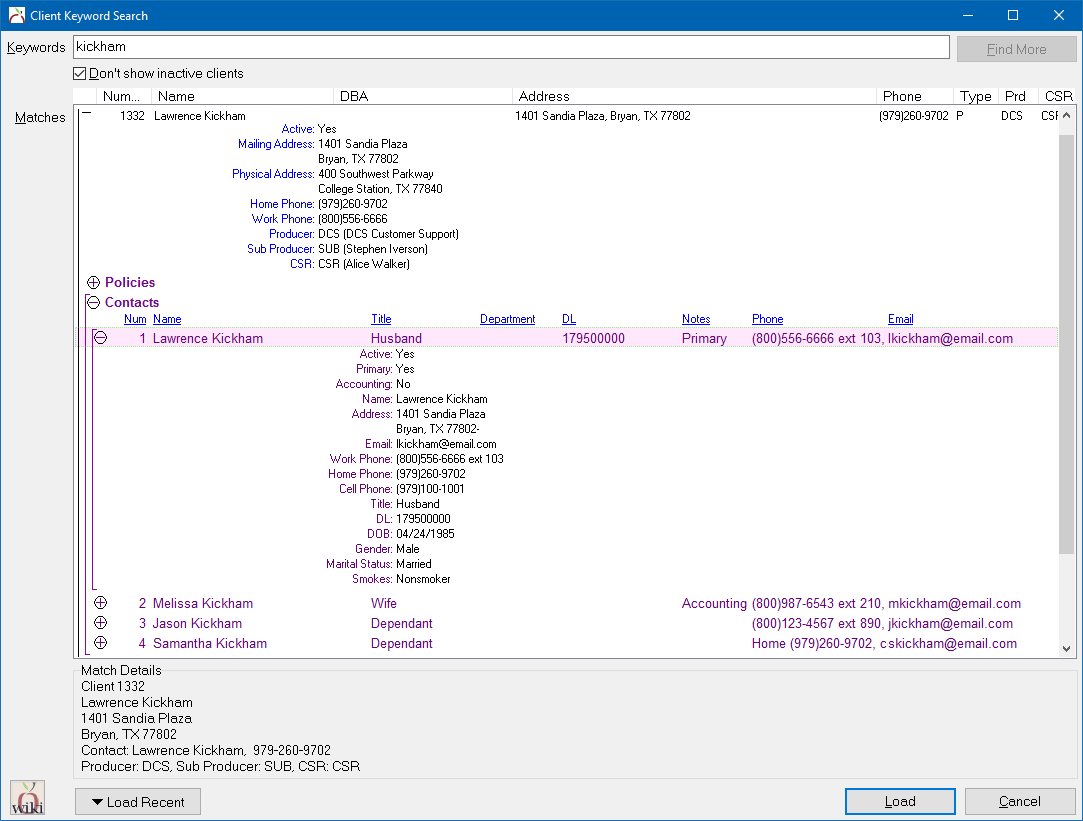
Select the + the expand the client and display additional details such as addresses, phone numbers, territory, source of business, user codes and more.
Within the expanded client view, additional data is also available.
- Policies (Active or recently expired only)
- Contacts
- Drivers
- Properties
- Vehicles
- Account (Client accounting view)
Select the (+) to expand additional details, without ever leaving the keyword search window.
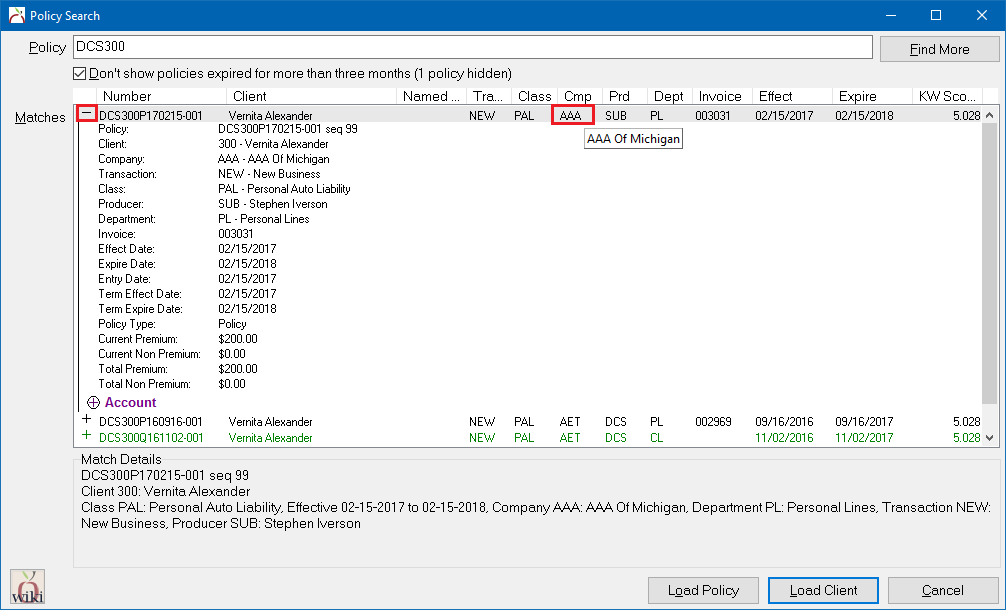
Policy Keyword Search
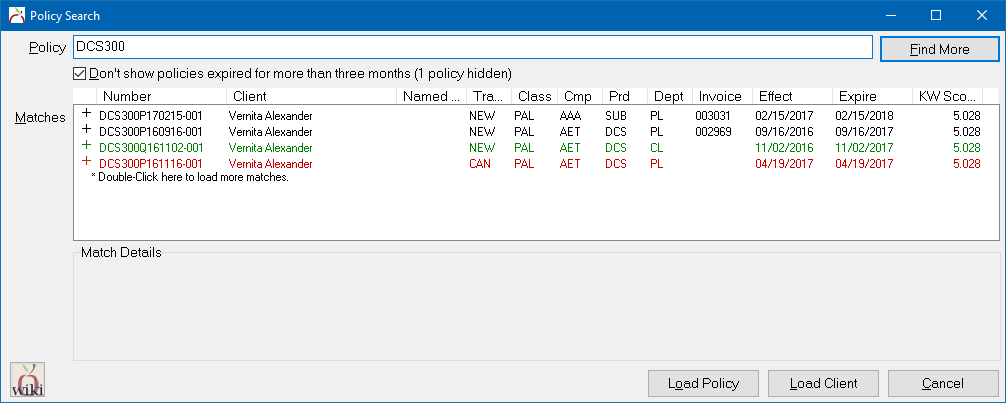
The interface has been updated to display more information, making it even easier to locate and open the right client.
- The window can now be resized, and the system will retain the modified window size settings.
- The display font size has been increased.
- The results will display the user-defined dashboard color.
- The results now us the same Information Bands used on the client dashboard. The user-defined band font size will apply to the results.
- The results are now separated into sortable columns. The columns can be resized and the system will retain the modified column size settings.
- The Policy Transaction, Company, Producer, Department, last invoice, and Keyword Score are now listed as columns.
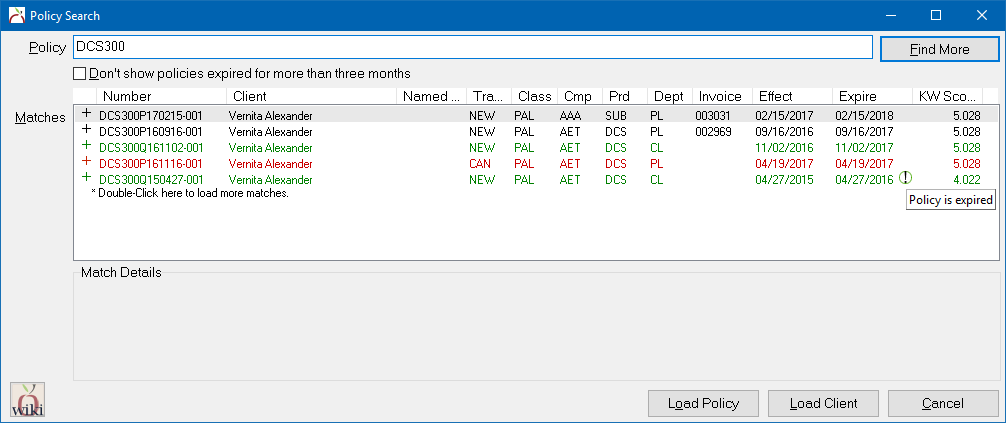
- Quotes are listed in green and cancelled policies are listed in red, and binders are listed in purple.
Expired policies display an icon that includes hint text for easy identification.
Select the + the expand the policy and display additional details such as premium, non premium, and additional dates.
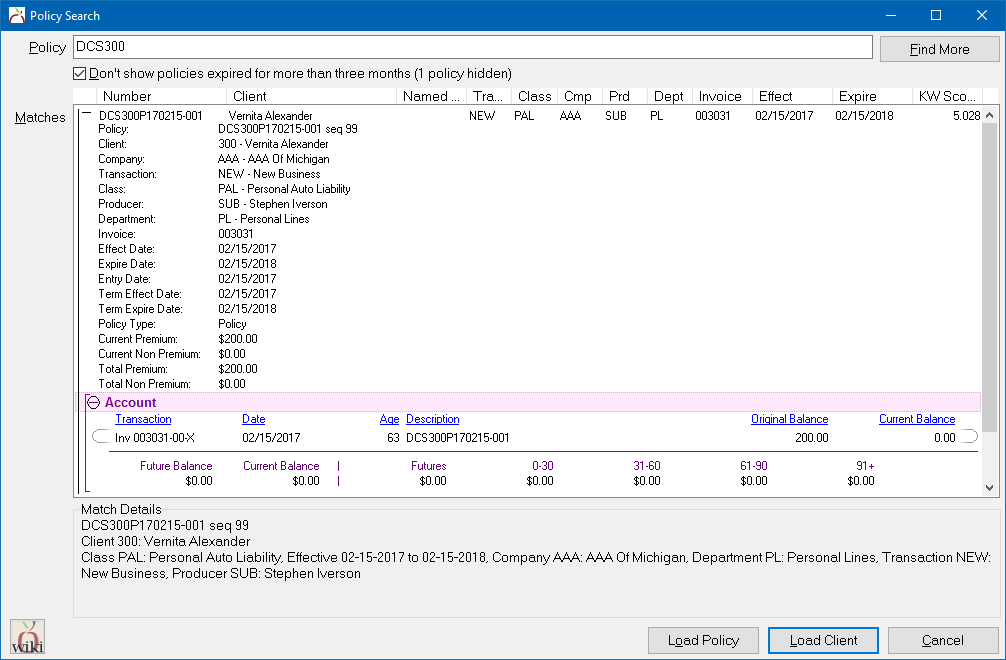
Within the expanded policy view, additional accounting data is also available. Select the (+) to expand account details, without ever leaving the keyword search window.
Recent Activity Panel
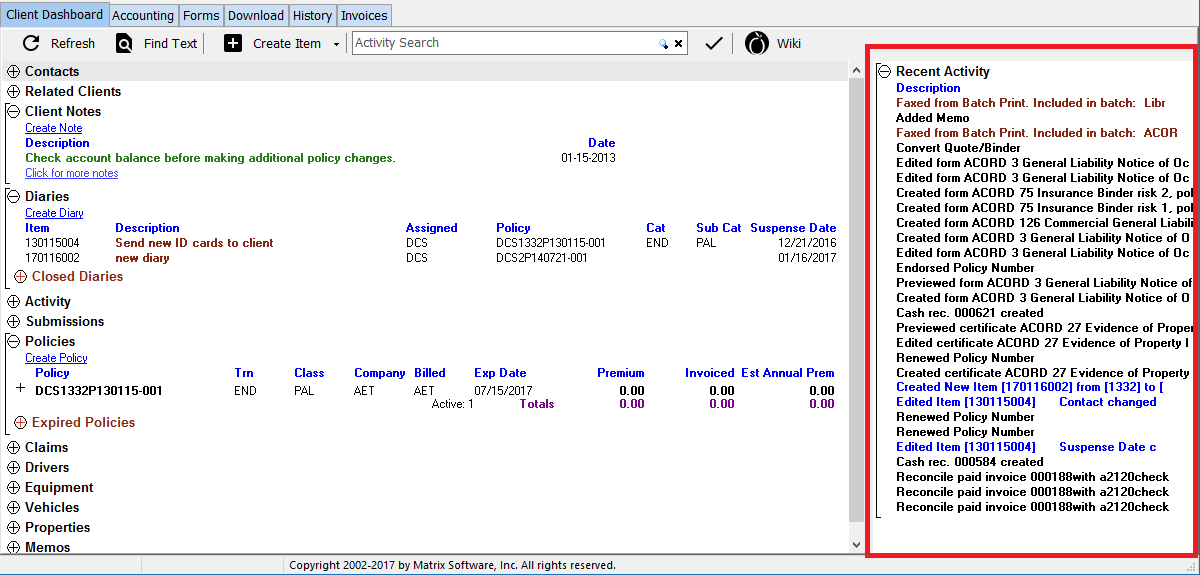
The Client Dashboard and Policy Dashboard have a new Recent Activity panel that is automatically displayed.
- The panel is supplemental to the existing Activity band, that requires no additional steps to view.
- The items are shown regardless of date, and regardless of type. If the most recent thing was a download from two years ago, it will be at the top of the list.
- The panel uses the information band viewer to display items and the font size is variable. Mouse hints are displayed and the activity items can be opened.
- Selecting Refresh on the Client Dashboard or Policy dashboard will automatically update the list.
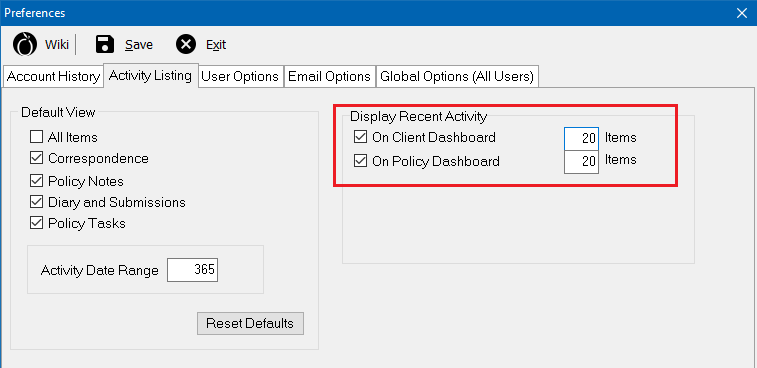
The number of items in each recent activity list is configurable with a new user preference. The panels can be disabled independently if desired. (Setup -> Preferences -> Activity Listing)
Download
Company Form Lists
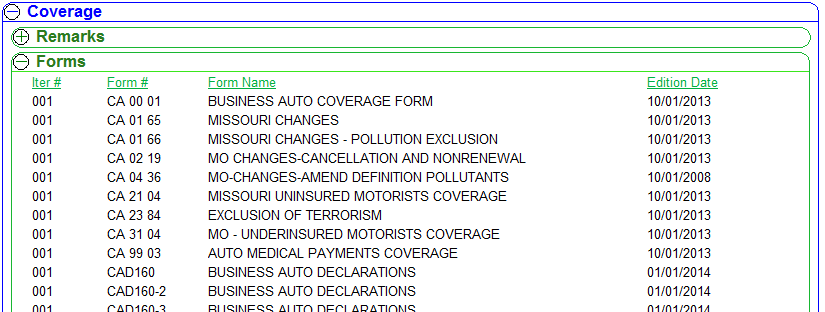
The list of forms provided within a company download will automatically populate the ACORD 829: Forms and Endorsements Schedule.
Example - Download Risk Data
Example - ACORD 829: Forms and Endorsements Schedule
The ACORD 829 is automatically created by download by default. If the ACORD 829 is not created, the company form list is placed in the Remarks sections of the appropriate ACORD applications.
To disable the ACORD 829 within download:
- Select Company -> Download -> Options -> AL3 (tab).
- Deselect "Download ACORD 829 for company form lists".
- Select OK and close the Download Management Center.
Garaging Address
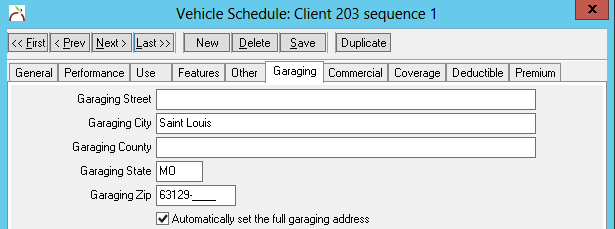
The garaging address (City, State, Zip) provided within a company download will automatically populate the Garaging tab of the vehicle schedule for new or edited vehicles.
Example - Download Risk Data
Example - Vehicle Schedule: Garaging tab
The updated garaging information will automatically populate the vehicle schedule sections of the the appropriate ACORD forms, such as the ACORD 127: Business Auto Section and ACORD 129: Vehicle Schedule.
Property Location Description
The property schedule can now import the property address into the location description field. The location description field is located on a number of certificates to display location information for property interests.
The location description field is also populated by download for new properties, or existing properties if empty.
Forms
Additional Interests
Dozens of forms have additional interest sections, and the exact contents of these sections vary between forms and, on each form, they vary from edition to edition.
Additional Interests have been improved in a number of areas including:
- Reduction in the number of additional interest profiles created by Download.
- Allowing conduit transfer of additional interests from one form to another.
- Allowing form bundles to lift additional interest options off the form.
- Allowing form bundles to fill additional interest sections on forms.
Downloading Additional Interests
When a new additional interest is created from download, the legacy Details tab within the main profile will no longer be populated. This information will now be populated in the interest properties section when the interest is added to a policy, vehicle, or driver from download. See #Additional Interest Properties for more information.
Additional improvements to automatic matching of existing interests within download will reduce the number of interest profiles by automatically correcting inconsistent address information specified by insurance carriers.
Additional Interest Properties
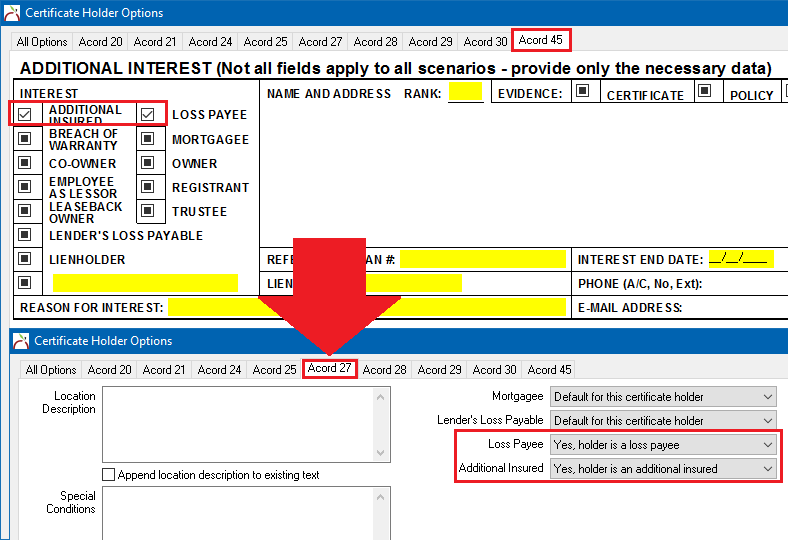
The additional interest properties are available from the Policy Dashboard -> Interests band, or from the interest section of a Vehicle, Property, or Equipment item. The options window provides form-specific entry fields, including an updated ACORD 45 tab.
Any settings saved to the ACORD 45 tab will be shared and displayed on the other form-specific tabs, such as the ACORD 27 pictured below.
The interest property options will be automatically set by Download when applicable.
Adding An Existing Interest To A Form
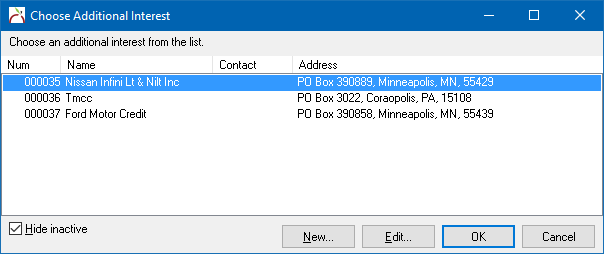
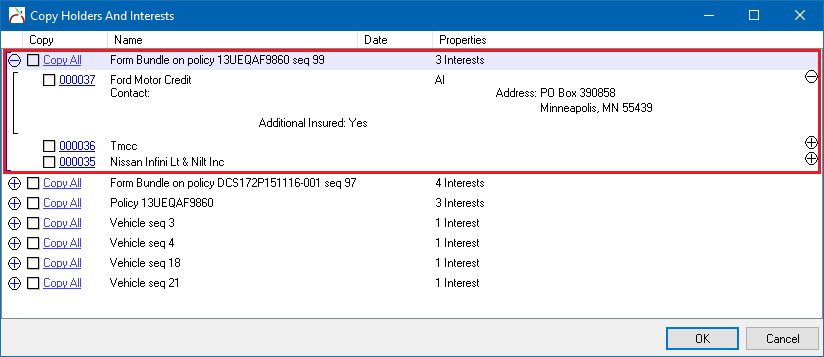
There are now two buttons when you select the choose interest button on ACORDS (non certs). One to choose from client interests (new), and one to choose from the master list. Choose From Client List borrows a lot from the Copy Interests function within certs, but with a simplified interface.
Selecting Choose From Client List
- Lists interests in bundles.
- Lists interests on schedule items, such as properties and vehicles.
- Lists interests on Certificates.
- Lists policy interests.
The interests are only listed a single time, even if they appear in multiple locations.
Form Bundles with Additional Interests
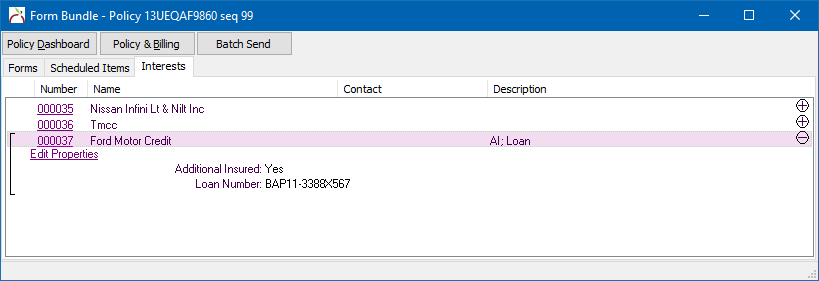
Additional interests are now listed within the form bundle window. An additional interest is added to a form bundle when an ACORD form with an interest is added or updated. The interest list automatically includes any properties included on the ACORD form.
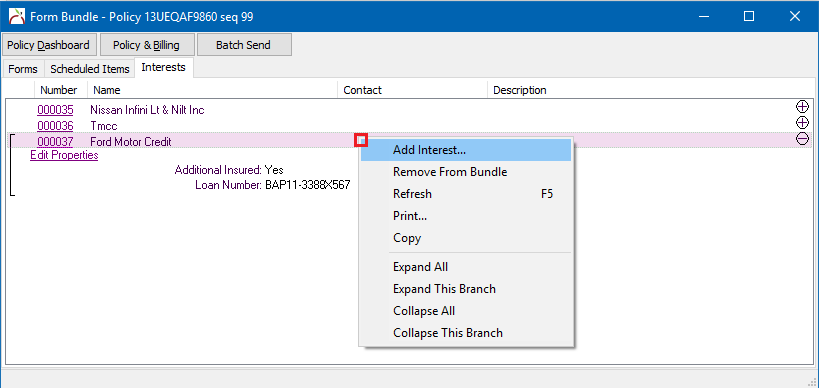
Interests can also be manually updated using the right-click menu from within the form bundle window.
Interests with a form bundle can be selected as a group when adding a group of interests to a certificate, such as the ACORD 25 Certificate of Liability Insurance.
Form Function Updates
Form and schedule windows should save their window position now. Each form/schedule has its own place; ie Acord 80 remembers its spot, Acord 125 has another spot, etc, but individual form instances do not remember their spot (unlike the form bundle windows where they do).
ACORD Question "Mark All No" Buttons
A number of ACORD forms contain buttons for question pages to "mark all answers no". Selecting the button will place a 'N' for each question within the section. Some forms have multiple buttons, one for each section, such as the ACORD 83 Personal Umbrella Application.
Certificates With Multiple Holders
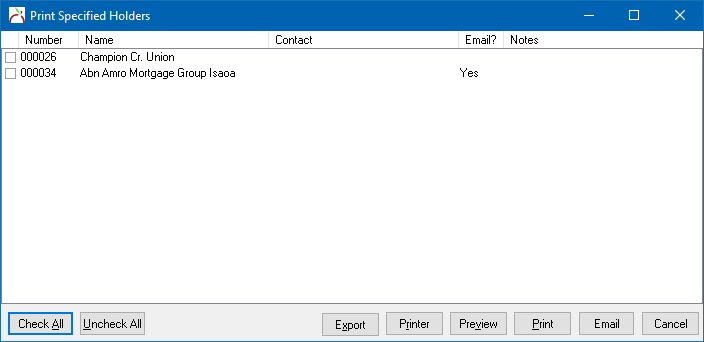
The Print button on the forms toolbar will now automatically redirect to the print selected holders screen if the form is a certificate and has multiple holders.
Contact Import
The ACORD 1, 2, 3, 125, and 130 can all import details from the contact list on a client.
Empty Pages With Only A Customer Number
ACORD forms with only a customer number on a page are now considered "no data pages". For example, pages 3 and 4 on the ACORD 2: Automobile Loss Notice.
Select Setup -> Configure Forms -> Configure, then choose to print, don't print, or ask to print pages with no data.
![]() For more information, see: Configure Forms.
For more information, see: Configure Forms.
Evidence of Property Insurance (ACORD 27)
The Evidence of Property Insurance can import coverage details from other ACORD forms, such as the Certificate of Property Insurance (ACORD 24). The form can also display custom property values per property, for each interest on that property.
The values for a property are saved by editing the details of a property, and selecting the correct coverage screens for each ACORD form.
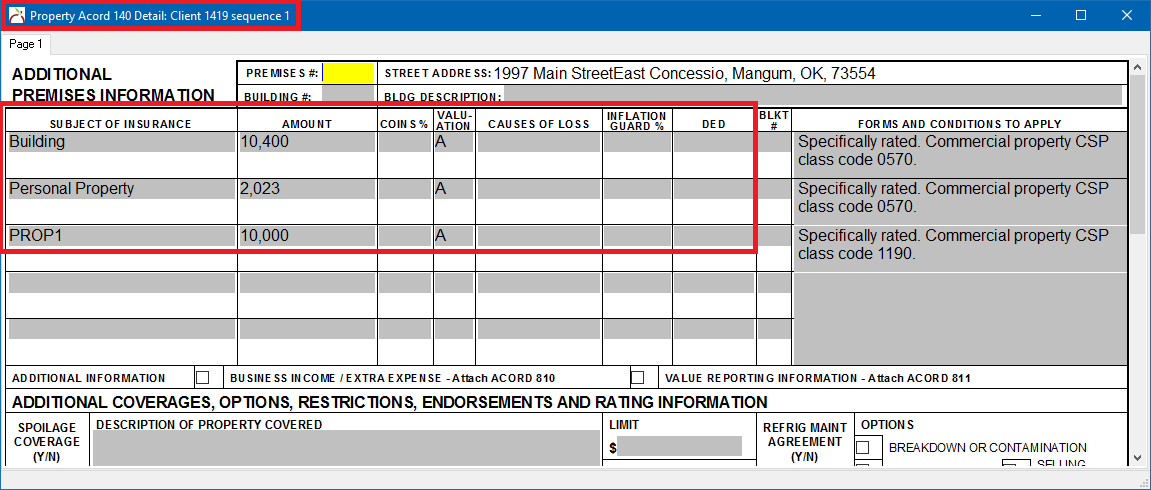
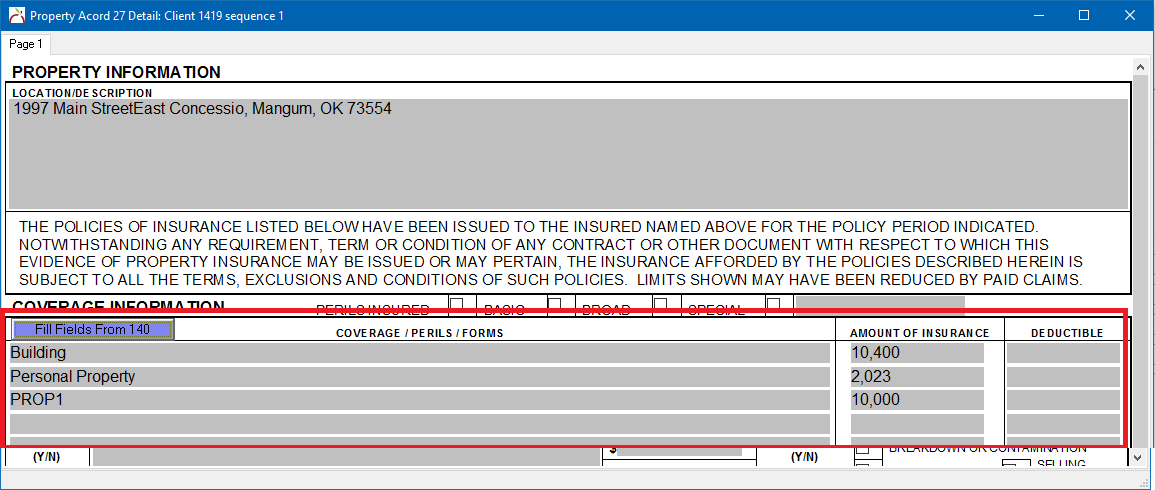
The ACORD 27 details can now import previously entered coverage details from the Property Section (ACORD 140) details.
- Load the Client.
- Expand the Properties section.
- Select the property from the list to open the property details.
- Select the Additional tab.
- Select the "When printing ACORD 27, override coverage with property values" checkbox.
- Select the Override Acord 27, 2016-03 Fields button.
- Select the "Fill Fields from 140" button. The existing ACORD 140 values will transfer to the corresponding ACORD 27 values.
Insert Schedule Item Description
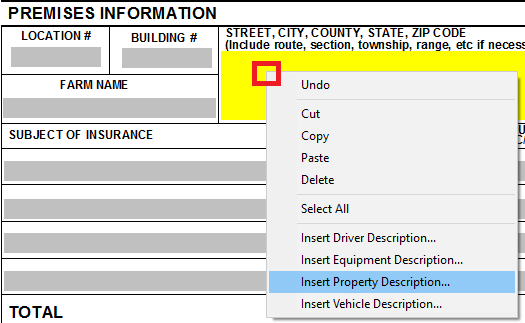
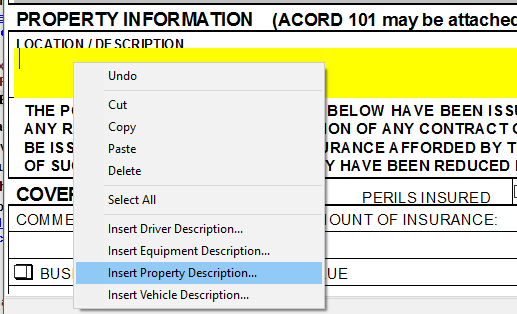
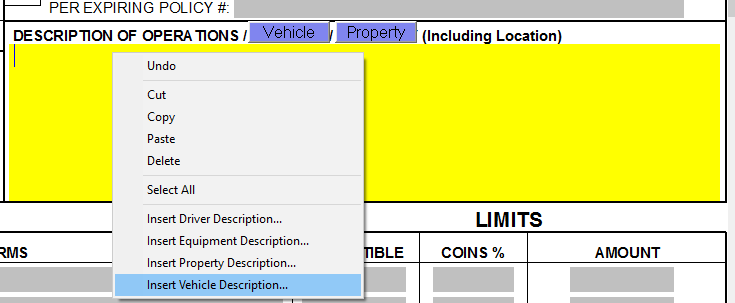
All forms include a new global right-click menu option that allows you to insert any schedule item’s description into a memo field on any ACORD form.
- Open an ACORD form.
- Right-click in the memo field. Select to Insert Property Description…
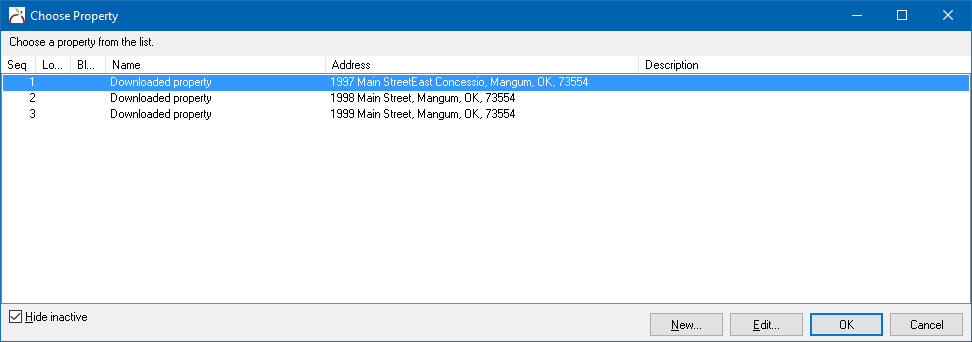
- Select the correct property from the list, and select the OK button.
- The form is now populated with the description from the property schedule.
The new right-click menu is available on any ACORD form, including all previous versions, within any memo field.
This is particularly helpful with forms such as the ACORD 75 Insurance Binder, which require either a vehicle or property description.
NC FS-1 North Carolina Certificate of Liability Insurance
Automatically fills the policy date information and includes options to import vehicle and driver information previously saved to the client.
Personal Umbrella Application (ACORD 83)
Pages 1 and 2 can import information from the ACORD 90, 84, 82, 80. Vehicle, Driver, and Property integration is available on page 2, allowing data to import from the client schedules.
Schedule List - Export to Excel (Drivers, Vehicles, Properties, Equipment)
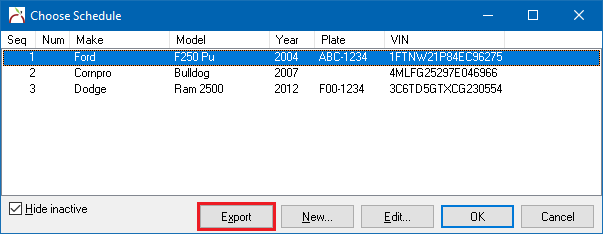
Each of the risk schedule windows can export to a Microsoft Excel spreadsheet with a single click.
- Driver Schedule
- Equipment Schedule
- Property Schedule
- Vehicle Schedule
- Worker Schedule
To export a list of vehicles, from the Client Dashboard select Create Item -> Vehicle. Select Export.
Microsoft Excel is automatically displayed, with the spreadsheet populated. The exported spreadsheet contains more information than the schedule window, such as Actual Cash Value.
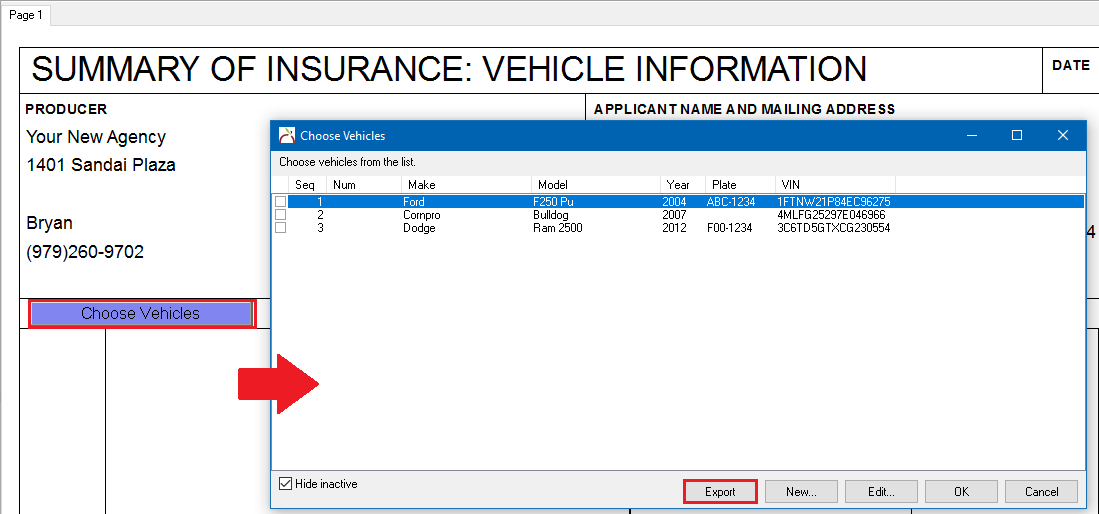
The export option is also available from any form that integrates with the schedules, such as the Vehicle Schedule.
Truckers Insurance Application (TruckApp)
A new custom Truckers Insurance Application is now available. The simple one page form can import from both the vehicle and driver schedule and is designed as a replacement for the complex ACORD trucking applications.
![]() Example: Truckers Insurance Application.pdf
Example: Truckers Insurance Application.pdf
Years Experience / Year Licensed
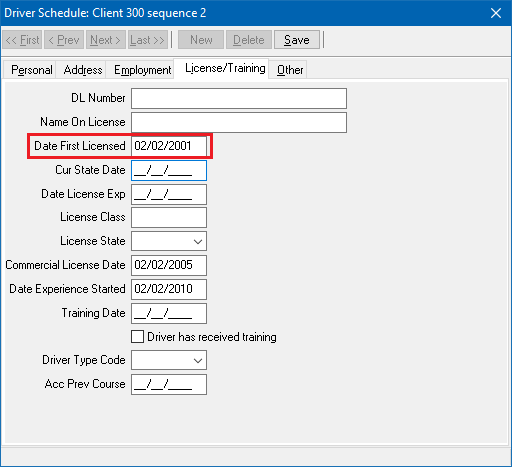
The columns for Years Experience (YRS EXP) and Year Licensed (YEAR LIC) can now be optionally split from the Date First Licensed value.
The Driver Schedule has two additional fields. When the new driver fields are populated, the ACORD forms will automatically display the new values.
- Commercial License Date: Date first issued a commercial license.
- Date Experience Started: Date first doing whatever they're doing now.
Example:
J.P Doe - Date Licensed configured as 02/02/2001.
Additional fields populated for Commercial License Date and Date Experience Started.
The changes apply to the ACORD 127: Business Auto Section, ACORD 163: Driver Information Schedule, and the Truckers Insurance Application.
Forms Interface
Forms Toolbar
The forms toolbar has been updated to combine similar functions into a single menu, and surface features which were previously only available within the "other" menu.
- Import Data… is available as a button, outside the “Other” menu.
- The form Description field is always visible, and editable outside the “Other” menu.
- The Print button opens a selection list of certificate holders if the form is a cert with multiple holders.
- The add functions are consolidated into a single menu.
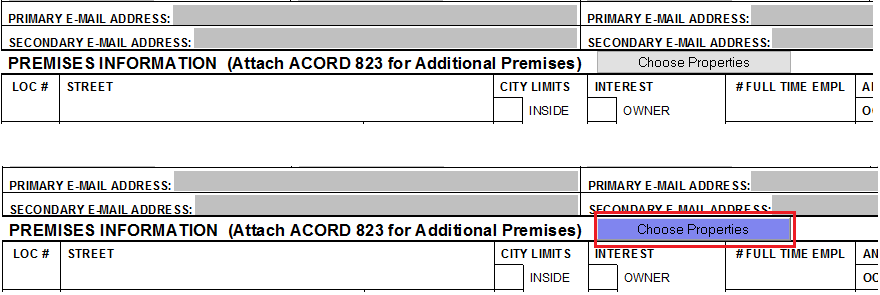
Button Color
Buttons within forms have color to assist with visual identification due to style changes in Windows decreasing visibility.
Create New Form Window
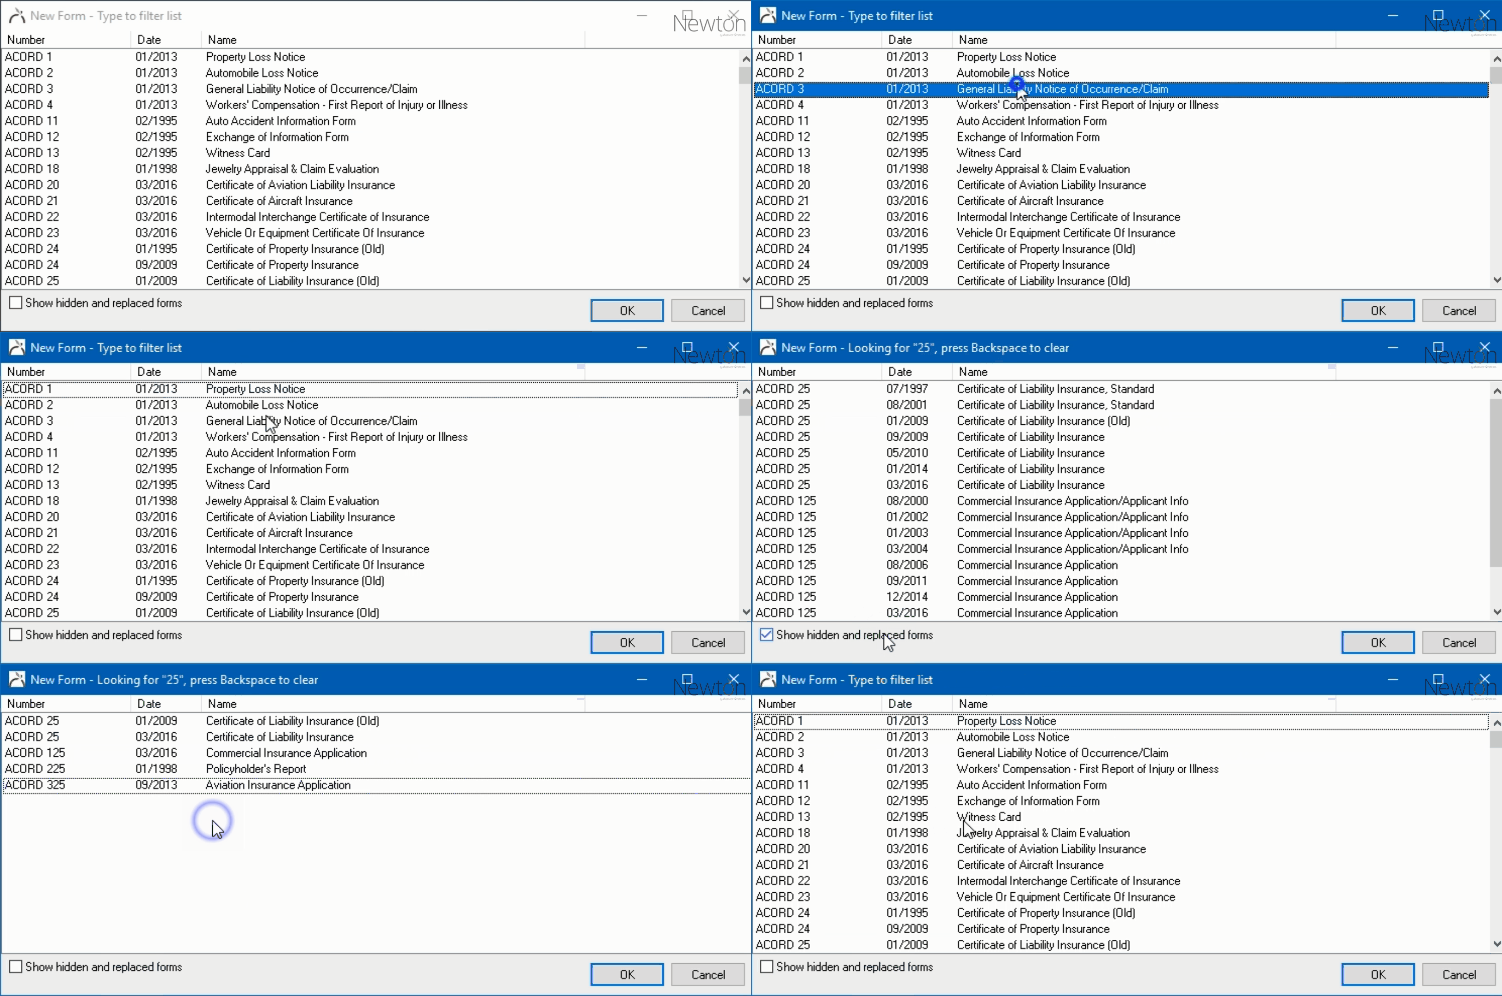
The create new form window displays a date column by default. There is a checkbox to show hidden and replaced forms, such as expired versions that have been replaced with newer revisions.
The list can be filtered by typing the name of a form, or the number of a form. For example "truck" for trucking application, or "25" for the ACORD 25 Certificate of Liability. The entered filter can be viewed in the title bar of a window. To clear the filter, press <backspace>.
New keyboard shortcuts have been added to the forms entry interface for quickly moving up and down the page. In addition, a new <CTRL + TAB> option is available to jump to the top of the next page. The new shortcuts allow the operator to quickly navigate without taking their hands off of the keyboard.
- PgUp - Moves page upward and moves tab location.
- PgDown - Moves page down and moves tab location.
- Ctrl-PgUp - Moves to top of page and first tab location.
- Ctrl-PgDown - Moves to bottom of page and last tab location.
- Ctrl-Tab - Move to next page and pop to top and first tab location.
- Ctrl-Shift-Tab - Move to previous page and pop to top and first tab location.
- Shift-PgDown - Move forward 10 tab spots, if that moves to next page then turn page and select first tab stop.
- Shift-PgUp - Move backward 10 tab spots, if that moves to previous page then turn page and select last tab stop.
Updated ACORD Forms
| Number | Name | Form Version |
|---|---|---|
| 1 | Property Loss Notice | (2016/10) |
| 2 | Automobile Loss Notice | (2016/10) |
| 3 | General Liability Notice of Occurrence/Claim | (2016/10) |
| 20 | Certificate of Aviation Liability Insurance | (2016/03) |
| 21 | Certificate of Aircraft Insurance | (2016/03) |
| 22 | Intermodal Interchange Certificate of Insurance | (2016/03) |
| 23 | Vehicle or Equipment Certificate of Insurance | (2016/03) |
| 24 | Certificate of Property Insurance | (2016/03) |
| 25 | Certificate of Liability Insurance | (2016/03) |
| 27 | Evidence of Property Insurance | (2016/03) |
| 28 | Evidence of Commercial Property Insurance | (2016/03) |
| 29 | Evidence of Flood Insurance | (2016/03) |
| 30 | Certificate of Garage Insurance | (2016/03) |
| 45 | Additional Interest Schedule | (2016/03) |
| 50-CT | Insurance Identification Card | (2009/01) |
| 50-TN | Insurance Identification Card | (2007/02) |
| 50-WM Set | Insurance Identification Card | (2007/02) |
| 51-NJ | Permanent Insurance Identification Card | (2007/06) |
| 51-NJ Set | Permanent Insurance Identification Card Set | (2007/06) |
| 61-ID | Auto Supplement | (2009/01) |
| 61-UT | Auto Supplement | (2013/04) |
| 70 | Personal Policy Change Request (Except Auto) | (2015/09) |
| 71 | Personal Auto Policy Change Request | (2015/09) |
| 75 | Insurance Binder | (2016/03) |
| 81 | Personal Inland Marine Application | (2016/03) |
| 82 | Watercraft Application | (2016/03) |
| 83 | Personal Umbrella Application | (2013/09) |
| 83 | Personal Umbrella Application | (2016/03) |
| 84 | Dwelling Fire Application | (2016/03) |
| 125 | Commercial Insurance Application | (2016/03) |
| 126 | Commercial General Liability Section | (2016/03) |
| 127 | Business Auto Section | (2015/12) |
| 133 | Worker's Compensation Insurance Plan | (2015/05) |
| 137-AL | Commercial Auto | (2015/12) |
| 137-AR | Commercial Auto | (2015/12) |
| 137-AZ | Commercial Auto | (2015/12) |
| 137-CA | Commercial Auto | (2015/12) |
| 137-CO | Commercial Auto | (2015/12) |
| 137-CT | Commercial Auto | (2015/12) |
| 137-DC | Commercial Auto | (2015/12) |
| 137-DE | Commercial Auto | (2015/12) |
| 137-FL | Commercial Auto | (2015/12) |
| 137-GA | Commercial Auto | (2015/12) |
| 137-HI | Commercial Auto | (2015/12) |
| 137-IA | Commercial Auto | (2015/12) |
| 137-ID | Commercial Auto | (2015/12) |
| 137-IL | Commercial Auto | (2015/12) |
| 137-IN | Commercial Auto | (2015/12) |
| 137-KS | Commercial Auto | (2015/12) |
| 137-KY | Commercial Auto | (2015/09) |
| 137-LA | Commercial Auto | (2015/12) |
| 137-MA | Commercial Auto | (2015/12) |
| 137-MD | Commercial Auto | (2015/12) |
| 137-ME | Commercial Auto | (2015/12) |
| 137-MI | Commercial Auto | (2015/12) |
| 137-MN | Commercial Auto | (2015/12) |
| 137-MO | Commercial Auto | (2015/12) |
| 137-MS | Commercial Auto | (2015/12) |
| 137-MT | Commercial Auto | (2015/12) |
| 137-NC | Commercial Auto | (2015/12) |
| 137-ND | Commercial Auto | (2015/12) |
| 137-NE | Commercial Auto | (2015/12) |
| 137-NH | Commercial Auto | (2015/12) |
| 137-NJ | Commercial Auto | (2015/12) |
| 137-NM | Commercial Auto | (2015/12) |
| 137-NY | Commercial Auto | (2015/12) |
| 137-OH | Commercial Auto | (2015/12) |
| 137-OK | Commercial Auto | (2015/12) |
| 137-OR | Commercial Auto | (2015/12) |
| 137-PA | Commercial Auto | (2015/12) |
| 137-SC | Commercial Auto | (2015/12) |
| 137-SD | Commercial Auto | (2015/12) |
| 137-TN | Commercial Auto | (2015/12) |
| 137-TX | Commercial Auto | (2015/12) |
| 137-UT | Commercial Auto | (2015/12) |
| 137-VA | Commercial Auto | (2015/12) |
| 137-VT | Commercial Auto | (2015/12) |
| 137-WI | Commercial Auto | (2015/12) |
| 137-WV | Commercial Auto | (2015/12) |
| 137-WA | Commercial Auto | (2015/12) |
| 137-WY | Commercial Auto | (2015/12) |
| 138-DE | Garage And Dealers | (2015/12) |
| 138-KY | Garage And Dealers | (2015/09) |
| 138-NE | Garage And Dealers | (2015/12) |
| 138-TN | Garage And Dealers | (2015/12) |
| 138-TX | Garage And Dealers | (2015/12) |
| 138-VA | Garage And Dealers | (2015/12) |
| 143 | Transportation Section | (2013/09) |
| 144 | Glass and Sign Section | (2013/09) |
| 145 | Accounts Receivable / Valuable Papers | (2013/09) |
| 147 | Installation/Builders Risk Section | (2016/03) |
| 163 | Commercial Auto Driver Information Schedule | (2012/06) |
| 190 | Supplemental Property Application | (2013/09) |
| 302 | Flood Insurance General Change Endorsement | (2015/04) |
| 327 | Airport And FBO Liability Section | (2014/12) |
| 330 | Aircraft Section | (2014/12) |
| 803 | Liquor Liability Section | (2014/12) |
| 811 | Value Reporting Information | (2014/12) |
| 829 | Forms and Endorsements Schedule | (2009/05) |
| 854-CA | Fair Plan Property Insurance Application for Dwelling Insurance | (2015/01) |
| 855-CA | California Fair Plan Property Insurance Application for Commercial Insurance | (2015/01) |
| 856-CA | Fair Plan Property Insurance Application for Businessowners Insurance | (2016/01) |
| 857-CA | Earthquake Authority Earthquake Insurance Application | (2011/02) |
| NC FS-4 | North Carolina Notice of Termination of Liability Insurance | |
| TruckApp | Truckers Insurance Application | (2016/09) |
Reconcile
Adjustment Invoices
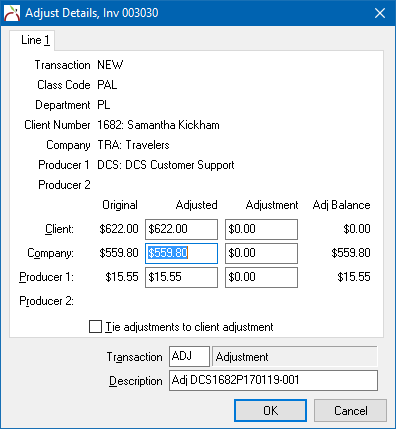
The adjust invoice screen has a number of improvements designed to make it easier to select the specific payable or receivable to adjust, easier to calculate the amount of the adjustment, and faster to enter.
- The adjust invoice screen will now show the adjusted invoice balance, which includes payments. This is helpful in calculating the adjustment invoice value if the receivable or payable balance needs to be 0.00.
- The adjustment invoice window within reconcile receivables and payables automatically deselects the bottom “Tie adjustments to client/company adjustment” for company and producer reconciles by default.
- The adjustment window will now automatically select and highlight the adjusted field according to the active reconcile screen. For example, reconcile company payables will select the company value, and reconcile producer payables will select the producer 1 or producer 2 value.
- Since the value is automatically highlighted, keyboard shortcuts can be used to start the adjustment (CTRL + A), or enter the values quickly without using the mouse.
- The adjustment screen will also remember the last adjustment transaction code used, and pre-fill it automatically.
Bank Reconcile
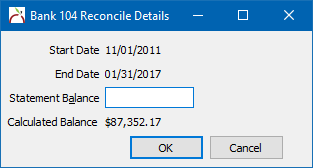
There is a new right-click menu option: Edit Reconcile Details… The detail window displays the start and end date for the bank reconcile, the entered statement balance, and the calculated (all items/control totals) balance.
- The statement balance can be modified if entered incorrectly, added if skipped initially, or removed if added incorrectly.
- The Bank Balance section of the bank reconcile window will automatically switch modes if the statement balance is added / removed. (Statement Balance vs Bank Balance)
Producer Payables
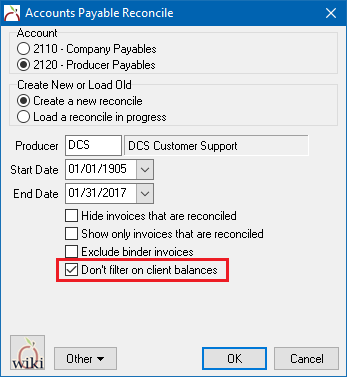
There is a new option in reconcile producer payables which ignores client balances. Selecting the option will display any invoice with a producer payable balance, even if no client payment is attached.
- This will not affect the amount calculated for “pay all in trust”, but it will allow the user to manually mark the invoices to pay, or pay all in full.
- Batch reconcile producer payables also includes the new option.
Reconcile Validation Engine
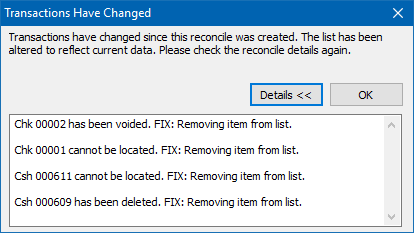
Reconcile payables and receivables now automatically verifies the invoices when you resume a saved reconcile in progress. It performs the same verification when you select process all, or when batch reconcile payables is used.
- It will update the invoice amounts (including new lines), and remove items as needed.
- It will reduce the payment amount if an invoice is removed entirely. (Sub-GL change or invoice deleted).
- It will not reduce the payment amount if an invoice amount is changed. After an invoice change has been detected, edit the payment details or select the desired Pay All action to recalculate the payment amounts.
- It will not add new invoices automatically, however that can still be done with the right-click menu within reconcile.
Bank Reconcile Validation
Bank reconcile automatically verifies any Cash, Check, or Journal entries when you resume a saved reconcile in progress. It performs the same verification when you select process all.
- It will update the reconcile totals automatically when items are removed, or amounts are changed.
- It will not add new transactions automatically, however that can still be done with the right-click menu within reconcile.
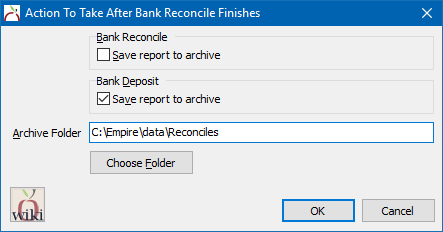
Select Actions When Reconcile Completes
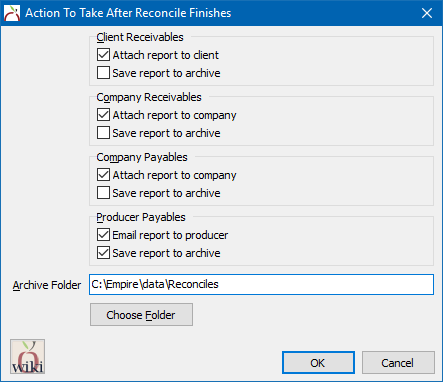
The reconcile functions in Newton provide the ability to run reports from the archive of processed items. The reconcile functions can also be configured to automatically create and store .PDF copies of the reports as each item is processed. The .PDF copies can be stored on the various attachment bands within Newton (Client Tab -> Attachments, Company Tab -> Attachments), or externally in a user-specified folder.
- Reconcile Producer Payables can optionally email the producer's report, in addition to placing the .PDF archive in the user-specified Archive folder.
- These settings apply to both individual reconciles and Batch Reconcile Company/Producer Payables.
- The automatic actions do not require any additional steps, clicks, or prompts during processing.
Reconcile Functions With Automatic Actions:
- Bank Deposit Wizard
- Bank Reconcile
- Client Receivables
- Company Payables
- Company Receivables
- Producer Payables (Includes .PDF or email)
Configure Invoice Reconcile Actions
- Select AP -> Reconcile Payables.
- Select Other -> Select Actions When Reconcile Completes...
- Check to enable or disable the different report options. If Save report to archive is selected for any option, select the desired Archive Folder. (Each Newton user can have a different archive folder providing the option to store the files in a secure local folder on the workstation.)
- Select OK.
Configure Bank Reconcile Actions
- Select GL -> Bank Reconcile.
- Select Other -> Select Actions When Bank Reconcile Completes...
- Check to enable or disable the different report options. If Save report to archive is selected for any option, select the desired Archive Folder. (The Archive folder is shared with the invoice reconcile archive folder.)
- Select OK.
Vouchers
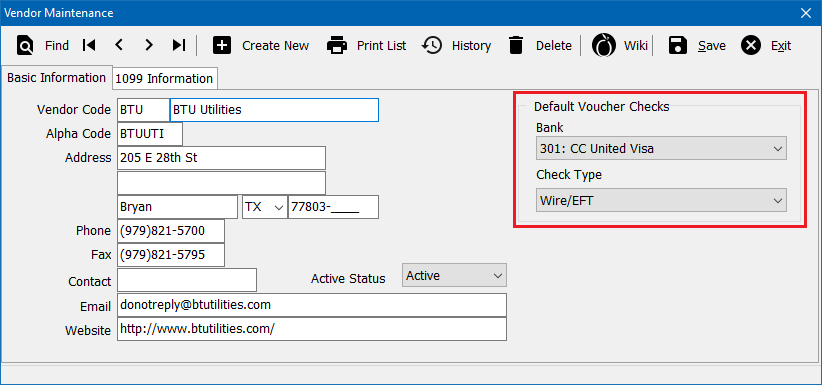
Default Voucher payment Bank and check types can now be saved to the Vendor Profile.
- From the Main Menu, select Setup -> Vendor.
- Select Find.
- Select the desired vendor number and select OK.
- Select the Default Voucher Checks -> Bank and Check Type (Regular, Wire/EFT).
- Select Save. (Requires Security System: Profiles -> Vendor -> Edit access.)
- Select Exit.
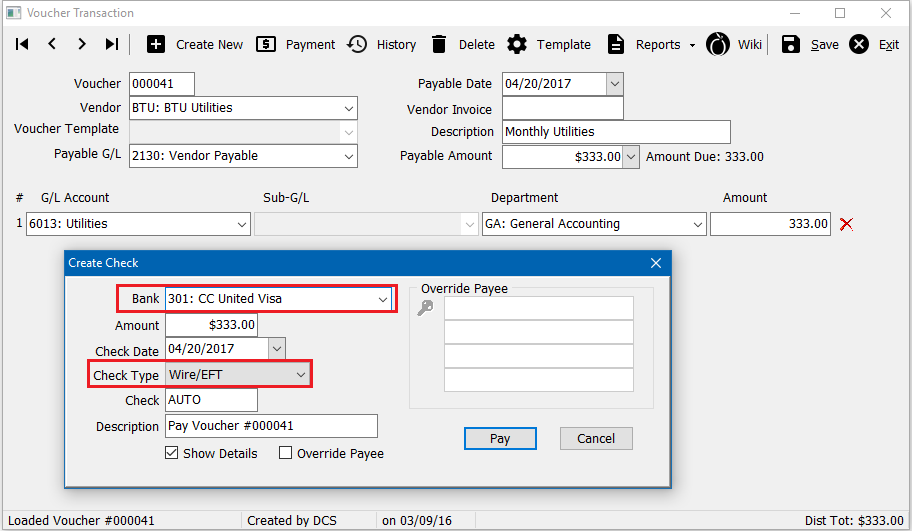
When a single voucher or multiple vouchers are paid, the values will default based on the vendor profile for that voucher.
If nothing is set, the Bank value will display “Default from Agency Profile”, and voucher payments will continue to default based on the Agency Profile.
Other
- Easy MAPI Outlook integration updated to version 7.2.0.52.
- Management Add-ons: Backdated transactions includes GL, SUB-GL and Amount columns.
- Management Add-ons: Client - Clients by territory
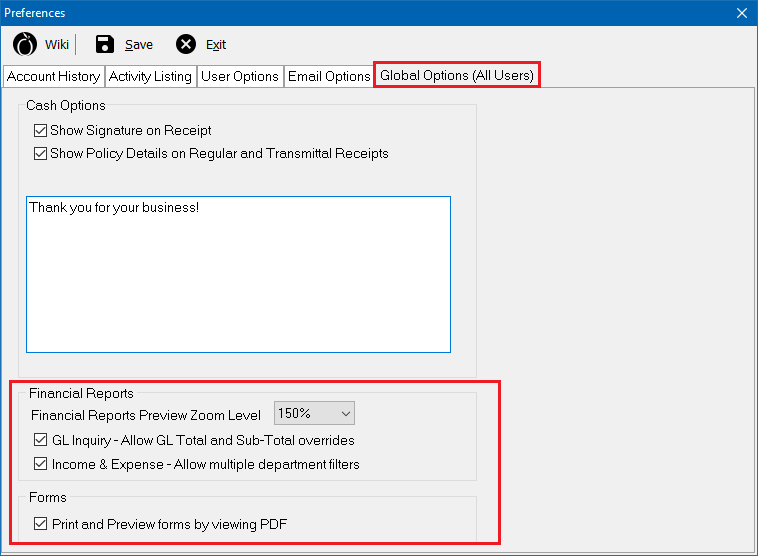
Preferences - Global Options (All Users)
A new Global Options (All Users) tab is now available within the preferences window with a number of new options. The tab is only visible to users with the highest security level.
- All previous cash options have been moved to the new tab.
- Financial Reports Preview Zoom Level: Controls the default zoom level for report previews of financial reports such as the Balance Sheet and Income & Expense.
- GL Inquiry - Allow GL Total and Sub-Total overrides: If the overrides are enabled, the Totals Type and SubTotals Type for each General Ledger account can be modified on-the-fly.
- Income & Expense - Allow multiple department filters: By default, the Income & Expense report will include totals for one department, or all departments. Enabling this option allows the agency to including multiple individual department filters.
- Print and Preview forms by viewing PDF: When the print or preview options are selected from within an ACORD form, the output is automatically displayed as a PDF file, or send to the printer as a PDF file using the computer's default PDF application.
