Make Text and Other Items Larger or Smaller
| Related Pages |
| Related Categories |
There are a number of usability adjustments inside and outside of Agency Systems which can be used to increase the displayed font size and other items.
Although Microsoft provides an option to adjust only the text size, using this option can cause issues with display fields and printed text.
Font Size
There are two user settings for font sizes within Newton that are available to each individual user.
Band Font Size
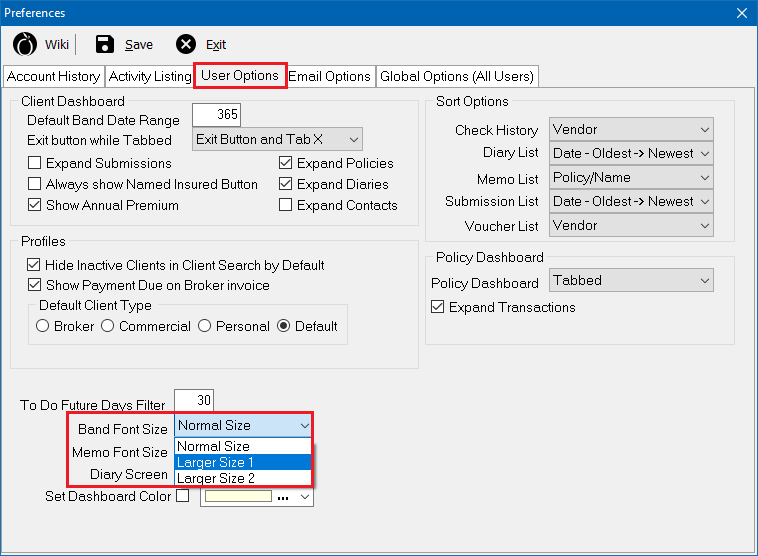
The band font size increases the font used by the text bands on the User Dashboard Tab, Client Tab, Policy Dashboard, Management Tab, Company Tab, Vendor Tab and more.
- Select Setup -> Preferences.
- Select the User Options tab.
- Select Band font size and choose Larger Size 1 or Larger Size 2.
- Select Save, then OK.
- Select Log Off to close Newton and log back in for the change to be applied.
Memo Font Size
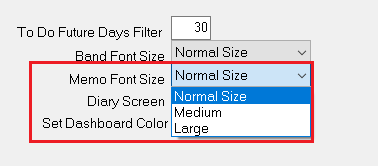
The Memo Font Size value controls the text size for Activity -> View and Entry, Client Notes, Company Notes, Diary -> Comments, Policy Dashboard -> Policy Summary Panel (right), Policy Dashboard -> Preview Pane and Policy Bulletin (bottom), Submission -> Comments, and the User Dashboard Tab -> Preview Pane.
- Select Setup -> Preferences.
- Select the User Options tab.
- Select Memo font size and choose Larger Size 1 or Larger Size 2.
- Select Save, then OK.
- Select Log Off to close Newton and log back in for the change to be applied.
Configure Forms
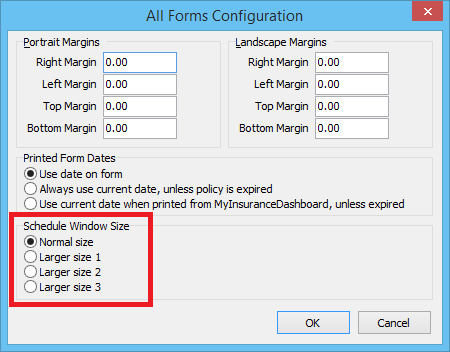
Increasing the Schedule Window Size will adjust the text and field display size for schedule entry fields such as drivers, vehicles, properties and equipment. The Configure Forms settings are shared by all Newton Users and require administrative access. (Requires Producer (User) -> Security Level -> 9)
- Select Setup -> Configure Forms.
- Select All Forms. This will open the the All Forms Configuration window.
- Change Schedule Window Size to a larger setting.
- Select OK, then Close.
- Select Log Off to close Newton and log back in for the change to be applied.
Windows Resolution
If the text size for the entire computer does not display not large enough, the best alternative is to lower the screen resolution. If the screen resolution is reduced, everything will display larger on the screen within and outside of Newton.
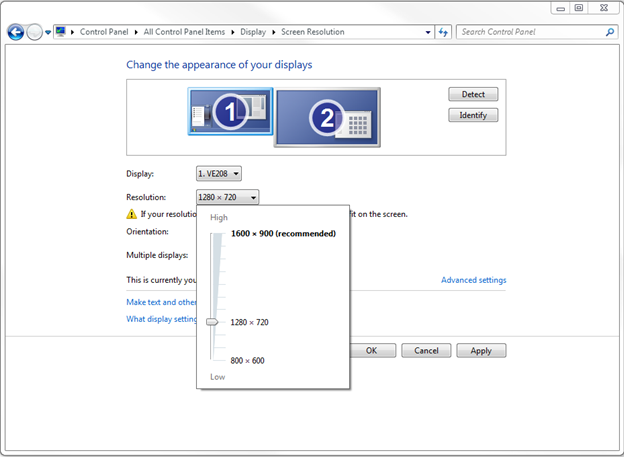
- Open the Microsoft Control Panel. Select Appearance and Personalization. Select Display. Select Adjust Resolution in the top left of the window.
- (Optionally Right-Click on the desktop and select Screen Resolution.)
- Select the Screen Resolution drop-down, and move the slider down reducing the setting to one of the lower named resolutions.
- Select Apply to view the changes.
- A preview of the new resolution will display, and the system will prompt to either Keep changes or Revert to the previous resolution.
- There are many different options, so try a few and pick the one that looks the best.
- To keep the correct aspect ratio of width and height, try to avoid the tick marks between the named resolutions. (1024 x 768 is the minimum supported resolution).
- If multiple monitors are available, each monitor must be individually adjusted.


