Difference between revisions of "Batch Send"
(updated for 2017) |
|||
| Line 1: | Line 1: | ||
| − | [[Category: | + | [[Category:Attachment]][[Category:Email]][[Category:Forms]][[Category:Memo Writer]][[Category:MyInsuranceDashboard]][[Category: Training Guides]] |
<table class="infobox" cellspacing="5" style="background-color: #FFFFFF; width:27em; text-align:left; border-spacing: 2px; line-height:1.5em;"> | <table class="infobox" cellspacing="5" style="background-color: #FFFFFF; width:27em; text-align:left; border-spacing: 2px; line-height:1.5em;"> | ||
<tr> | <tr> | ||
| − | <td>[[File: | + | <td>[[File:Ic_description_black_24dp.png|link=Newton User Guide#Correspondence]] Newton User Guide: [[Newton User Guide#Correspondence|Correspondence]]</td> |
</tr> | </tr> | ||
<tr> | <tr> | ||
| − | <td>[[File: Ic_settings_backup_restore_black_24dp.png]] Legacy Instructions Available: [http://wiki.agencysystems.com/mediawiki/index.php?title=Batch_Send&oldid= | + | <td>[[File:Ic_info_black_24dp.png]] Required Software Version: [[:Category:Release Notes|Spring 2017]]</td> |
| + | </tr> | ||
| + | <tr> | ||
| + | <td>[[File: Ic_settings_backup_restore_black_24dp.png]] Legacy Instructions Available: [http://wiki.agencysystems.com/mediawiki/index.php?title=Batch_Send&oldid=5007 Click Here]</td> | ||
</tr> | </tr> | ||
| Line 14: | Line 17: | ||
<td> | <td> | ||
<ul> | <ul> | ||
| − | |||
<li>[[Attachments]]</li> | <li>[[Attachments]]</li> | ||
<li>[[Email]]</li> | <li>[[Email]]</li> | ||
<li>[[Fax Integration]]</li> | <li>[[Fax Integration]]</li> | ||
| − | <li>[[ | + | <li>[[Forms]]</li> |
| + | <li>[[Memo Writer]]</li> | ||
| + | <li>[[My Insurance Dashboard]]</li> | ||
</ul> | </ul> | ||
</td> | </td> | ||
</tr> | </tr> | ||
| − | |||
<tr style="background-color: #d3d3d3; text-align: center; "> | <tr style="background-color: #d3d3d3; text-align: center; "> | ||
<td>Related Categories</td> | <td>Related Categories</td> | ||
| Line 34: | Line 37: | ||
<li>[[:Category:Forms|Forms]]</li> | <li>[[:Category:Forms|Forms]]</li> | ||
<li>[[:Category:Memo Writer|Memo Writer]]</li> | <li>[[:Category:Memo Writer|Memo Writer]]</li> | ||
| − | <li>[[:Category: | + | <li>[[:Category:MyInsuranceDashboard|My Insurance Dashboard]]</li> |
| − | <li>[[:Category: | + | <li>[[:Category:Training Guides|Training Guides]]</li> |
</ul> | </ul> | ||
</td> | </td> | ||
</tr> | </tr> | ||
</table> | </table> | ||
| − | Batch Send is a powerful feature that allows you to group [[ | + | Batch Send is a powerful feature that allows you to group [[Memo Writer|Memos]], [[Forms]], and other [[Attachments]] together. The selected items can be sent in batch to the printer, fax printer, output as a .PDF, published to My Insurance Dashboard, or sent as an attachment in an email message. |
| − | |||
| − | |||
| − | |||
| − | |||
== Accessing Batch Send == | == Accessing Batch Send == | ||
Batch Send can be opened from a number of locations and will always be associated with the selected [[Policy: Create A Policy|Policy or Quote number]]. | Batch Send can be opened from a number of locations and will always be associated with the selected [[Policy: Create A Policy|Policy or Quote number]]. | ||
| − | + | [[File:Batchsend-topmenu.png]] | |
| − | |||
| − | |||
| − | |||
| − | |||
| − | |||
| − | ==== Batch | + | ==== Batch send from a policy or quote ==== |
| − | #[[ | + | #[[Client_Keyword_Search#Find_a_Client|Load a Client]] on a [[Client Tab|client tab]]. |
| − | # | + | #On the [[Client Tab: Client Dashboard|Client Dashboard tab]] select the (+) next to '''Policies'''. ''(To expand the band by default, see: [[Preferences]])'' |
| − | #'''Left-Click''' the desired policy number to open | + | #'''Left-Click''' the desired policy number to open the [[Policy Dashboard]]. (Optionally, '''Right-Click''' on the policy number and select '''Batch Send''' to jump directly to [[#Selecting items|the selection window]].) |
| + | #:[[File:Clientdash-policies-selectpolicy.png]] | ||
#Select '''Batch Send''' within the top toolbar. | #Select '''Batch Send''' within the top toolbar. | ||
| − | #See [[#Selecting | + | #See [[#Selecting items|Selecting items]] below. |
| − | ==== Batch | + | The [[Policy Dashboard]] can also be loaded using the [[Policy Keyword Search]]. |
| − | #[[ | + | |
| − | # | + | ==== Batch send from a form ==== |
| − | #'''Left-Click''' the desired policy number to open | + | #[[Client_Keyword_Search#Find_a_Client|Load a Client]] on a [[Client Tab|client tab]]. |
| − | #Select the '''Forms | + | #On the [[Client Tab: Client Dashboard|Client Dashboard tab]] select the (+) next to '''Policies'''. |
| − | #Open the desired [[ | + | #'''Left-Click''' the desired policy number to open the [[Policy Dashboard]]. |
| + | #Select the '''Policy Forms''' tab. | ||
| + | #Open the desired [[Forms|form]]. | ||
#Select '''Batch Send''' within the top toolbar. | #Select '''Batch Send''' within the top toolbar. | ||
| − | #See [[#Selecting | + | #See [[#Selecting items|Selecting items]] below. |
| − | ==== Batch | + | [[File:Ic_info_black_24dp.png]] See: [[Forms]] for more information. |
| − | #[[ | + | |
| − | # | + | ==== Batch send from a form bundle ==== |
| − | #'''Left-Click''' the desired policy number to open | + | #[[Client_Keyword_Search#Find_a_Client|Load a Client]] on a [[Client Tab|client tab]]. |
| − | #Select '''View Current Form Bundle (Risk)'''. | + | #On the [[Client Tab: Client Dashboard|Client Dashboard tab]] select the (+) next to '''Policies'''. |
| − | + | #'''Left-Click''' the desired policy number to open the [[Policy Dashboard]]. | |
| + | #Select '''View Current Form Bundle (Risk)'''. | ||
#Select '''Batch Send''' within the top toolbar. | #Select '''Batch Send''' within the top toolbar. | ||
| − | #See [[#Selecting | + | #See [[#Selecting items|Selecting items]] below. |
| + | |||
| + | [[File:Ic_info_black_24dp.png]] See: [[Forms: Form Bundle]] for more information. | ||
| − | ==== Batch | + | ==== Batch send from a submission ==== |
| − | #[[ | + | #[[Client_Keyword_Search#Find_a_Client|Load a Client]] on a [[Client Tab|client tab]]. |
| − | # | + | #On the [[Client Tab: Client Dashboard|Client Dashboard tab]] select the (+) next to '''Submissions'''. ''(To expand the band by default, see: [[Preferences]])'' |
#'''Left-Click''' the '''Submission Description'''. | #'''Left-Click''' the '''Submission Description'''. | ||
#Select '''Batch Send''' within the top toolbar. | #Select '''Batch Send''' within the top toolbar. | ||
| − | #See [[#Selecting | + | #See [[#Selecting items|Selecting items]] below. |
| + | |||
| + | A submission can also be opened from the assigned [[User Dashboard Tab]]. | ||
| − | == Selecting | + | [[File:Ic_info_black_24dp.png]] See: [[Submission]] for more information. |
| + | |||
| + | == Selecting items == | ||
The Batch Send window can contain the following sections. ''(Sections without records are automatically hidden.)'' | The Batch Send window can contain the following sections. ''(Sections without records are automatically hidden.)'' | ||
| − | *[[ | + | *[[Policy Dashboard|Policy Memos]] |
| − | *[[Client_Tab | + | *[[Client_Tab:_Client_Dashboard|Client Memos]] |
| − | *[[Memo Writer: Create a Form Letter Template|Library | + | *[[Memo Writer: Create a Form Letter Template|Library Memo Templates]] |
| − | *[[ | + | *[[#Selecting forms|Forms]] |
*[[Attachments]] | *[[Attachments]] | ||
*[[Invoice: Create An Invoice|Other (Invoice)]] | *[[Invoice: Create An Invoice|Other (Invoice)]] | ||
| + | *Other (Client Statement) | ||
| − | To select an item, expand the category and '''Check''' the desired item(s). Items from multiple categories can be selected, but attachments can [[#Batch | + | To select an item, expand the category and '''Check''' the desired item(s). Items from multiple categories can be selected, but attachments can [[#Batch send actions|only be emailed or uploaded to My Insurance Dashboard]]. |
| − | ==== Selecting | + | |
| + | ==== Selecting forms ==== | ||
The forms list includes categories, the form date, and the form description. All forms are also listed, regardless of their sequence. | The forms list includes categories, the form date, and the form description. All forms are also listed, regardless of their sequence. | ||
| − | + | ||
| + | [[File:releasenotes-batchprint-formspriorforms.png]] | ||
| + | |||
Certificates also have their own category, similar to the forms tab. | Certificates also have their own category, similar to the forms tab. | ||
| − | + | ||
| + | [[File:releasenotes-batchprint-forms-certificate.png]] | ||
| + | |||
Combine both the certificate tree and the availability of prior forms, and you gain access to older certificates for that policy. | Combine both the certificate tree and the availability of prior forms, and you gain access to older certificates for that policy. | ||
| − | |||
| − | ==== Selecting | + | [[File:releasenotes-batchprint-forms-certificate-older.png]] |
| + | |||
| + | ==== Selecting form bundles ==== | ||
The Batch Send screen also automatically incorporates [[Forms: Form Bundle|Form Bundles]] into the form selection process. | The Batch Send screen also automatically incorporates [[Forms: Form Bundle|Form Bundles]] into the form selection process. | ||
| − | |||
| − | == Batch | + | [[File:Batchsend-formswithbundles.png]] |
| + | |||
| + | == Batch send actions == | ||
[[File:Batchsend-topmenu.png]] | [[File:Batchsend-topmenu.png]] | ||
{| class="wikitable" | {| class="wikitable" | ||
| Line 120: | Line 132: | ||
|- | |- | ||
|Print | |Print | ||
| − | |Sends the selected documents to the printer and automatically creates an activity record with a .PDF copy of the package. | + | |Sends the selected documents to the printer and automatically [[Activity|creates an activity record]] with a .PDF copy of the package. |
|- | |- | ||
|PDF | |PDF | ||
|Generates and opens a combined .PDF package of the selected items. ''(The .PDF can then be saved to an external file folder, outside of Newton.)'' | |Generates and opens a combined .PDF package of the selected items. ''(The .PDF can then be saved to an external file folder, outside of Newton.)'' | ||
|- | |- | ||
| − | |Publish to | + | |Publish to My Insurance Dashboard (MID) |
| − | |[[#Publish to | + | |[[#Publish to My Insurance Dashboard|See below]]. |
|- | |- | ||
|Fax | |Fax | ||
| − | |[[#Batch | + | |[[#Batch send memos and forms to fax|See below]]. |
|- | |- | ||
|Email | |Email | ||
| − | |Opens the [[Email|compose email window]] with all selected items combined as a single .PDF package | + | |Opens the [[Email|compose email window]] with all selected items combined as a single .PDF package. Existing [[Attachments]] are listed individually. |
|- | |- | ||
|Setup | |Setup | ||
| Line 146: | Line 158: | ||
''(If [[Attachments]] are selected, the Print, Preview, and FAX options will be disabled)'' | ''(If [[Attachments]] are selected, the Print, Preview, and FAX options will be disabled)'' | ||
| − | === Publish to | + | === Publish to My Insurance Dashboard === |
| − | {{#ev:youtube|6kxT7c2MYP0|300|right| | + | {{#ev:youtube|6kxT7c2MYP0|300|right|My Insurance Dashboard and Batch Send}} |
| − | Selecting the '''Publish to MyInsuranceDashboard''' option will upload the documents to [[ | + | Selecting the '''MID - Publish to MyInsuranceDashboard''' option will upload the documents to [[My Insurance Dashboard]] as a new .PDF package or as individual attachments. |
[[File:Batchsend-publishtomid.png]] | [[File:Batchsend-publishtomid.png]] | ||
| − | + | [[File:Ic_info_black_24dp.png]] See: [[My Insurance Dashboard]] for more information. | |
| + | |||
| + | === Batch send memos and forms to fax === | ||
| + | The fax action within batch send can include a fax cover page with the document package. The cover page template can be customized using [[:Category:Memo Writer|Memo Writer]]. | ||
| + | |||
| + | ====Create fax cover page==== | ||
| + | The fax cover page template only needs to be created once. After the template is saved, it can be [[#Create fax package|selected for any fax package]]. | ||
| − | |||
| − | |||
| − | |||
#[[Memo Writer: Sample Memo Templates|Download the Fax Cover template provided here]] and save it to your Desktop. | #[[Memo Writer: Sample Memo Templates|Download the Fax Cover template provided here]] and save it to your Desktop. | ||
| − | #Select ''' | + | #Select '''Setup''' -> '''Memo Writer Letter Library'''. |
| − | #Select '''File -> Import'''. | + | #Select '''File''' -> '''Import'''. |
#Browse to your desktop and select the downloaded file '''FAX_COVER.rtf'''. | #Browse to your desktop and select the downloaded file '''FAX_COVER.rtf'''. | ||
#Select '''Open'''. The memo writer screen should now display the cover page. | #Select '''Open'''. The memo writer screen should now display the cover page. | ||
#:[[File:Mw-import.PNG]] | #:[[File:Mw-import.PNG]] | ||
| − | #Select '''File -> Save As'''. | + | #Make any desired changes to the template. Select '''File''' -> '''Save As'''. |
| − | #Select '''Library''' and enter a Title e.g. FAX COVER. ''' | + | #Select '''Library''' and enter a Title e.g. FAX COVER. Leave the '''Category''' empty (blank). Select '''OK'''. |
| − | #:[[File: | + | #:[[File:Fax-memotemp-saveas.png]] |
#Exit Memo Writer. | #Exit Memo Writer. | ||
| − | ==== Create | + | |
| − | #[[ | + | [[File:Ic_info_black_24dp.png]] See: [[Memo Writer: Sample Memo Templates]] for more information. |
| − | # | + | |
| − | #'''Left-Click''' the desired policy number to open | + | ==== Create fax package ==== |
| − | #Select '''Batch Send''' | + | #[[Client_Keyword_Search#Find_a_Client|Load a Client]] on a [[Client Tab|client tab]]. |
| − | #Select the desired [[ | + | #On the [[Client Tab: Client Dashboard|Client Dashboard tab]] select the (+) next to '''Policies'''. |
| − | #:[[File: | + | #'''Left-Click''' the desired policy number to open the [[Policy Dashboard]]. |
| − | #Select '''Cover Sheet -> FAX COVER''' created in the [[#Create | + | #Select '''Batch Send''' within the top toolbar. |
| − | #Select the installed '''Fax Printer'''. ''(Every third-party fax printer is designed differently. Some fax printers will open a separate software window when a document is submitted prompting the user to enter the fax to number.)'' | + | #Select the desired [[Forms]] or [[Memo Writer]] documents. Do not try to select the cover page. Select the '''Fax''' action button. |
| − | #Enter any additional details and select '''OK'''. | + | #:[[File:Fax-batchsendfax.png]] |
| − | #:[[File: | + | #:<br> |
| + | #Confirm the fax package details: | ||
| + | #*Select the recipient and confirm the sender details. | ||
| + | #*Optionally select the '''Cover Sheet''' -> '''FAX COVER''' created in the [[#Create fax cover page|section above]]. ''(Select '''Omit Cover Page''' to ignore the template.)'' | ||
| + | #*Select the installed '''Fax Printer'''. ''(Every third-party fax printer is designed differently. Some fax printers will open a separate software window when a document is submitted prompting the user to enter the fax to number.)'' | ||
| + | #*Enter any additional details and select '''OK'''. | ||
| + | #:[[File:Fax-faxpackage.png]] | ||
| + | #:<br> | ||
#The '''User Defined Field''' will display, prompting for the number of pages. Enter the total if desired, and select '''Accept'''. | #The '''User Defined Field''' will display, prompting for the number of pages. Enter the total if desired, and select '''Accept'''. | ||
#:[[File:Batchprint-fax-faxpackge-user-defined.png]] | #:[[File:Batchprint-fax-faxpackge-user-defined.png]] | ||
| − | #The fax cover sheet’s merge fields will automatically be processed and the document sent. When prompted, include any additional details for the policy log, and select '''Save'''. | + | #:<br> |
| − | #:[[File: | + | #The fax cover sheet’s merge fields will automatically be processed and the document sent. When prompted, include any additional details for the [[Activity|policy log]], and select '''Save'''. |
| + | #:[[File:Fax-faxpackage-pollog.png]] | ||
| + | #:<br> | ||
#A PDF file will automatically be saved in Newton showing both the cover sheet and the selected package. | #A PDF file will automatically be saved in Newton showing both the cover sheet and the selected package. | ||
| − | #:[[File: | + | #:[[File:Fax-faxpackage-pollog-details.png]] |
| + | |||
| + | [[File:Ic_info_black_24dp.png]] See: [[Attachments]] for more information. | ||
Revision as of 16:10, 21 May 2018
| Related Pages |
| Related Categories |
Batch Send is a powerful feature that allows you to group Memos, Forms, and other Attachments together. The selected items can be sent in batch to the printer, fax printer, output as a .PDF, published to My Insurance Dashboard, or sent as an attachment in an email message.
Accessing Batch Send
Batch Send can be opened from a number of locations and will always be associated with the selected Policy or Quote number.
Batch send from a policy or quote
- Load a Client on a client tab.
- On the Client Dashboard tab select the (+) next to Policies. (To expand the band by default, see: Preferences)
- Left-Click the desired policy number to open the Policy Dashboard. (Optionally, Right-Click on the policy number and select Batch Send to jump directly to the selection window.)
- Select Batch Send within the top toolbar.
- See Selecting items below.
The Policy Dashboard can also be loaded using the Policy Keyword Search.
Batch send from a form
- Load a Client on a client tab.
- On the Client Dashboard tab select the (+) next to Policies.
- Left-Click the desired policy number to open the Policy Dashboard.
- Select the Policy Forms tab.
- Open the desired form.
- Select Batch Send within the top toolbar.
- See Selecting items below.
![]() See: Forms for more information.
See: Forms for more information.
Batch send from a form bundle
- Load a Client on a client tab.
- On the Client Dashboard tab select the (+) next to Policies.
- Left-Click the desired policy number to open the Policy Dashboard.
- Select View Current Form Bundle (Risk).
- Select Batch Send within the top toolbar.
- See Selecting items below.
![]() See: Forms: Form Bundle for more information.
See: Forms: Form Bundle for more information.
Batch send from a submission
- Load a Client on a client tab.
- On the Client Dashboard tab select the (+) next to Submissions. (To expand the band by default, see: Preferences)
- Left-Click the Submission Description.
- Select Batch Send within the top toolbar.
- See Selecting items below.
A submission can also be opened from the assigned User Dashboard Tab.
![]() See: Submission for more information.
See: Submission for more information.
Selecting items
The Batch Send window can contain the following sections. (Sections without records are automatically hidden.)
- Policy Memos
- Client Memos
- Library Memo Templates
- Forms
- Attachments
- Other (Invoice)
- Other (Client Statement)
To select an item, expand the category and Check the desired item(s). Items from multiple categories can be selected, but attachments can only be emailed or uploaded to My Insurance Dashboard.
Selecting forms
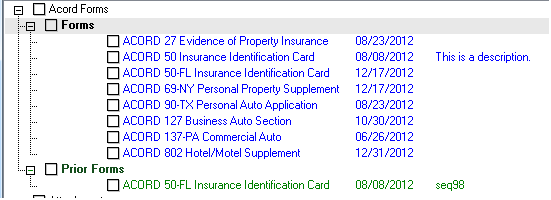
The forms list includes categories, the form date, and the form description. All forms are also listed, regardless of their sequence.
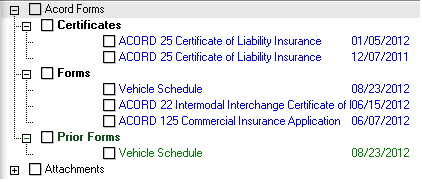
Certificates also have their own category, similar to the forms tab.
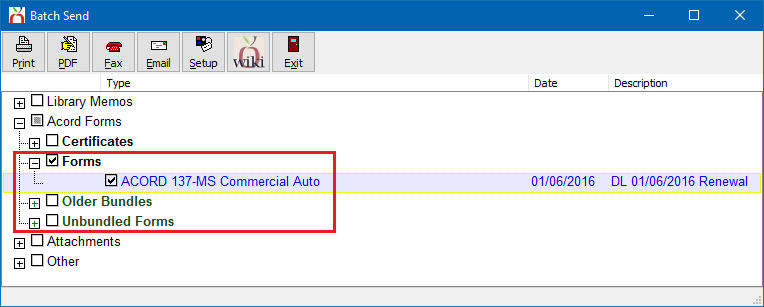
Combine both the certificate tree and the availability of prior forms, and you gain access to older certificates for that policy.
Selecting form bundles
The Batch Send screen also automatically incorporates Form Bundles into the form selection process.
Batch send actions
| Action Button | Result |
|---|---|
| Sends the selected documents to the printer and automatically creates an activity record with a .PDF copy of the package. | |
| Generates and opens a combined .PDF package of the selected items. (The .PDF can then be saved to an external file folder, outside of Newton.) | |
| Publish to My Insurance Dashboard (MID) | See below. |
| Fax | See below. |
| Opens the compose email window with all selected items combined as a single .PDF package. Existing Attachments are listed individually. | |
| Setup | Edits the currently selected printer. |
| Wiki | Opens the Newton Wiki help documentation. |
| Exit | Closes the window. |
(If Attachments are selected, the Print, Preview, and FAX options will be disabled)
Publish to My Insurance Dashboard
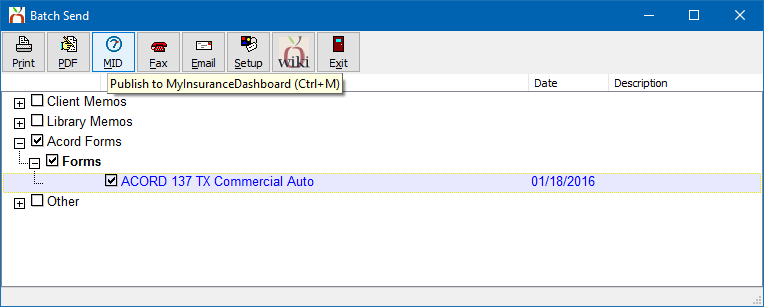
Selecting the MID - Publish to MyInsuranceDashboard option will upload the documents to My Insurance Dashboard as a new .PDF package or as individual attachments.
![]() See: My Insurance Dashboard for more information.
See: My Insurance Dashboard for more information.
Batch send memos and forms to fax
The fax action within batch send can include a fax cover page with the document package. The cover page template can be customized using Memo Writer.
Create fax cover page
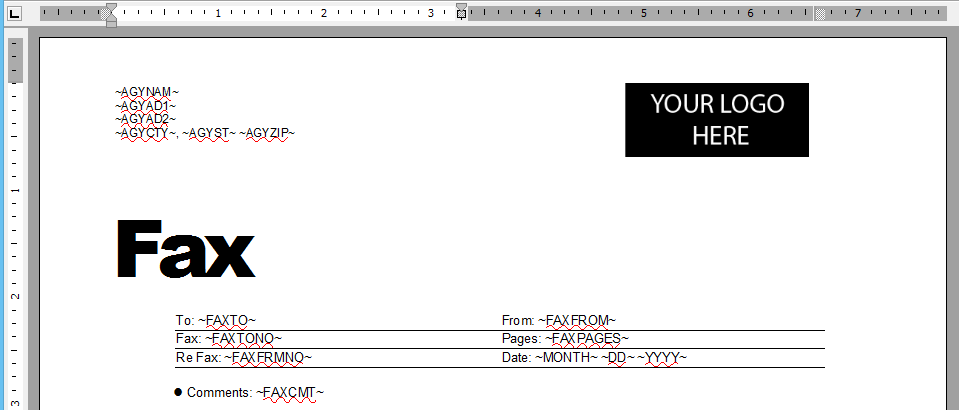
The fax cover page template only needs to be created once. After the template is saved, it can be selected for any fax package.
- Download the Fax Cover template provided here and save it to your Desktop.
- Select Setup -> Memo Writer Letter Library.
- Select File -> Import.
- Browse to your desktop and select the downloaded file FAX_COVER.rtf.
- Select Open. The memo writer screen should now display the cover page.
- Make any desired changes to the template. Select File -> Save As.
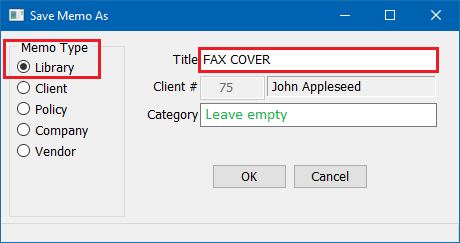
- Select Library and enter a Title e.g. FAX COVER. Leave the Category empty (blank). Select OK.
- Exit Memo Writer.
![]() See: Memo Writer: Sample Memo Templates for more information.
See: Memo Writer: Sample Memo Templates for more information.
Create fax package
- Load a Client on a client tab.
- On the Client Dashboard tab select the (+) next to Policies.
- Left-Click the desired policy number to open the Policy Dashboard.
- Select Batch Send within the top toolbar.
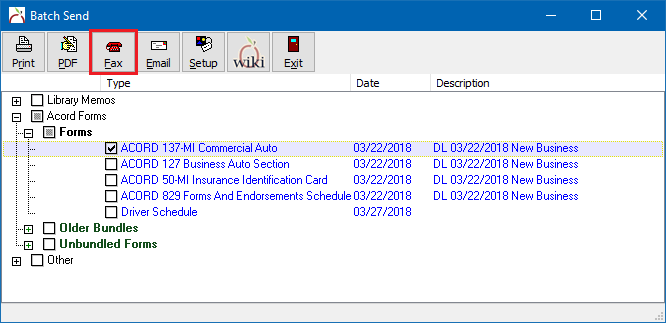
- Select the desired Forms or Memo Writer documents. Do not try to select the cover page. Select the Fax action button.
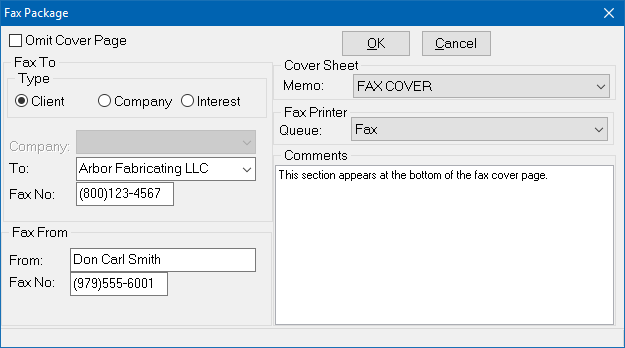
- Confirm the fax package details:
- Select the recipient and confirm the sender details.
- Optionally select the Cover Sheet -> FAX COVER created in the section above. (Select Omit Cover Page to ignore the template.)
- Select the installed Fax Printer. (Every third-party fax printer is designed differently. Some fax printers will open a separate software window when a document is submitted prompting the user to enter the fax to number.)
- Enter any additional details and select OK.
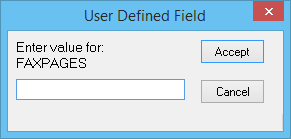
- The User Defined Field will display, prompting for the number of pages. Enter the total if desired, and select Accept.
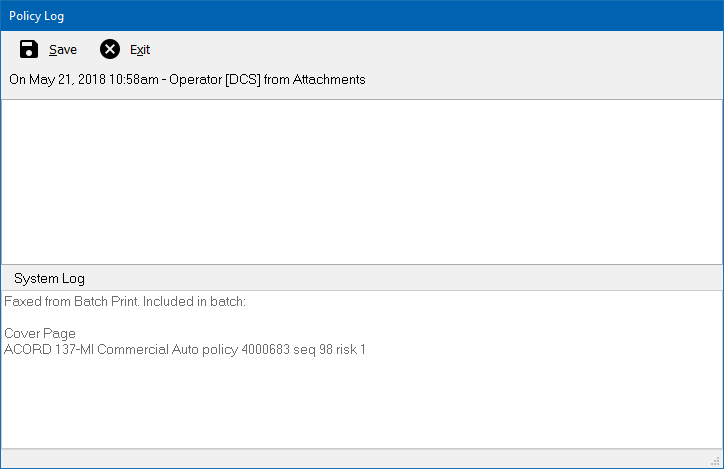
- The fax cover sheet’s merge fields will automatically be processed and the document sent. When prompted, include any additional details for the policy log, and select Save.
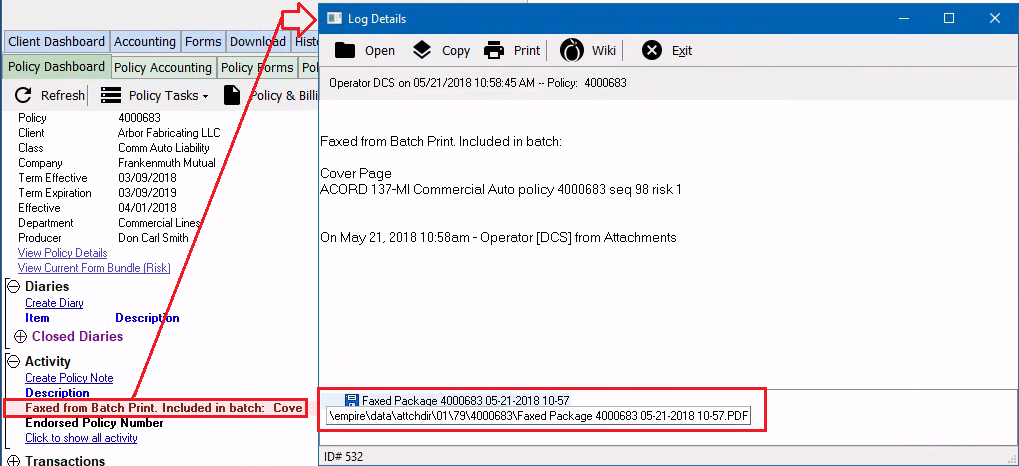
- A PDF file will automatically be saved in Newton showing both the cover sheet and the selected package.
![]() See: Attachments for more information.
See: Attachments for more information.


