Difference between revisions of "Evolution Rating Integration (Capital Rating)"
Jump to navigation
Jump to search
| Line 92: | Line 92: | ||
#From the [[Main Menu and Tab Navigation|Main Menu]], select '''Company''' -> '''Download'''. | #From the [[Main Menu and Tab Navigation|Main Menu]], select '''Company''' -> '''Download'''. | ||
#Select '''Add Files'''. | #Select '''Add Files'''. | ||
| − | #Highlight the NEWTON. | + | #Highlight the NEWTON.AL3 exported file and select '''Open'''. |
#Select to either use an [[Client Profile|existing client, or create a new client]]. | #Select to either use an [[Client Profile|existing client, or create a new client]]. | ||
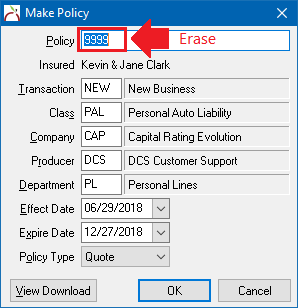
#'''Erase the quote number''' and the system will automatically assign a unique quote number. Optionally a number can be manually assigned. | #'''Erase the quote number''' and the system will automatically assign a unique quote number. Optionally a number can be manually assigned. | ||
Latest revision as of 19:48, 13 September 2018
| Related Pages |
| Related Categories |
The Evolution comparative rating integration is based on standard .AL3 download files.
In order to export files from Newton -> Evolution, your agency must be be downloading policies from your carriers.
Contents
Before You Begin
Rating integration has multiple security options and tiers of access. The upload security options can be configured to limit which clients a specific operator can export out of Newton.
![]() From the Main Menu, select Setup -> Upload Configuration -> Upload Security... and Security System: Other -> Upload Configuration to configure the options.
From the Main Menu, select Setup -> Upload Configuration -> Upload Security... and Security System: Other -> Upload Configuration to configure the options.
Setup
Configure Newton Export to Evolution
- From the Main Menu, select Setup -> Upload Configuration. (If unavailable, Contact Agency Systems support.)
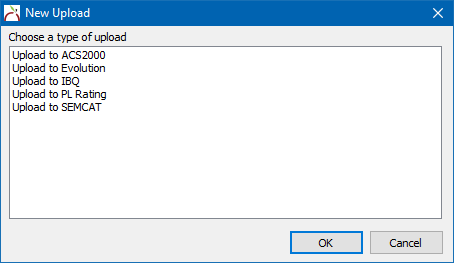
- Select New.
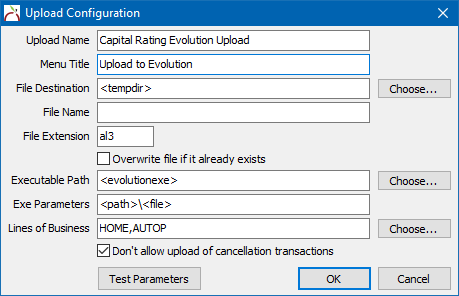
- Select Upload to Evolution.
- Leave all defaults. Select Ok
- Close the Upload System Configuration window.
Configure Evolution Export to Newton
- Open Evolution
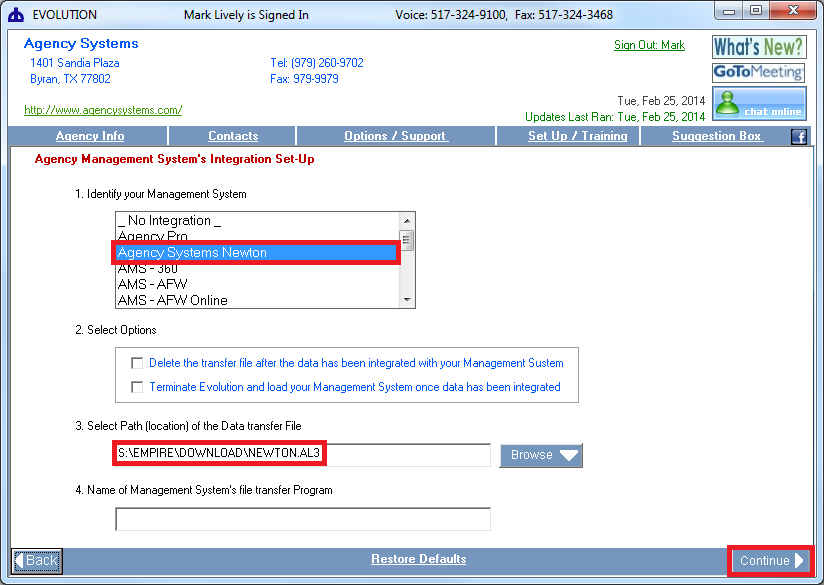
- Select Set Up / Training.
- Select Management System Integration.
- Select Agency Systems Newton. If the option is not listed, you will need to update the Evolution software first.
- Change the drive letter from S: to if needed, and select Continue.
Processing
Export a File from Newton -> Evolution
Only policies previously downloaded from insurance carriers can be exported from Newton to Evolution.
- Configure Newton Export to Evolution.
- Load a Client on a client tab.
- Select the Download tab.
- Left-Click the (+) band to expand the desired policy number.
- Right-Click on the bottom or most-recent downloaded transaction and select Upload to Evolution.
- The Evolution software will automatically start the import process.
Export a File from Evolution -> Newton
Contact Evolution support for additional assistance.
- Configure Evolution Export to Newton.
- Complete a quote in Evolution.
- Select Upload / Integrate -> Agency Systems Newton.
- Evolution creates a file in the S:\EMPIRE\DOWNLOAD folder. (The drive letter can be altered as needed.)
- Switch to the Newton window from any machine in the office.
- From the Main Menu, select Company -> Download.
- Select Add Files.
- Highlight the NEWTON.AL3 exported file and select Open.
- Select to either use an existing client, or create a new client.
- Erase the quote number and the system will automatically assign a unique quote number. Optionally a number can be manually assigned.
- Update the Company Code for the quote if necessary. Select OK.
- The file has now been processed.


