Difference between revisions of "Company Profile"
(updated for 2017) |
|||
| (5 intermediate revisions by 2 users not shown) | |||
| Line 1: | Line 1: | ||
[[Category: Profiles]][[Category:Mailing Labels]] | [[Category: Profiles]][[Category:Mailing Labels]] | ||
<table class="infobox" cellspacing="5" style="background-color: #FFFFFF; width:27em; text-align:left; border-spacing: 2px; line-height:1.5em;"> | <table class="infobox" cellspacing="5" style="background-color: #FFFFFF; width:27em; text-align:left; border-spacing: 2px; line-height:1.5em;"> | ||
| + | <tr> | ||
| + | <td>[[File:Ic_description_black_24dp.png|link=Newton User Guide#Setup Profiles]] Newton User Guide: [[Newton User Guide#Setup Profiles|Setup Profiles]]</td> | ||
| + | </tr> | ||
<tr> | <tr> | ||
<td>[[File:Ic_info_black_24dp.png]] Required Software Version: [[:Category:Release Notes|March 2017]]</td> | <td>[[File:Ic_info_black_24dp.png]] Required Software Version: [[:Category:Release Notes|March 2017]]</td> | ||
| Line 57: | Line 60: | ||
#:[[File:Ic_info_black_24dp.png]] Default commission by [[Class Profile|class code]] is also [[#Commission Percent (%)|available in the section below]]. | #:[[File:Ic_info_black_24dp.png]] Default commission by [[Class Profile|class code]] is also [[#Commission Percent (%)|available in the section below]]. | ||
#Select the default '''Billing Method''' ([[Agency Bill]] or [[Direct Bill]]) used for [[Invoice: Create An Invoice|invoices created]] with [[Policy & Billing]]. | #Select the default '''Billing Method''' ([[Agency Bill]] or [[Direct Bill]]) used for [[Invoice: Create An Invoice|invoices created]] with [[Policy & Billing]]. | ||
| − | #Enter the '''NAIC Code''' that will display on [[:Category: | + | #Enter the '''NAIC Code''' that will display on [[:Category: Forms|ACORD Forms]]. ''([[Configure NAIC Codes|Download Integration]] does not reference this value)'' |
| − | #Enter the '''NY ID Code''' as needed. (See [[New York Driver ID Card Configuration]].) | + | #Enter the '''NY ID Code''' as needed. (See [[Forms: New York Driver ID Card Configuration]].) |
#Enter the '''Parent Company''' if the new company is a subsidiary. | #Enter the '''Parent Company''' if the new company is a subsidiary. | ||
#:[[File:Ic_info_black_24dp.png]] See [[#Parent Company|the Parent Company section below]] for more information. | #:[[File:Ic_info_black_24dp.png]] See [[#Parent Company|the Parent Company section below]] for more information. | ||
| − | #Select the '''Addresses''' tab to enter the Accounting ([[:Category:Checks|Checks]]) and Underwriting ([[:Category: | + | #Select the '''Addresses''' tab to enter the Accounting ([[:Category:Checks|Checks]]) and Underwriting ([[:Category: Forms|ACORD Forms]]) addresses for the company. |
#Enter the address information and press '''<TAB>''' to step through the address fields. | #Enter the address information and press '''<TAB>''' to step through the address fields. | ||
#Select '''Save'''. (Requires [[Security System|Security System: Profiles -> Company -> Entry]] access.) | #Select '''Save'''. (Requires [[Security System|Security System: Profiles -> Company -> Entry]] access.) | ||
#Select the '''Contacts''' tab. | #Select the '''Contacts''' tab. | ||
| − | #Select '''Create New Contact'''. Contacts saved to the company are available on the [[Company Tab]], the [[Email | + | #Select '''Create New Contact'''. Contacts saved to the company are available on the [[Company Tab]], the [[Email|compose email window]] and more. |
#Select the '''Web''' tab and enter the '''Website''' address. (Optionally configure [[Policy View]]). | #Select the '''Web''' tab and enter the '''Website''' address. (Optionally configure [[Policy View]]). | ||
#Select '''Exit'''. | #Select '''Exit'''. | ||
| Line 122: | Line 125: | ||
=== Parent Company === | === Parent Company === | ||
| − | Individual company codes in Newton can now be assigned to a Parent Company. The '''[[Company Tab]]''' -> '''Policies''' list for a parent company will list all policies assigned to the parent company, '''and all policies assigned to any subsidiary'''. | + | Individual company codes in Newton can now be assigned to a Parent Company. |
| + | |||
| + | [[File:Ic_info_black_24dp.png]] The '''[[Company Tab]]''' -> '''Policies''' list for a parent company will list all policies assigned to the parent company, '''and all policies assigned to any subsidiary'''. | ||
| − | The '''[[Management Tab]]''' -> '''Company Tab''' will also summarize all active polices by Parent Company. | + | The '''[[Management Tab]]''' -> '''Company Tab''' will also summarize all active polices by Parent Company. |
Both tabs retain the option to also display only policies assigned to specific company codes. | Both tabs retain the option to also display only policies assigned to specific company codes. | ||
| Line 147: | Line 152: | ||
#:[[File:Setup-company-parentwithsub.png]] | #:[[File:Setup-company-parentwithsub.png]] | ||
#Select '''Exit'''. | #Select '''Exit'''. | ||
| + | |||
| + | [[File:Ic_info_black_24dp.png]] See: [[MyNewtonCampus.com_Add-ons#Profile_Reports:_Master.2FSub_Company_Listing|Profile Reports: Master/Sub Company Listing]] for a complete printable list for '''all companies'''. | ||
Latest revision as of 18:24, 17 May 2018
| Related Pages |
| Related Categories |
Every policy and invoice in Newton is assigned a company code. The company profile allows you to specify default commission percentages, billing method (Agency Bill or Direct Bill), and website information by company.
Company refers to an insurance company, or policy-related finance company used with policies and insurance accounting. For administrative tasks, such as Vouchers, see the Vendor Profile.
Contents
Before You Begin
Access to view the Company Profile requires the current operator to have Security System: Profiles -> Company -> View access.
![]() See: Security System for more information.
See: Security System for more information.
Create a Company
Before creating a new company code, first verify a similar code does not already exist. Select Print List to preview a report of all existing company codes.
The name assigned to a company code can be modified, without creating a new company profile.
- From the Main Menu, select Setup -> Company.
- Select Create New.
- Enter the desired three digit number. Capital letters and numbers are both available. (Examples: AET, PR1, A01)
 A company code cannot match an existing vendor code.
- Enter the name for the company. This name will appear in drop-down selection lists when entering data, or running reports.
- Press <TAB> to populate the Alpha Code.
- Enter a default Agency Commission amount for invoice transactions.
 Default commission by class code is also available in the section below.
- Select the default Billing Method (Agency Bill or Direct Bill) used for invoices created with Policy & Billing.
- Enter the NAIC Code that will display on ACORD Forms. (Download Integration does not reference this value)
- Enter the NY ID Code as needed. (See Forms: New York Driver ID Card Configuration.)
- Enter the Parent Company if the new company is a subsidiary.
 See the Parent Company section below for more information.
- Select the Addresses tab to enter the Accounting (Checks) and Underwriting (ACORD Forms) addresses for the company.
- Enter the address information and press <TAB> to step through the address fields.
- Select Save. (Requires Security System: Profiles -> Company -> Entry access.)
- Select the Contacts tab.
- Select Create New Contact. Contacts saved to the company are available on the Company Tab, the compose email window and more.
- Select the Web tab and enter the Website address. (Optionally configure Policy View).
- Select Exit.
Edit a Company
- From the Main Menu, select Setup -> Company.
- Select Find.
- Select the desired company number and select OK.
- Enter or modify any desired values. (Example: Name, Parent Company, Policy View, commission, active status).
- Select Save. (Requires Security System: Profiles -> Company-> Edit access.)
- Select Exit.
Delete a Company
Deleting a company should not be done if the company code has ever been used for any policy or accounting transactions. Instead, Edit the Company and change the Active Status to Inactive. Inactive company codes do not display on the company search lists, and cannot be used when creating new invoices.
- From the Main Menu, select Setup -> Company.
- Select Find.
- Select the desired company number and select OK.
- Select Delete. (Requires Security System: Profiles -> Company -> Global access.)
- Confirm Yes.
- Select Exit.
Company Profile Screen
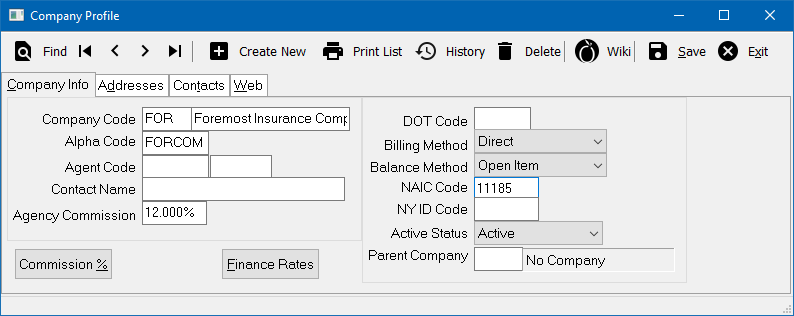
From the Main Menu, select Setup -> Company.
- Company Profile Toolbar
- Find: - Find a company code.
- First: - Skip to the first company.
- Previous: - Skip to the previous company.
- Next: - Skip to the next company.
- Last: - Skip to the last company.
- Create New: - Create a new company.
- Print List: - Print a list of company profiles, or mailing labels for all companies.
- History: - View company profile history.
- Delete: - Delete company profile.
- Wiki: - Wiki Help Documentation.
- Save: - Save the current profile item. (ALT + S)
- Exit: - Exit the profile windows. (ALT + X)
Commission Percent (%)
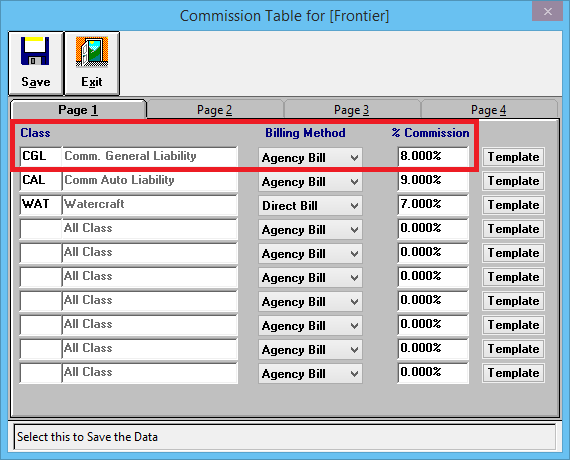
Agency commission tables for each Company Profile can be configured by individual lines of business (Class Code).
The default company commission rate for a company code will pre-fill for the invoice line when an invoice is created using Policy & Billing.
- From the Main Menu, select Setup -> Company.
- Select Find.
- Select the desired company number and select OK.
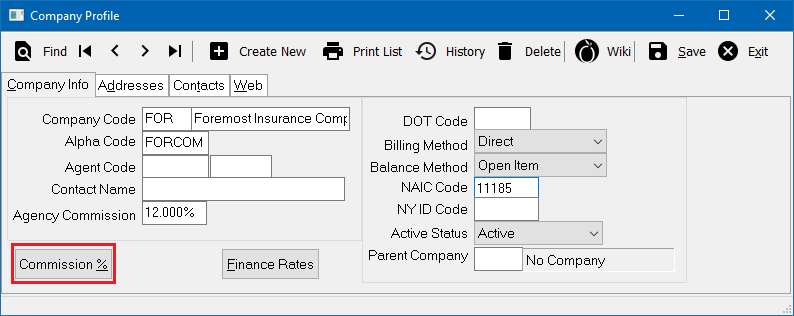
- Select the Commission % button.
- Enter the Class Code or enter * to search.
- Select the Billing Method (Agency Bill or Direct Bill), and enter the default Commission %.
- Repeat for each desired class code. (You cannot configure the same Class Code as both Agency Bill and Direct Bill).
- When finished, select Save, then Exit, then close the Company Profile window.
Parent Company
Individual company codes in Newton can now be assigned to a Parent Company.
![]() The Company Tab -> Policies list for a parent company will list all policies assigned to the parent company, and all policies assigned to any subsidiary.
The Company Tab -> Policies list for a parent company will list all policies assigned to the parent company, and all policies assigned to any subsidiary.
The Management Tab -> Company Tab will also summarize all active polices by Parent Company.
Both tabs retain the option to also display only policies assigned to specific company codes.
Assign a Parent Company
- From the Main Menu, select Setup -> Company.
- Select Find.
- Select the desired subsidiary company number and select OK.
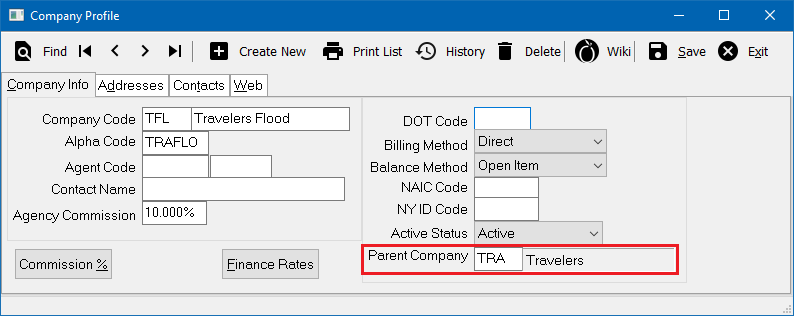
- Enter the primary company code in the Parent Company field. Enter * to search.
- Select Save. (Requires Security System: Profiles -> Company-> Edit access.)
- Repeat this process to assign each subsidiary.
- When finished, select Exit.
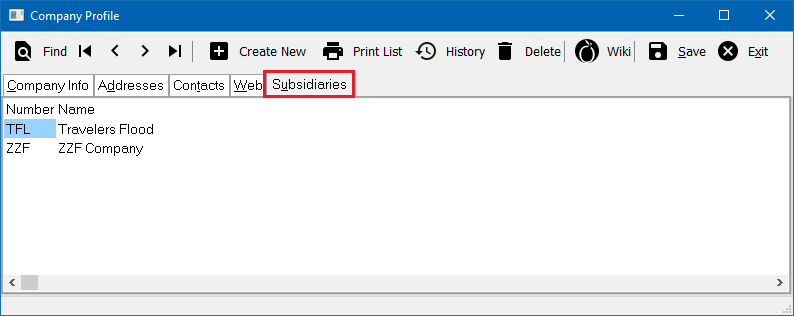
The Parent Company field is disabled if the current company code has subsidiary companies assigned. See the next section to list the assigned sub-companies.
List All Subsidiaries Assigned to a Parent Company
- From the Main Menu, select Setup -> Company.
- Select Find.
- Select the desired parent company number and select OK.
- Select the Subsidiaries tab. All assigned subsidiaries will be displayed.
- Select Exit.
![]() See: Profile Reports: Master/Sub Company Listing for a complete printable list for all companies.
See: Profile Reports: Master/Sub Company Listing for a complete printable list for all companies.
