Difference between revisions of "Vendor Tab"
(initial save) |
m |
||
| (14 intermediate revisions by 2 users not shown) | |||
| Line 2: | Line 2: | ||
<table class="infobox" cellspacing="5" style="background-color: #FFFFFF; width:27em; text-align:left; border-spacing: 2px; line-height:1.5em;"> | <table class="infobox" cellspacing="5" style="background-color: #FFFFFF; width:27em; text-align:left; border-spacing: 2px; line-height:1.5em;"> | ||
<tr> | <tr> | ||
| − | <td>[[File: | + | <td>[[File:Ic_description_black_24dp.png|link=Newton User Guide#Newton Interface Overview]] Newton User Guide: [[Newton User Guide#Newton Interface Overview|Newton Interface Overview]]</td> |
</tr> | </tr> | ||
| + | <tr> | ||
| + | <td>[[File:Ic_info_black_24dp.png]] Required Software Version: [[:Category:Release Notes|Spring 2017]]</td> | ||
| + | </tr> | ||
| + | <tr> | ||
| + | <td>[[File: Ic_settings_backup_restore_black_24dp.png]] Legacy Instructions Available: [http://wiki.agencysystems.com/mediawiki/index.php?title=Vendor_Tab&oldid=3506 Click Here]</td> | ||
| + | </tr> | ||
| + | |||
<tr style="background-color: #bdbdbd; text-align: center; font-weight:bold;"> | <tr style="background-color: #bdbdbd; text-align: center; font-weight:bold;"> | ||
<td>Related Pages</td> | <td>Related Pages</td> | ||
| Line 10: | Line 17: | ||
<td> | <td> | ||
<ul> | <ul> | ||
| + | <li>[[Main Menu and Tab Navigation]]</li> | ||
<li>[[Management Tab]]</li> | <li>[[Management Tab]]</li> | ||
<li>[[Vendor Profile]]</li> | <li>[[Vendor Profile]]</li> | ||
| + | <li>[[Vendor Tab: Vendor Accounting]]</li> | ||
<li>[[Voucher Transaction]]</li> | <li>[[Voucher Transaction]]</li> | ||
| − | |||
| − | |||
</ul> | </ul> | ||
</td> | </td> | ||
| Line 26: | Line 33: | ||
<li>[[:Category:Checks|Checks]]</li> | <li>[[:Category:Checks|Checks]]</li> | ||
<li>[[:Category:Payables|Payables]]</li> | <li>[[:Category:Payables|Payables]]</li> | ||
| − | <li>[[:Category:Training Guides]]</li> | + | <li>[[:Category:Training Guides|Training Guides]]</li> |
</ul> | </ul> | ||
</td> | </td> | ||
| Line 32: | Line 39: | ||
</table> | </table> | ||
| − | The vendor tab has a [[#Vendor Tab: Dashboard | + | This page provides an overview of the Vendor Tab that displays by selecting '''Vendor''' -> '''Add Vendor Tab''' from the [[Main Menu and Tab Navigation|Main Menu]]. |
| + | |||
| + | The vendor tab has a secured [[#Vendor Tab: Vendor Accounting|Vendor Accounting tab]] which lists [[Voucher Transaction|Vouchers]], and vendor checks. | ||
| + | |||
| + | The [[Main Menu and Tab Navigation|Main Menu]], [[User Dashboard Tab]], [[Client Tab]], [[Policy Dashboard]], [[Policy & Billing]], [[Company Tab]], Vendor Tab, and [[Management Tab]] are the primary interfaces and dashboards within Newton. | ||
| + | |||
| + | == Find a Vendor == | ||
| + | A Vendor Tab is created by selecting '''Vendor''' -> '''Add Vendor Tab''' from the [[Main Menu and Tab Navigation|Main Menu]]. | ||
| + | |||
| + | '''Multiple vendor tabs can be opened at the same time''', similar to tabs in a browser. When an operator is finished with a vendor, | ||
| + | the current tab can be switched to a new vendor profile, or the vendor tab can be closed entirely. | ||
| + | |||
| + | [[File:Vendortab-full.png]] | ||
| − | |||
| − | |||
| − | + | The vendor drop list provides a quick search feature which automatically searches vendor names or codes for partial or complete matches. | |
| + | Select the drop-down box, enter the [[Vendor Profile|vendor code or name]] in the drop-down field and press '''<Enter>''' or '''<TAB>''' when finished. | ||
| − | + | By default, inactive vendors are not included in the drop-down list. To load an inactive vendor, first select the "'''Include Inactive Vendors'''" check box. | |
| − | + | [[File:Vendortab-summarypanel-inactive.png]] | |
| − | == Vendor | + | == Create a Vendor == |
| − | [[ | + | To enter a [[Vendor Profile|new vendor]] into Newton, you should always [[#Find a Vendor|search existing vendors first]] to avoid creating duplicates. Remember to include inactive vendors. |
| − | + | [[File:Ic_info_black_24dp.png]] For more information, see: [[Vendor Profile]]. | |
| − | |||
| − | |||
| − | |||
| − | |||
| − | |||
| − | |||
| − | |||
| − | |||
| − | |||
| − | |||
| − | |||
| − | |||
| − | |||
| − | == Vendor Tab | + | == Vendor Tab Interface == |
| − | The vendor | + | The Vendor tab contains vendor [[#Vendor Tab: Summary Panel|information such as contact numbers]], and data tabs for different data types such as diaries, emails, attachments, vouchers and more. |
| − | + | The main menu is not specific to the Vendor Tab, displayed at the top of the Newton window. | |
| − | The vendor details | + | [[File:Newton-mainmenu.png]] |
| + | |||
| + | [[File:Ic_info_black_24dp.png]] See: [[Main Menu and Tab Navigation]] for more information. | ||
| + | |||
| + | === Vendor Tab: Summary Panel === | ||
| + | The vendor summary panel is below the main menu. The summary panel includes the vendor selection drop-down box, and vendor details. | ||
| + | |||
| + | [[File:Vendortab-summarypanel.png]] | ||
| + | |||
| + | ;Vendor Details | ||
*Vendor name and number. | *Vendor name and number. | ||
*Vendor email address. | *Vendor email address. | ||
| − | * | + | *Both vendor phone and fax numbers. |
| − | |||
*Vendor Address. | *Vendor Address. | ||
| − | === Vendor Tab: Summary Panel - | + | [[File:Vendortab-summarypanel-icons.png]] |
| − | + | ||
| + | ;Action Icons | ||
| + | *'''Edit''': Edit Vendor - Edits the current [[Vendor Profile]]. | ||
| + | *'''Globe''': View Website - Opens the [[Vendor Profile|vendor website]] in a browser. | ||
| + | *'''Printer''': Dymo - Send [[Vendor Profile|vendor address]] to a [[DYMO Printer Integration|Dymo label printer]]. | ||
| + | *'''Street Sign''': View Map - Opens a map to the [[Vendor Profile|vendor address]] in a browser. | ||
| + | *'''House''': Reload Tab - Clears any filters and sub-tabs and reloads the current vendor tab. | ||
| + | *'''Up Arrow''': Pop Out Tab - Opens the current tab as a window. Select again to reload the vendor window as a vendor tab. | ||
| + | *'''Exit''': Exit Tab - Closes the current tab. | ||
| + | |||
| + | == Vendor Tab: Vendor Dashboard == | ||
| + | After [[#Find a Vendor|searching for and loading a vendor]], the Vendor Dashboard tab is displayed below the [[#Vendor Tab: Summary Panel|Summary Panel]]. | ||
| + | |||
| + | [[File:Vendortab-dashboard.png]] | ||
| + | |||
| + | === Vendor Dashboard Toolbar === | ||
| + | [[File:Vendortab-dashboard-toolbar.png]] | ||
| + | |||
| + | ;Vendor Dashboard Toolbar | ||
| + | *'''Refresh:''' Reload the data on the selected tab. To reload the entire vendor, [[#Vendor Tab: Summary Panel|select the house icon within the summary panel]]. | ||
| + | *'''Find Text:''' Jump to text on the page. | ||
| + | *'''Create Item:''' Menu of vendor action items in addition to the '''Create Item''' links at the beginning of expanded data bands (+). | ||
| + | *'''Activity Search:''' Find and the filter the email and attachment data bands for a specific word or value. | ||
| + | |||
| + | === Notes === | ||
| + | Permanent notes that cannot be modified, and can be optionally configured as pop up notes. | ||
| + | |||
| + | === Diaries === | ||
| + | Select '''Create Diary''' from the vendor tab to create a diary that is only associated with the vendor, and assigned to an [[User Dashboard Tab|operator's dashboard]]. | ||
| + | |||
| + | [[File:Ic_info_black_24dp.png]] For additional information, see: [[Diary]]. | ||
| + | |||
| + | === Memos === | ||
| + | Memos are word-processing documents that provide the ability to [[Memowriter: Create A Form Letter Template|create form letter templates]] that can be used to quickly merge data fields. | ||
| + | |||
| + | [[File:Vendortab-memo-saveas.png]] | ||
| + | |||
| + | |||
| + | [[File:Ic_info_black_24dp.png]] For additional information, see: [[Memowriter]]. | ||
| + | |||
| + | === Emails=== | ||
| + | Click '''Emails''' to show e-mails sent from or attached to Newton. To attach an e-mail to a vendor, [[Email|drag and drop it from Outlook]] onto the vendor dashboard. | ||
| + | |||
| + | [[File:Companytab-email.png]] | ||
| + | |||
| + | Only emails within the default filtered date range are initially displayed. Select '''Click to show all Emails''' to remove the date filter. | ||
| + | ''(See [[Preferences#User Options|Setup -> Preferences -> User Options -> Default Band Date Range]] to change the value)'' | ||
| + | |||
| + | [[File:Ic_info_black_24dp.png]] For additional information, see: [[Email]]. | ||
| + | |||
| + | === Attachments === | ||
| + | Vendor tab attachments can be created through drag+drop. | ||
| + | |||
| + | Click the (+) next to '''Attachments''' to see attachments for vendor. Click '''Add Attachment''' to add an attachment by browsing, or simply drag and drop a file or photo onto the vendor dashboard. | ||
| + | |||
| + | [[File:Vendortab-attachments.PNG]] | ||
| + | |||
| + | Only attachments within the default filtered date range are initially displayed. Select '''Click to show all''' to remove the date filter. | ||
| + | ''(See [[Preferences#User Options|Setup -> Preferences -> User Options -> Default Band Date Range]] to change the value)'' | ||
| + | |||
| + | [[File:Ic_info_black_24dp.png]] For additional information, see: [[Attachments]]. | ||
| + | |||
| + | ==== Secure Attachments ==== | ||
| + | All [[Producer Profile|operators]] with access to the Vendor tab can view vendor attachments. | ||
| − | [[ | + | Vendor tab attachments can be '''converted to secure attachments''' using a right-click menu. After the conversion, the attachment will be removed from the vendor tab, and only available from the [[Management Tab]]. |
| − | + | [[File:Vendortab-attachments-convert.PNG]] | |
| − | |||
| − | |||
| − | |||
| − | |||
| − | |||
| − | |||
| − | + | [[File:Ic_info_black_24dp.png]] For additional information, see: [[Management Tab]]. | |
| − | |||
| − | :[[ | + | == Vendor Tab: Vendor Accounting == |
| + | After [[#Find a Vendor|searching for and loading a vendor]], select the '''Vendor Accounting''' tab displayed below the [[Vendor Tab#Vendor Tab: Summary Panel|Summary Panel]]. | ||
| − | + | [[File:Vendor-accounting-toolbar.png]] | |
| − | :Vendor | ||
| − | |||
| − | |||
| − | |||
| − | |||
| − | |||
| − | + | The secure vendor accounting tab displays [[Voucher Transaction|vouchers]] and check transactions previously created for the selected vendor. | |
| − | + | Access to the vendor accounting tab is controlled by a number of security settings. If the [[Producer Profile|current operator]] does not have access to either vouchers or checks, the vendor accounting tab '''will not be visible'''. | |
| − | + | [[File:Ic_info_black_24dp.png]] For more information, see: [[Vendor Tab: Vendor Accounting]] | |
Latest revision as of 21:52, 24 May 2018
| Related Pages |
| Related Categories |
This page provides an overview of the Vendor Tab that displays by selecting Vendor -> Add Vendor Tab from the Main Menu.
The vendor tab has a secured Vendor Accounting tab which lists Vouchers, and vendor checks.
The Main Menu, User Dashboard Tab, Client Tab, Policy Dashboard, Policy & Billing, Company Tab, Vendor Tab, and Management Tab are the primary interfaces and dashboards within Newton.
Contents
Find a Vendor
A Vendor Tab is created by selecting Vendor -> Add Vendor Tab from the Main Menu.
Multiple vendor tabs can be opened at the same time, similar to tabs in a browser. When an operator is finished with a vendor, the current tab can be switched to a new vendor profile, or the vendor tab can be closed entirely.
The vendor drop list provides a quick search feature which automatically searches vendor names or codes for partial or complete matches.
Select the drop-down box, enter the vendor code or name in the drop-down field and press <Enter> or <TAB> when finished.
By default, inactive vendors are not included in the drop-down list. To load an inactive vendor, first select the "Include Inactive Vendors" check box.
Create a Vendor
To enter a new vendor into Newton, you should always search existing vendors first to avoid creating duplicates. Remember to include inactive vendors.
![]() For more information, see: Vendor Profile.
For more information, see: Vendor Profile.
Vendor Tab Interface
The Vendor tab contains vendor information such as contact numbers, and data tabs for different data types such as diaries, emails, attachments, vouchers and more.
The main menu is not specific to the Vendor Tab, displayed at the top of the Newton window.
![]() See: Main Menu and Tab Navigation for more information.
See: Main Menu and Tab Navigation for more information.
Vendor Tab: Summary Panel
The vendor summary panel is below the main menu. The summary panel includes the vendor selection drop-down box, and vendor details.
- Vendor Details
- Vendor name and number.
- Vendor email address.
- Both vendor phone and fax numbers.
- Vendor Address.
- Action Icons
- Edit: Edit Vendor - Edits the current Vendor Profile.
- Globe: View Website - Opens the vendor website in a browser.
- Printer: Dymo - Send vendor address to a Dymo label printer.
- Street Sign: View Map - Opens a map to the vendor address in a browser.
- House: Reload Tab - Clears any filters and sub-tabs and reloads the current vendor tab.
- Up Arrow: Pop Out Tab - Opens the current tab as a window. Select again to reload the vendor window as a vendor tab.
- Exit: Exit Tab - Closes the current tab.
Vendor Tab: Vendor Dashboard
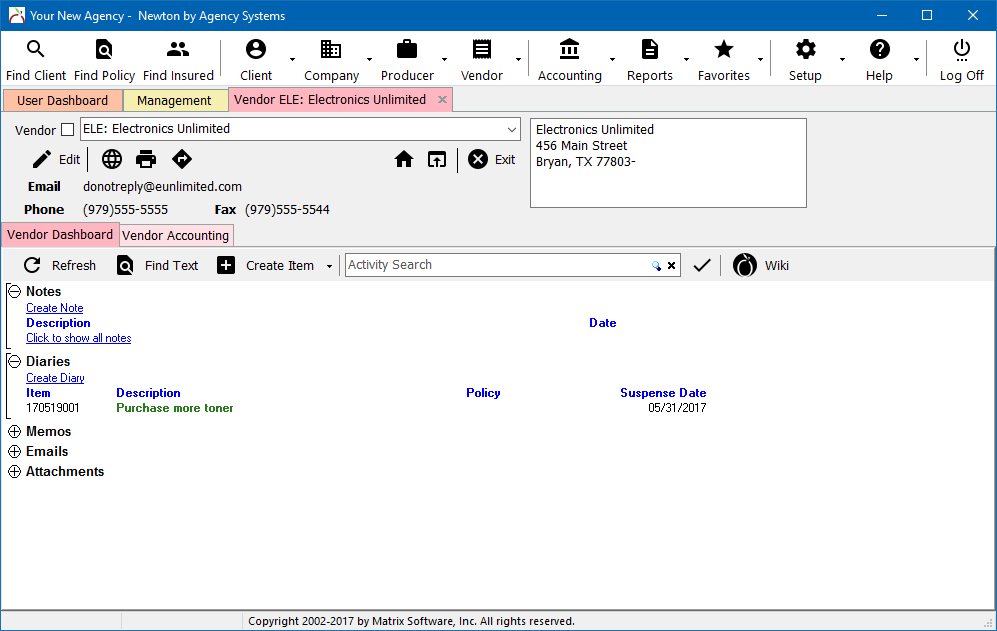
After searching for and loading a vendor, the Vendor Dashboard tab is displayed below the Summary Panel.
Vendor Dashboard Toolbar
- Vendor Dashboard Toolbar
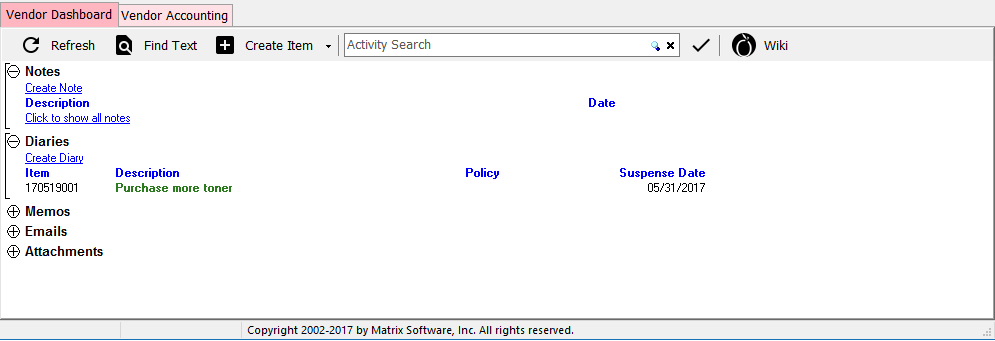
- Refresh: Reload the data on the selected tab. To reload the entire vendor, select the house icon within the summary panel.
- Find Text: Jump to text on the page.
- Create Item: Menu of vendor action items in addition to the Create Item links at the beginning of expanded data bands (+).
- Activity Search: Find and the filter the email and attachment data bands for a specific word or value.
Notes
Permanent notes that cannot be modified, and can be optionally configured as pop up notes.
Diaries
Select Create Diary from the vendor tab to create a diary that is only associated with the vendor, and assigned to an operator's dashboard.
![]() For additional information, see: Diary.
For additional information, see: Diary.
Memos
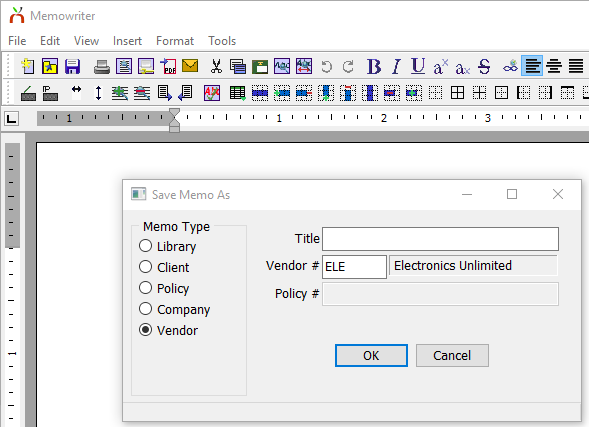
Memos are word-processing documents that provide the ability to create form letter templates that can be used to quickly merge data fields.
![]() For additional information, see: Memowriter.
For additional information, see: Memowriter.
Emails
Click Emails to show e-mails sent from or attached to Newton. To attach an e-mail to a vendor, drag and drop it from Outlook onto the vendor dashboard.
Only emails within the default filtered date range are initially displayed. Select Click to show all Emails to remove the date filter. (See Setup -> Preferences -> User Options -> Default Band Date Range to change the value)
![]() For additional information, see: Email.
For additional information, see: Email.
Attachments
Vendor tab attachments can be created through drag+drop.
Click the (+) next to Attachments to see attachments for vendor. Click Add Attachment to add an attachment by browsing, or simply drag and drop a file or photo onto the vendor dashboard.
Only attachments within the default filtered date range are initially displayed. Select Click to show all to remove the date filter. (See Setup -> Preferences -> User Options -> Default Band Date Range to change the value)
![]() For additional information, see: Attachments.
For additional information, see: Attachments.
Secure Attachments
All operators with access to the Vendor tab can view vendor attachments.
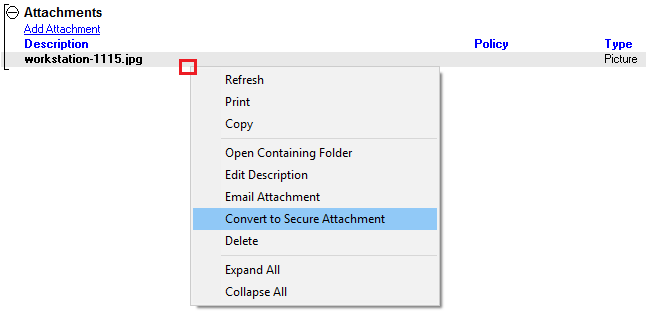
Vendor tab attachments can be converted to secure attachments using a right-click menu. After the conversion, the attachment will be removed from the vendor tab, and only available from the Management Tab.
![]() For additional information, see: Management Tab.
For additional information, see: Management Tab.
Vendor Tab: Vendor Accounting
After searching for and loading a vendor, select the Vendor Accounting tab displayed below the Summary Panel.
The secure vendor accounting tab displays vouchers and check transactions previously created for the selected vendor.
Access to the vendor accounting tab is controlled by a number of security settings. If the current operator does not have access to either vouchers or checks, the vendor accounting tab will not be visible.
![]() For more information, see: Vendor Tab: Vendor Accounting
For more information, see: Vendor Tab: Vendor Accounting


