Difference between revisions of "Invoice: Create An Invoice - Premium Finance"
(→Record The Client's Down Payment - Full Amount Collected: added payment section) |
(updated link as internal) |
||
| Line 36: | Line 36: | ||
*See [[#Full Amount Collected|Full Amount Collected]] if the full amount is received by the [[Agency Profile|agency]], with the finance company sending the money to the [[Agency Profile|agency]] instead of the [[Company Profile|insuring/billing company]] direct. | *See [[#Full Amount Collected|Full Amount Collected]] if the full amount is received by the [[Agency Profile|agency]], with the finance company sending the money to the [[Agency Profile|agency]] instead of the [[Company Profile|insuring/billing company]] direct. | ||
| − | For return premium invoices, see [ | + | For return premium invoices, see [[Invoice: Create An Invoice - Premium Finance: Return Premium To Finance Company]]. |
== Down Payment Only Collected == | == Down Payment Only Collected == | ||
Revision as of 15:33, 22 December 2014
| Related Pages |
| Related Categories |
Invoices created in Agency Systems can have up to seven lines. For premium finance Agency Bill invoices, one of the lines is entered as a credit (-), reducing the client receivable balance.
The method used to create the premium finance invoice line is determined by how much of the total premium is passed through the agency.
- See Down Payment Only Collected if only the down payment is received from the client to the agency, and the finance company will pay the insuring/billing company direct.
- See Full Amount Collected if the full amount is received by the agency, with the finance company sending the money to the agency instead of the insuring/billing company direct.
For return premium invoices, see Invoice: Create An Invoice - Premium Finance: Return Premium To Finance Company.
Down Payment Only Collected
The procedure below should be used when posting a premium financed invoiced and the retail agency is responsible for collecting the down payment from the client.
If the Agency will be collecting the down payment and the amount financed from the premium finance company, see Full Amount Collected below.
Create An Invoice: Premium Finance - Down Payment Only Collected
Example: $1000 policy premium with $300.00 down payment from the client and $700.00 as the amount financed.
- Load the Client on one of the four Client Tabs.
- Select the Policy listed under Active Policies. (This will open Policy Express)
- Select Create Item -> Invoice. (This will open Express Billing)
- Verify the Bill Method is Agency Bill.
- Select Next to open line 1 of the invoice. Enter the following for line 1:
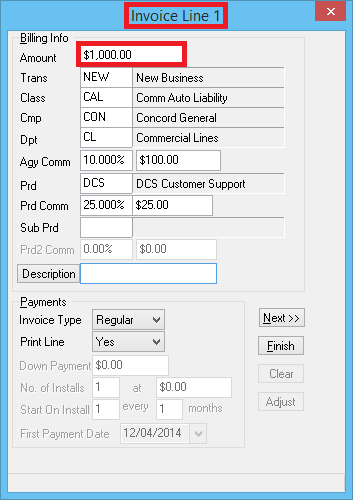
- Enter the policy premium Amount. (From example: $1000.00)
- Verify or change any of the default values, leaving the Company Code set to the Insuring/Billing company. (The transaction, class, company, department and producer will all default from the policy.)
- Enter the Agency Commission and Producer Commission if the defaults are not correct. (The Agency Commission will default from the Company Profile. The Producer Commission will default from the Producer Profile.)
- Select Next to open line 2 of the invoice. Enter the following for line 2:
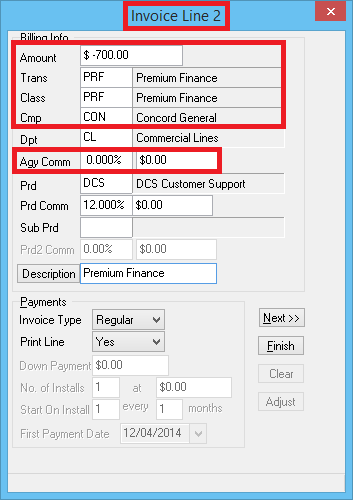
- Enter the amount financed as a credit. (From Example: $-700.00)
- Enter the Transaction Code for Premium Finance.
- Enter the Class Code for Premium Finance.
- Leave the Company Code as the Insuring/Billing company. Do not enter the premium finance company code.
- Verify the Agency Commission is $0.00.
- Select Finish then Yes to save.
- Select Finish or Save to finalize the invoice. This action will generate an invoice number, and create all of the general ledger receivables and payables for the invoice.
Do not close Express Billing. To enter the down payment, see Record The Client's Down Payment below.
For more information on creating invoices, see: Invoice: Create An Invoice.
Record The Client's Down Payment - Down Payment Only Collected
First, follow the steps above to create the invoice, leaving Express Billing open.
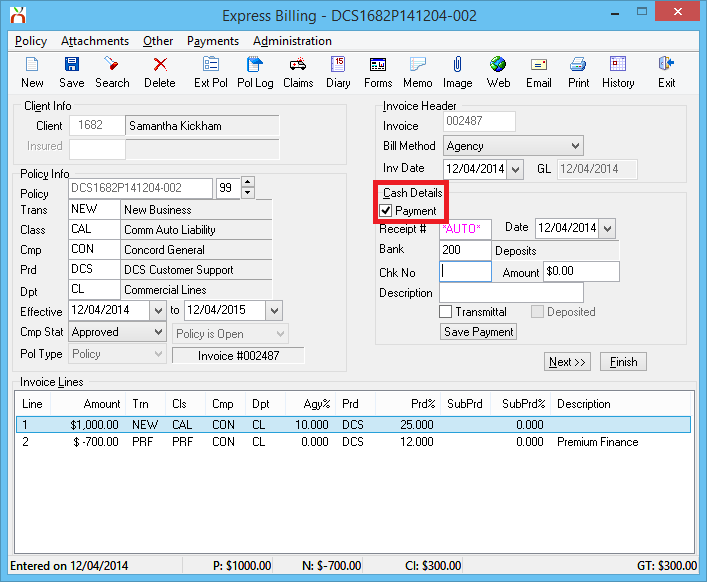
- From Express Billing select Payment.
- Enter the Date the cash was received.
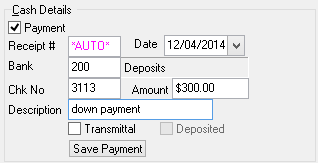
- Verify the Bank Code.
- Enter the client's Check Number. (Press <F2> for cash)
- Enter the Amount received. (From Example: $300.00)
- Optionally, enter a Description.
- Select Save Payment.
- Select Yes or No to print.
- Exit the Express Billing window.
For more information on taking client payments, see: Client Payment: Agency Bill Cash
Full Amount Collected
The procedure below should be used when posting a premium financed invoiced and the retail agency is responsible for collecting the down payment from the client and the amount financed from the premium finance company.
If the Agency will only be collecting the down payment, see Down Payment Only Collected above.
Create An Invoice: Premium Finance - Full Amount Collected
Example: $1000 policy premium with $300.00 down payment from the client and $700.00 as the amount financed.
- Load the Client on one of the four Client Tabs.
- Select the Policy listed under Active Policies. (This will open Policy Express)
- Select Create Item -> Invoice. (This will open Express Billing)
- Verify the Bill Method is Agency Bill.
- Select Next to open line 1 of the invoice. Enter the following for line 1:
- Enter the policy premium Amount. (From example: $1000.00)
- Verify or change any of the default values, leaving the Company Code set to the Insuring/Billing company. (The transaction, class, company, department and producer will all default from the policy.)
- Enter the Agency Commission and Producer Commission if the defaults are not correct. (The Agency Commission will default from the Company Profile. The Producer Commission will default from the Producer Profile.)
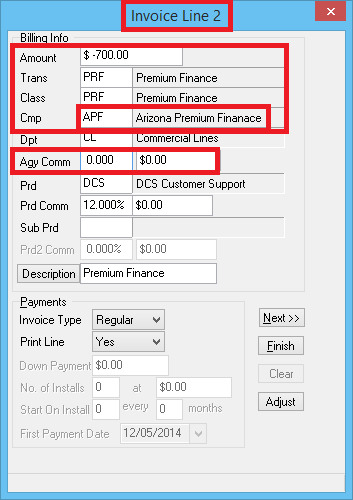
- Select Next to open line 2 of the invoice. Enter the following for line 2:
- Enter the amount financed as a credit. (From Example: $-700.00)
- Enter the Transaction Code for Premium Finance.
- Enter the Class Code for Premium Finance.
- Change the company code to the premium finance company.
- Verify the Agency Commission is $0.00.
- Select Finish then Yes to save.
- Select Finish or Save to finalize the invoice. This action will generate an invoice number, and create all of the general ledger receivables and payables for the invoice.
Do not close Express Billing. To enter the down payment, see Record The Client's Down Payment below.
For more information on creating invoices, see: Invoice: Create An Invoice.
Record The Client's Down Payment - Full Amount Collected
First, follow the steps above to create the invoice, leaving Express Billing open.
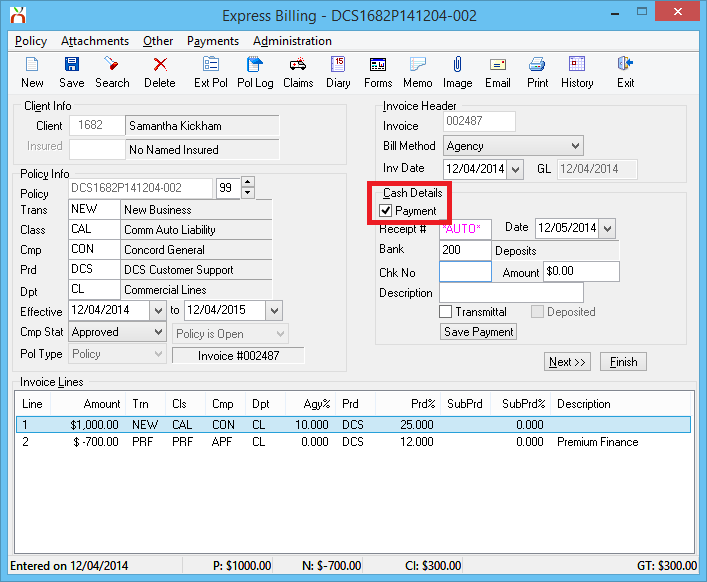
- From Express Billing select Payment.
- Enter the Date the cash was received.
- Verify the Bank Code.
- Enter the client's Check Number. (Press <F2> for cash)
- Enter the Amount received. (From Example: $300.00)
- Optionally, enter a Description.
- Select Save Payment.
- Select Yes or No to print.
- Exit the Express Billing window.
For more information on taking client payments, see: Client Payment: Agency Bill Cash
Record The Premium Finance Company Payment
After creating the invoice, and recording the client's down payment, follow the steps below to record the premium finance company payment.
If the premium finance company pays the insuring company direct, this step is not required. See: Down Payment Only Collected above.
Although Reconcile Company Payables is typically used to create GL-2110 Company Payable check transactions, the steps below will change the payment type to a cash receipt.
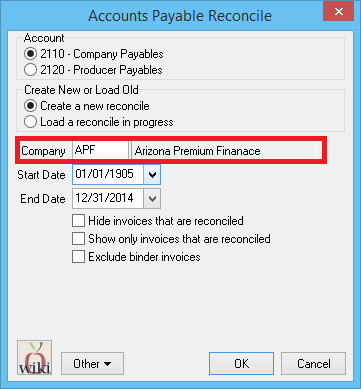
- Select AP -> Reconcile Payables.
- Enter the Premium Finance Company Code. (From Example: APF)
- Verify the premium finance invoice is within the selected Start Date and End Date.
- Select OK.
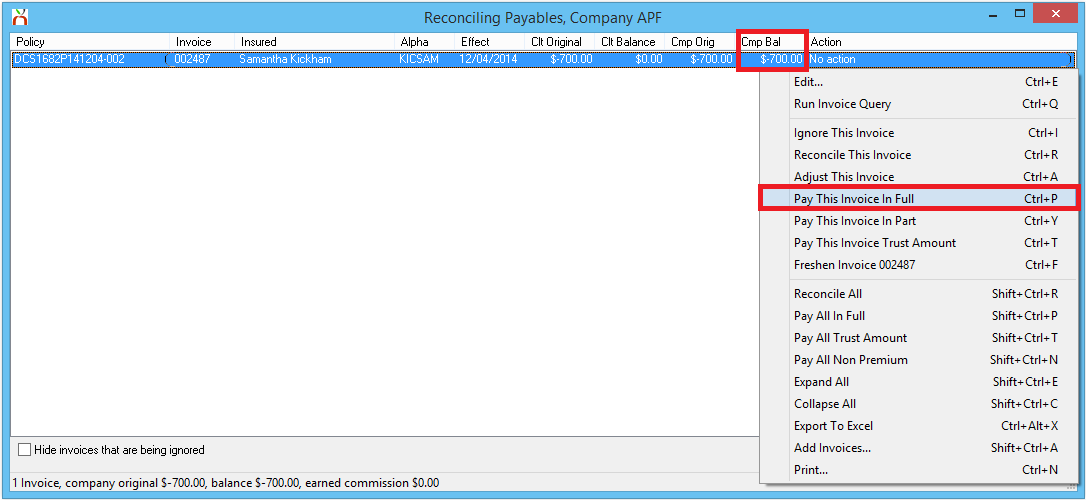
- Right-Click on the invoice, and select Pay This Invoice In Full.
- Select Payment Details at the bottom.
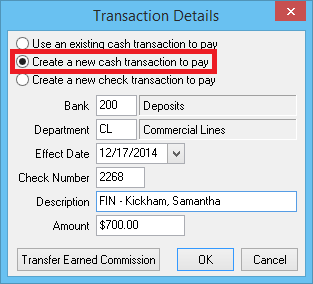
- Change the default payment type to Create A New Cash Transaction To Pay. Enter the cash receipt details, and select OK.
- Confirm the payment totals at the bottom, and select Perform Reconciliation.
- Select OK when prompted.
For more information regarding reconcile company payables, see: Reconcile Company Payables
