Invoice: Create An Invoice - Premium Finance
| Related Pages |
| Related Categories |
Invoices created in Agency Systems can have up to seven lines. For premium finance Agency Bill invoices, one of the lines is entered as a credit (-), reducing the client receivable balance.
The method used to create the premium finance invoice line is determined by how much of the total premium is passed through the agency.
- See Down Payment Only Collected if only the down payment is received from the client to the agency, and the finance company will pay the insuring/billing company direct.
- See Full Amount Collected if the full amount is received by the agency, with the finance company sending the money to the agency instead of the insuring/billing company direct.
![]() See: Invoice: Create An Invoice - Premium Finance: Return Premium To Finance Company for return premium invoices.
See: Invoice: Create An Invoice - Premium Finance: Return Premium To Finance Company for return premium invoices.
Contents
Option (A): Down Payment Only Collected
The procedure below should be used when posting a premium financed invoice and the retail agency is responsible for collecting the down payment from the client.
If the agency will be collecting the down payment and the amount financed from the premium finance company, see Full Amount Collected below.
Step 1: Create an Invoice (Down Payment Only)
| Example: Down Payment Only |
| $1000.00 policy premium. |
| $700.00 amount financed directly. |
| $300.00 down payment from the client. |
| Invoice - Premium Finance Down Payment.pdf |
| Invoice Query - Premium Finance Down Payment.pdf |
 |
 |
- Load a Client on a client tab.
- On the Client Dashboard tab select the (+) next to Policies. (To expand the band by default, see: Preferences)
- Left-Click the desired policy number to open the Policy Dashboard. (Optionally, Left-Click on the premium value to jump directly to Policy & Billing.)
- Select Policy & Billing within the top toolbar. The last transaction for the policy is displayed. If needed, select a prior policy sequence.
- Verify the transaction is not invoiced. If the policy transaction is already invoiced, first create a new policy sequence using the policy menu or the Policy Dashboard.
- Verify the Bill Method is Agency Bill. (The default bill method is specified in the Company Profile.)
- Verify the Invoice Date.
- Select Next to create the first invoice line. An invoice can have a maximum of seven lines.
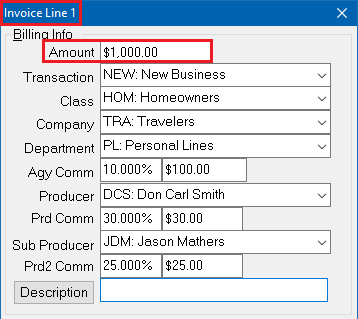
- Enter the premium in the Amount field and press <TAB>. (From example: $1000.00).
- Verify the invoice line values, pressing <TAB> to jump to the next field. Each value will default from the policy.
- Transaction
- Class
- Company - It is common to change the invoice company to a parent company that is different than the policy company.
- Department
- Verify the commission details. (Broker Billed commissions are calculated differently.)
- The Agency Commission defaults from the Company Profile. The commission can be entered as a percentage of the premium, or a dollar amount.
- The Producer and Producer Commission default from the Producer Profile. The commission can be entered as a percentage of the agency commission, or a dollar amount.
- The Sub Producer will default if it is saved to the client. Verify the commission which defaults from the Producer Profile.
- Optionally enter a short Description which will display for the line on the printed invoice.
- Verify Invoice Type -> Regular and select Next to add an additional invoice line.
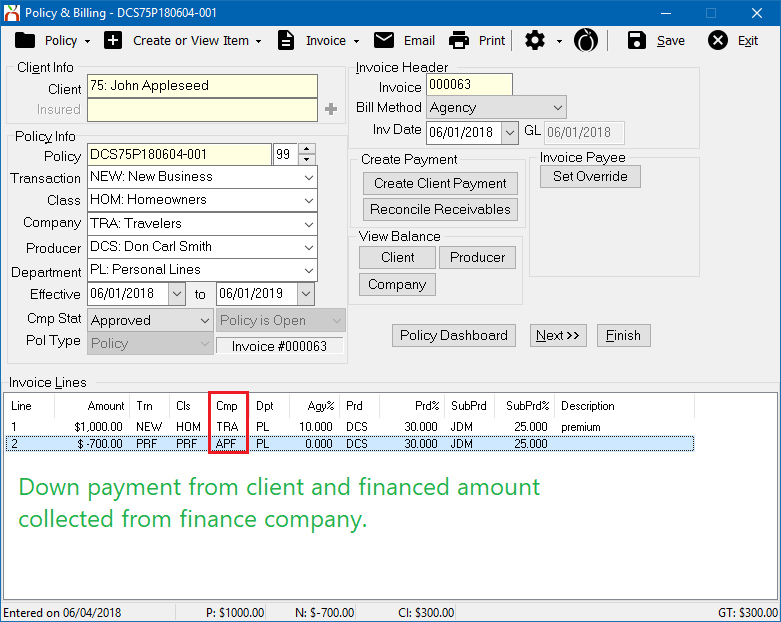
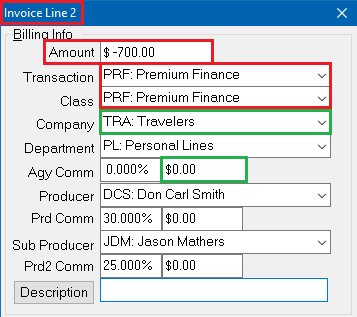
- Enter the following premium finance line 2 values:
- Enter the amount financed as a credit. (From example: $-700.00)
- Enter the Transaction Code for Premium Finance.
- Enter the Class Code for Premium Finance.
- Leave the Company Code as the Insuring/Billing company. Do not enter the premium finance company code.
- Verify the Agency Commission is $0.00.
- Optionally enter a short Description which will display for the line on the printed invoice.
- Verify Invoice Type -> Regular and select Finish when done, then Save when prompted.
- Select Finish or Save to finalize the invoice.
- Newton will generate an invoice number and create all of the general ledger receivables and payables for the invoice. Select Print or Email.
- Invoice - Premium Finance Down Payment.pdf - example of the invoice.
- Invoice Query - Premium Finance Down Payment.pdf - explanation of the general ledger credits and debits.
- To enter the down payment, do not close Policy & Billing. See Step 2: Record The Client's Down Payment below.
![]() See: Invoice: Create An Invoice for more information.
See: Invoice: Create An Invoice for more information.
Step 2: Record the Client's Down Payment (Down Payment Only)
First, follow the steps above to create the invoice, leaving Policy & Billing open. If not already opened, find and open the invoice from the Client Tab.
- From Policy & Billing select Create Client Payment. Press <TAB> after each step to step skip to the next field.
- Enter the client's Check Number. (Press <F2> for cash)
- Enter the Amount received. (From Example: $300.00)
- Verify Cash Type -> Regular.
- Enter the Date the cash was received.
- Verify the Bank.
- Verify the Department.
- Optionally, enter a Description.
- Select OK.
- Select Yes or No to print.
- Exit the Policy & Billing window.
![]() See: Client Payment for more information.
See: Client Payment for more information.
Option (B): Full Amount Collected
The procedure below should be used when posting a premium financed invoice and the retail agency is responsible for collecting the down payment from the client and the amount financed from the premium finance company.
If the agency will only be collecting the down payment, see Down Payment Only Collected above.
Step 1: Create an Invoice (Full Amount Collected)
| Example: Down Payment Only |
| $1000.00 policy premium. |
| $700.00 amount financed to be collected from company. |
| $300.00 down payment from the client. |
| Invoice - Premium Finance Full Amount.pdf |
| Invoice Query - Premium Finance Full Amount.pdf |
 |
 |
- Load a Client on a client tab.
- On the Client Dashboard tab select the (+) next to Policies. (To expand the band by default, see: Preferences)
- Left-Click the desired policy number to open the Policy Dashboard. (Optionally, Left-Click on the premium value to jump directly to Policy & Billing.)
- Select Policy & Billing within the top toolbar. The last transaction for the policy is displayed. If needed, select a prior policy sequence.
- Verify the transaction is not invoiced. If the policy transaction is already invoiced, first create a new policy sequence using the policy menu or the Policy Dashboard.
- Verify the Bill Method is Agency Bill. (The default bill method is specified in the Company Profile.)
- Verify the Invoice Date.
- Select Next to create the first invoice line. An invoice can have a maximum of seven lines.
- Enter the premium in the Amount field and press <TAB>. (From example: $1000.00).
- Verify the invoice line values, pressing <TAB> to jump to the next field. Each value will default from the policy.
- Transaction
- Class
- Company - It is common to change the invoice company to a parent company that is different than the policy company.
- Department
- Verify the commission details. (Broker Billed commissions are calculated differently.)
- The Agency Commission defaults from the Company Profile. The commission can be entered as a percentage of the premium, or a dollar amount.
- The Producer and Producer Commission default from the Producer Profile. The commission can be entered as a percentage of the agency commission, or a dollar amount.
- The Sub Producer will default if it is saved to the client. Verify the commission which defaults from the Producer Profile.
- Optionally enter a short Description which will display for the line on the printed invoice.
- Verify Invoice Type -> Regular and select Next to add an additional invoice line.
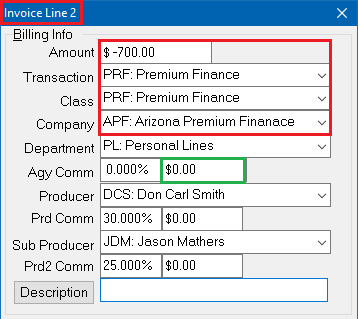
- Enter the following premium finance line 2 values:
- Enter the amount financed as a credit. (From example: $-700.00)
- Enter the Transaction Code for Premium Finance.
- Enter the Class Code for Premium Finance.
- Change the company code to the premium finance company.
- Verify the Agency Commission is $0.00.
- Optionally enter a short Description which will display for the line on the printed invoice.
- Verify Invoice Type -> Regular and select Finish when done, then Save when prompted.
- Select Finish or Save to finalize the invoice.
- Newton will generate an invoice number and create all of the general ledger receivables and payables for the invoice. Select Print or Email.
- Invoice - Premium Finance Full Amount.pdf - example of the invoice.
- Invoice Query - Premium Finance Full Amount.pdf - explanation of the general ledger credits and debits.
- To enter the down payment, do not close Policy & Billing. See Step 2: Record The Client's Down Payment below.
![]() See: Invoice: Create An Invoice for more information.
See: Invoice: Create An Invoice for more information.
Step 2: Record the Client's Down Payment (Full Amount Collected)
First, follow the steps above to create the invoice, leaving Policy & Billing open. If not already opened, find and open the invoice from the Client Tab.
- From Policy & Billing select Create Client Payment. Press <TAB> after each step to step skip to the next field.
- Enter the client's Check Number. (Press <F2> for cash)
- Enter the Amount received. (From Example: $300.00)
- Verify Cash Type -> Regular.
- Enter the Date the cash was received.
- Verify the Bank.
- Verify the Department.
- Optionally, enter a Description.
- Select OK.
- Select Yes or No to print.
- To enter the company finance payment, do not close Policy & Billing. See Step 3: Record the premium finance company payment below.
![]() See: Client Payment for more information.
See: Client Payment for more information.
Step 3: Record the Premium Finance Company Payment
Although Reconcile Company Payables is typically used to create GL-2110 Company Payable check transactions, the steps below will change the payment type to a cash receipt.
![]() If the premium finance company pays the insuring company direct, this step is not required. See: Down Payment Only Collected above.
If the premium finance company pays the insuring company direct, this step is not required. See: Down Payment Only Collected above.
First, follow the steps above to create the invoice, and record the client's down payment leaving Policy & Billing open.
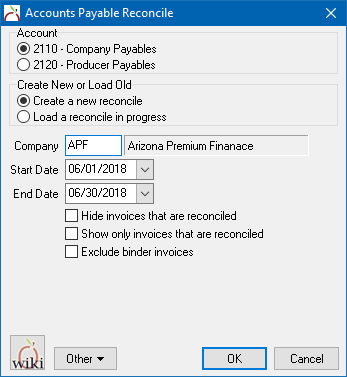
- From Policy & Billing, select Invoice -> Payment -> Reconcile Payables. (Otherwise select Company -> Reconcile Company Payables (Agency Bill).)
- Verify 2110 - Company Payables is selected.
- Enter the Premium Finance Company Code used on line 2. (From Example: APF)
- Verify the premium finance invoice is within the selected Start Date and End Date.
- Select OK.
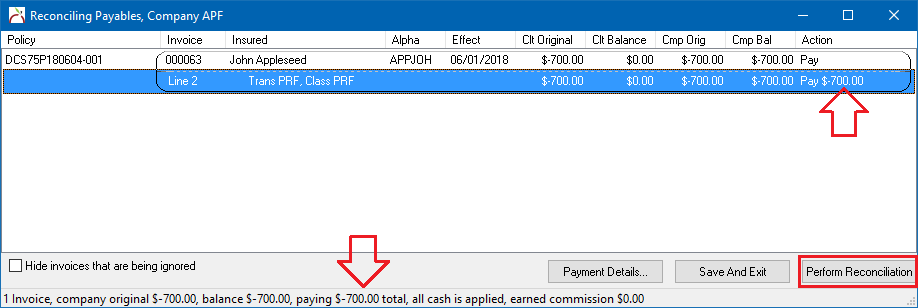
- Right-Click on the invoice, and select Pay This Invoice In Full.
- Select Payment Details... at the bottom.
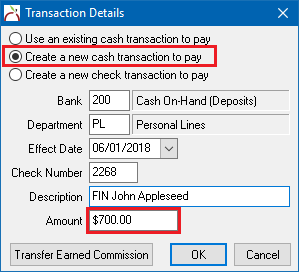
- Change the default payment type to Create A New Cash Transaction To Pay.
- Enter the cash receipt details for the premium finance company check.
- Verify the Bank.
- Enter the Department.
- Select the Effect Date.
- Enter the Check Number.
- Optionally enter a short description, such as the policy number or insured name.
- Enter the Amount. (From example: $700.00)
- Select OK to close the transaction details.
- Confirm the payment totals at the bottom of the reconcile window, and select Perform Reconciliation.
- Select OK when prompted.
- After the client and premium finance payments are attached, the policy / billing company is ready to be paid with a premium check through reconcile payables.
![]() See: Reconcile Company Payables for more information.
See: Reconcile Company Payables for more information.
Create Other Invoice Types
There are a number of different types of invoices, such as regular invoices, return premium finance invoices, mortgagee invoices, and installment invoices.
![]() See: Accounting - Invoice/Billing for more information.
See: Accounting - Invoice/Billing for more information.
Edit an Invoice
There are a number of different methods available to edit or adjust an invoice depending on the type of adjustment, and the status of the invoice. Invoices with accounting entries such as client or company payments limit the fields of an existing invoice that can be modified. Invoices in closed accounting periods cannot be modified. Adjustments to invoice balances can be made using reconcile, new invoices, or with journal transactions.
![]() See: Invoice: Edit An Invoice or Accounting - Invoice/Billing for more information.
See: Invoice: Edit An Invoice or Accounting - Invoice/Billing for more information.
