|
|
| (40 intermediate revisions by 2 users not shown) |
| Line 1: |
Line 1: |
| | [[Category:Training Guides]] | | [[Category:Training Guides]] |
| | + | <table class="infobox" cellspacing="5" style="background-color: #FFFFFF; width:27em; text-align:left; border-spacing: 2px; line-height:1.5em;"> |
| | + | <tr> |
| | + | <td>[[File:Ic_description_black_24dp.png|link=Newton User Guide#Newton Interface Overview]] Newton User Guide: [[Newton User Guide#Newton Interface Overview|Newton Interface Overview]]</td> |
| | + | </tr> |
| | + | <tr> |
| | + | <td>[[File:Ic_info_black_24dp.png]] Required Software Version: [[:Category:Release Notes|March 2017]]</td> |
| | + | </tr> |
| | + | <tr> |
| | + | <td>[[File: Ic_settings_backup_restore_black_24dp.png]] Legacy Instructions Available: [http://wiki.agencysystems.com/mediawiki/index.php?title=Main_Menu_and_Tab_Navigation&oldid=4145 Click Here]</td> |
| | + | </tr> |
| | | | |
| − | == Login == | + | <tr style="background-color: #bdbdbd; text-align: center; font-weight:bold;"> |
| − | === Security ===
| + | <td>Related Pages</td> |
| − | To begin using Newton, double-click the Newton icon on the desktop. You will login using your initials, and a password. This is for three purposes:
| + | </tr> |
| − | *Security controls who has access to things like accounting data and management reports.
| + | <tr> |
| − | *The Activity log will date- and time-stamp each action by the user, making it easy to see who did what, when.
| + | <td> |
| − | *And this allows setting up your personal profile in Newton for your To-Do list, e-mail, contact information, and adding your signature electronically to Acord forms.
| + | <ul> |
| − | === Test login ===
| + | <li>[[Log in to Newton by Agency Systems]]</li> |
| − | During training, we will create a login for each user in your agency. To get started you can use the test login of Agency '''99''', operator '''DCS''', and password '''EMPYRE'''. It’s case-sensitive so make sure to check caps lock.
| + | </ul> |
| | + | </td> |
| | + | </tr> |
| | + | <tr style="background-color: #d3d3d3; text-align: center; "> |
| | + | <td>Related Categories</td> |
| | + | </tr> |
| | + | <tr> |
| | + | <td> |
| | + | <ul> |
| | + | <li>[[:Category:Training Guides|Training Guides]]</li> |
| | + | </ul> |
| | + | </td> |
| | + | </tr> |
| | + | </table> |
| | + | This page provides an overview of the navigation for Newton by Agency Systems. |
| | | | |
| − | [[File:training1-login.png]] | + | The [[#Main Menu|Main Menu]], [[#User Dashboard Tab|User Dashboard Tab]], [[#Client Tab|Client Tab]], [[#Policy Dashboard|Policy Dashboard]], [[#Policy & Billing|Policy & Billing]], [[#Company Tab|Company Tab]], [[#Vendor Tab|Vendor Tab]], and [[#Management Tab|Management Tab]] are the primary interfaces and dashboards within Newton. |
| | | | |
| − | == Dashboard == | + | == Before you begin == |
| − | {{#ev:youtube|txeKbMItUNg|300|right|Part 1: Dashboard}}
| + | You must first log in to Newton by Agency Systems. |
| − | === The Dashboard screen ===
| |
| − | The first thing you see when you login to Newton is your Dashboard. The Newton Dashboard screen consolidates all of your active tasks in one location. This includes open follow-up items (Submissions and Diaries); active and expiring policies; active clients; as well as information on e-mails, activity, and attachments.
| |
| | | | |
| − | Click any of the columns to sort the list—for example by client or date. Past-due items appear in red. Select an item to view information in the preview pane.
| + | [[File:Ic_info_black_24dp.png]] See: [[Log in to Newton by Agency Systems]] for more information. |
| | | | |
| − | Click the plus sign next to any section to expand that section, or minus to collapse it.
| + | == Main Menu == |
| − | You can click the columns in any of these bands to sort the list; for example, to sort policies by premium, or clients by source of business.
| + | <table class="infobox" cellspacing="5" style="background-color: #FFFFFF; width:27em; text-align:left; border-spacing: 2px; line-height:1.5em;"> |
| − | You can right click any band and Copy List, then paste the information into a notepad or spreadsheet.
| + | <tr> |
| | + | <td>[[File: Ic_settings_backup_restore_black_24dp.png]] Updating from a prior version of Newton?</td> |
| | + | </tr> |
| | + | <tr> |
| | + | <td>See [[Media:Newton Main Menu - Quick Start Guide.pdf|Newton Main Menu - Quick Start Guide.pdf]]</td> |
| | + | </tr> |
| | + | </table> |
| | + | Newton's main menu is always available above the primary tab and includes categories organized by agency functions. The main menu also includes easy access to the user-defined favorites list and each of the powerful keyword search options, available with a single mouse click or a simple keyboard shortcut. |
| | | | |
| − | [[File:training1-dashboard.png]] | + | [[File:Newton-mainmenu.png]] |
| − | === Diaries ===
| |
| − | A Diary is a simple follow-up item; for example, a telephone message. A Diary includes a suspense-date for follow-up, description, and notes.
| |
| | | | |
| − | Click on any Diary description to open the Diary. Click in any of the fields to change or add information, or click your name to assign the Diary to a different operator. Only open items will appear on your Dashboard by default. When the item is complete, click “Close Item” to change the status to “Closed.”
| + | *'''Find Client:''' [[Client Keyword Search]] - Perform a search for a client. (F3) |
| | + | *'''Find Policy:''' [[Policy Keyword Search]] - Perform a search for a policy. (Shift + F3) |
| | + | *'''Find Insured:''' [[Named Insured Keyword Search]] - Perform a search for a named insured on an Agent. (Ctrl + F3). |
| | | | |
| − | [[File:training1-dashboard-diaries.png]] | + | Find Insured is only visible for General Agencies (GAs) or retail agencies with Broker Billed clients who have [[Preferences#Client_Dashboard_Bands|enabled the user preference]]. |
| − | === Submissions ===
| |
| − | A Submission is a follow-up item that is attached to the task of marketing or writing a specific policy or quote. A Submission allows you to attach company-specific applications, loss runs, renewal apps, etc. to a quote or policy. Comments you add to a submission are permanent, and cannot be changed or erased, and all changes to description, suspense dates, etc. are recorded in activity.
| |
| | | | |
| − | [[File:training1-dashboard-submissions.png]]
| + | === Report Shortcuts === |
| | + | The Client, Company, Producer, and Vendor menus contain report shortcuts that pre-fill filters providing faster access to common reports. |
| | | | |
| − | We’ll look further into Submissions in later training sessions.
| + | [[File:Mainmenu-producer-invoicereg.png]] |
| − | === Expiring Policies ===
| |
| − | Next your Dashboard shows Expiring Policies. Click the plus sign to expand this section. You can see policies expiring in the next 30, 60, or 90 days, as well as recently expired policies. You can click a Policy to open the Policy Express window, or right click to open the client. You can work your expiration list directly from the dashboard; as policies are renewed , replaced, or marked non-renewed, they will be removed from the list.
| |
| | | | |
| − | [[File:training1-dashboard-exppol.png]]
| |
| − | === Active Policies ===
| |
| − | Next you can see Active Policies—any active policy for which you are the assigned producer or CSR. You can click a policy to open the Policy Express window. The invoiced total of all the policies is shown here.
| |
| | | | |
| − | You can right click to Include Quotes or to open the client.
| + | Selecting a report shortcut will display the full reports menu with the required menu items automatically selected. (Pictured below in red.) |
| | | | |
| − | [[File:training1-dashboard-activepol.png]] | + | [[File:Invoicereg-producer-sumbyprem.png]] |
| − | === Active Clients ===
| |
| − | Active Clients shows clients for whom you are the assigned producer or CSR. You can click a client to load that client. You can right-click to edit the client or include prospects.
| |
| | | | |
| − | [[File:training1-dashboard-activeclients.png]]
| |
| − | === Emails ===
| |
| − | Emails shows e-mails you have sent from Newton. You can click an e-mail to read it. You can right-click to open the client.
| |
| | | | |
| − | [[File:training1-dashboard-emails.png]]
| + | Select the desired date range, optionally using the right-click shortcuts within each field to quickly jump to specific days, and run the report. |
| − | === Activity ===
| |
| − | Activity shows your recent actions. You can click on an item to read more information. You can right-click to choose whether to show only correspondence, notes, or all items.
| |
| | | | |
| − | [[File:training1-dashboard-activity.png]] | + | [[File:Invoicereg-producer-sumbyprem-datepicker.png]] |
| − | === Attachments ===
| |
| − | Attachments shows the files you have attached to clients, policies, and submissions. You can click any item to open and view the attachment.
| |
| | | | |
| − | [[File:training1-dashboard-attach.png]]
| |
| − | === Options ===
| |
| − | You can click the columns in any of these bands to sort the list; for example, to sort policies by premium, or clients by source of business.
| |
| | | | |
| − | You can right click any band and Copy List, then paste the information into a notepad or spreadsheet.
| + | There are dozens of report shortcuts available for premium production reports, expiration lists, claims reports, client or company cash reports and more. |
| | | | |
| − | [[File:training1-dashboard-options.png]]
| + | === Favorites === |
| | + | The Favorites drop-down can be customized by the current user. Favorites for common reports such as the balance sheet or income and expense can be selected, or other menu items such as reconcile receivables or payables. |
| | | | |
| − | *Click the flashlight to search for a word or words on the Dashboard.
| + | [[File:favorites.png]] |
| − | *Click '''Select Operator''' to choose from a list of available operators and view another operator’s list.
| |
| − | *Click '''Send Email''' to send an E-mail to a client, company, producer, or policy interest.
| |
| − | *Click '''Client Search''' to search for a client.
| |
| − | *Click '''Policy Search''' to search for a client or policy by policy number.
| |
| − | *Click the Preview Pane button to toggle the Preview Pane on/off.
| |
| − | == Client Explorer ==
| |
| − | {{#ev:youtube|uCwa0c_28B8|300|right|Part 2: Client Tabs}}
| |
| − | === Client Tabs ===
| |
| − | After the Dashboard tab are four tabs for browsing clients. Having four client tabs allows you to work on multiple clients at once, so you can leave one client open to look up another without losing your place.
| |
| | | | |
| − | The client’s Basic tab shows:
| |
| − | *Address and phone information
| |
| − | *Default producer and CSR
| |
| − | *Contacts
| |
| − | *Client notes
| |
| − | *Open Diaries and Submissions
| |
| − | *Active policies
| |
| − | *Drivers, Vehicles, Equipment, & Properties
| |
| − | *E-mails
| |
| − | *Attachments, such as photographs and PDFs.
| |
| | | | |
| − | [[File:training1-basictab.png]]
| + | Select '''Favorites''' -> '''Edit List''' to choose the desired menu options. Double-click on each menu to add it to the favorites list on the left. Highlight a specific item and select Up or Down to update the order of the list. When finished, select '''Save'''. |
| | | | |
| − | === Client Search by Keyword ===
| + | [[File:favorites-edit.png]] |
| − | {{#ev:youtube|3KBw08uBVu8|300|right|Client Keyword Search}}
| |
| | | | |
| − | Click the Search button to search for a client. Client search allows you to find clients by:
| + | == Tabs == |
| − | *Name
| + | === User Dashboard Tab=== |
| − | *Address
| + | The dashboard tab consolidates all of your active tasks in one location. This includes open follow-up items (Submissions and Diaries), active and expiring policies, active clients, as well as information on e-mails, activity, and attachments. |
| − | *Phone number
| |
| − | *E-mail address
| |
| | | | |
| − | A drop-down box displays suggested matches as you type. You can exclude inactive clients. The search includes client contacts as well as drivers.
| + | [[File:Ic_info_black_24dp.png]] See [[User Dashboard Tab]] for additional details. |
| | | | |
| − | Client search can find partial matches, including incomplete telephone numbers. The last four digits of a phone number alone are almost always enough to narrow it to a single client. | + | === Client Tab === |
| | + | The client tab contains client [[Client Tab#Client Tab: Summary Panel|information such as contact numbers and client type]], and data tabs for different data types. The client sub-tabs are [[Client Tab#Client Tab: Dashboard|Client Dashboard]], [[Client Tab#Client Tab: Accounting|Accounting]], [[Forms]], [[Client Tab: Download|Download]], History, and Invoices. |
| | | | |
| − | Client search will locate common aliases, such as Bob or Robert, and abbreviations such as first or 1st. | + | [[File:Ic_info_black_24dp.png]] See [[Client Tab]] for more information. |
| | | | |
| − | [[File:training1-clientkeyword.png]] | + | === Policy Dashboard === |
| | + | The Policy Dashboard is the primary interface for [[:Category:Policy Tasks|Policy Tasks]] such as renewals, endorsements, and cancellations. There are multiple tabs for rich content such as [[Policy_Dashboard#Policy_Forms|ACORD Forms]], and company [[Policy_Dashboard#Policy Download|Download data]]. |
| | | | |
| − | === Client Search by Policy ===
| + | [[Policy_Dashboard#Policy_Dashboard_Interface|The Policy Dashboard contains multiple expandable bands on each tab to organize content]] such as activity, emails, and attachments. |
| − | {{#ev:youtube|2SNA8JpjWsg|300|right|Enhanced Policy Keyword Search}}
| |
| − | You can also search for clients by policy number. Like the client search, the policy-number search displays possible matches while you type and can even locate partial policy numbers and close matches.
| |
| | | | |
| − | [[File:training1-polkeyword.png]] | + | [[File:Ic_info_black_24dp.png]] See [[Policy Dashboard]] for more information. |
| | | | |
| − | === Create a Client === | + | === Policy & Billing === |
| − | To enter a new client or prospect into Newton, you should always search existing clients first to avoid creating duplicates. Remember to include inactive clients.
| + | Policy & Billing is the primary interface used to create new policies and invoices in Newton. |
| − | Click New Client. Enter the client’s name and address. Enter the zip code and Newton will fill in the city and state.
| |
| | | | |
| − | Select commercial or personal lines. You can also select '''Broker-Billed''' type for outside agents who write through your agency. This does not restrict the type of policies and forms the client can have. It is strictly for your information. If you select commercial, “Home” and “Work” numbers change to “Phone” and “Fax.”
| + | [[File:Ic_info_black_24dp.png]] See [[Policy & Billing]] for more information. |
| | | | |
| − | Specify the default producer and CSR for this client. It is important to specify the producer because when you add an invoice for this client, this is the default who will receive producer commission unless you change it on the invoice.
| + | === Company Tab === |
| | + | The company tab contains a top toolbar of global options, a profile drop-down box to change the selected company, and information such as contact numbers and company address. |
| | | | |
| − | Click '''Save''' to record your changes.
| + | [[File:Ic_info_black_24dp.png]] See [[Company Tab]] for more information. |
| | | | |
| − | [[File:training1-createclient.png]] | + | === Vendor Tab=== |
| | + | The vendor tab has a [[Vendor_Tab#Vendor_Tab:_Dashboard|Vendor Dashboard Tab]], similar to the [[#Company Tab|Company Tab]], and an [[Vendor_Tab#Vendor_Tab:_Accounting|Vendor Accounting Tab]] which lists [[Voucher Transaction|Vouchers]], and vendor checks. |
| | | | |
| − | ==== Details Tab ====
| + | [[File:Ic_info_black_24dp.png]] See [[Vendor Tab]] for more information. |
| − | On the Details tab you can choose:
| |
| − | *Prospect or client
| |
| − | *Active status
| |
| − | *Website
| |
| − | *User defined fields
| |
| | | | |
| − | You can set up User defined fields under the Profiles menu, and use them later for reports.
| + | ===Management Tab=== |
| − | Contacts
| + | The management tab provides several instant reports for agency managers, including a book of business that can easily be broken down by policy or line of business, and a bar graph of income and expense over time. The management tab is available only to operators with sufficient security to see the [[Report: Balance Sheet|Balance Sheet]]. |
| | | | |
| − | [[File:training1-createclient-details.png]] | + | [[File:Ic_info_black_24dp.png]] See [[Management Tab]] for more information. |
| − | ==== Contacts Tab ====
| |
| − | Select the Contacts tab and click '''Add''' to add a contact. You can set contact-specific phone and extension, and add an e-mail address. Remember that client search can be used with e-mail addresses, so this is useful for pulling up a contact when you receive an e-mail from them. Enter a contact’s date of birth to use for reports, such as birthday mailings and age-group-targeted marketing. Select '''Primary''' to mark this as the primary contact, or '''Accounting''' to mark them as the accounting contact. These two will appear first in the list of contacts on the client’s Basic tab.
| |
| | | | |
| − | [[File:training1-createclient-contact.png]]
| + | == Navigating tabs and sub-tabs == |
| − | === Client Maintenance === | + | Multitasking between multiple clients, and multiple policies within each client has never been easier. Policies and client diaries automatically open as sub-tabs on a client. |
| − | On the client’s Basic tab you can click '''Add Contact''' in the client-information bar on the left side to add a contact, or '''Edit''' to edit one. To edit the client’s information, click '''Edit Client'''.
| |
| | | | |
| − | To change a prospect to a client, for example, click '''Edit Client''', select the Details tab, and change '''Client Status''' from “Prospect” to “Client.” When a client is no longer active, edit the client, select the Details tab, and change '''Client is Active'''? to “No.” You should always mark old clients as inactive rather than deleting them, to retain accounting and other data.
| + | [[File:Newton-clientdash-mutlitab-markup.png]] |
| | | | |
| − | [[File:training1-basictab-clientframe.png]]
| |
| − | === Basic Tab ===
| |
| − | When you search for and load a client, you will see the client’s Basic tab.
| |
| | | | |
| − | Open [[#Diaries|Diaries]], highlighted [[#Client Notes|client notes]], and [[#Active Policies|active policies]] will show up by default. All other information, including [[#Submissions|active Submissions]], is collapsed, or hidden, and you must click the plus-signs next to the respective bands to see the information. Hover over a diary or note to read more text.
| + | If a policy or diary is selected from the User Dashboard Tab, Management Tab, or Company Tab, Newton will automatically load the client tab first, then the selected item as a sub-tab. |
| − | Click any of the columns to sort the list—for example by class or date. Past-due items appear in red. Click the plus- or minus-signs to expand and collapse the sections or to see more information on a policy. You can right-click any band and '''Copy List''', then paste the information into a notepad or spreadsheet.
| + | *Multiple policies or diaries can be opened on the same client. |
| | + | *When a Client Tab is closed, all sub-tabs will be automatically closed. |
| | | | |
| − | [[File:training1-basictab.png]] | + | [[File:Subtabs-fromdashboard.gif]] |
| − | ==== Client Notes ====
| |
| − | Client notes are used for permanent notes about a client. Highlighted client notes will show up by default. '''Click for more notes''' to see notes that aren’t highlighted.
| |
| | | | |
| − | Click '''Create Note''' to add a client note. You can choose whether to highlight your note. The text you enter is permanent, and can’t be changed once you save. You _can_ highlight and un-highlight it. Check '''Popup Notice''' only for showstopper items. It will pop up a window every time anyone loads the client.
| |
| | | | |
| − | Client notes aren’t indexed for searching, so they’re useful for things you would want to remember about a client but wouldn’t necessarily search for.
| + | Optionally, the diary and policy dashboard windows can still be configured to open as a window by selecting the user preference within '''Setup''' -> '''Preferences''' -> '''User Options'''. |
| | | | |
| − | [[File:training1-basictab-notes.png]]
| + | ==== Closing Tabs ==== |
| − | ==== Diaries ==== | + | When a tab is closed, the system will automatically switch to the tab to the right. When there are no tabs remaining, the system will automatically switch to the first tab. |
| − | Diaries, as discussed in the Dashboard overview, are simple follow-up or to-do items. Click a Diary to open it. Click in any of the fields to change or add information or modify the designee. When you update a Diary, don’t forget to update the suspense date to show it is up-to-date. You can also suspend items to future dates for later follow-up.
| |
| | | | |
| − | You can create a client Diary from the [[#Basic Tab|Basic tab.]] You can also create a Diary that is attached to a policy from [[#Policy Express|Policy Express]].
| + | [[File:Newton-mutlitab-closeorder.png]] |
| | | | |
| − | [[File:training1-basictab-diary.png]]
| |
| − | ==== Activity ====
| |
| − | {{#ev:youtube|wIhsskzoYUU|300|right|Activity - Automatic and Permanent}}
| |
| − | Activity shows recent activity on this client. You can hover or click on an item to read more information. You can right-click to choose whether to show only correspondence, notes, or all items. Click Activity Search to search all activity items for a word or phrase. Use the Activity search to easily find e-mails, attachments, updates to suspense items, and more.
| |
| | | | |
| − | Click '''Clear''' to clear the search filter.
| + | To close all open client tabs quickly, select the first client tab and select '''Exit'''. Without moving the mouse, continue selecting '''Exit''' until all tabs are closed. |
| | | | |
| − | [[File:training1-basictab-activity.png]] | + | [[File:Newton-multitab-closeaction.gif]] |
| − | | |
| − | ==== Submissions ====
| |
| − | Click the plus sign next to '''Active Submissions''' to see Submissions. Remember that unlike Diaries and policies, active Submissions do not display automatically when you load the client’s [[#Basic Tab|Basic tab]].
| |
| − | | |
| − | A Submission is a follow-up item that is attached to the task of marketing or writing a specific policy or quote. A Submission allows you to attach company-specific applications, loss runs, renewal apps, et cetera to a quote or policy. Comments you add to a submission are permanent, and cannot be changed or erased, and all changes to description, suspense dates, etc. are recorded in activity.
| |
| − | | |
| − | [[File:training1-basictab-submissions.png]]
| |
| − | | |
| − | We’ll look further into Submissions in later training sessions.
| |
| − | ==== Active Policies ====
| |
| − | Next you can see Active Policies—any policy or quote that is currently in force and not expired. Quotes appear in green. You can click a policy to open the [[#POlicy Express|Policy Express]] window. Right-click for an extended menu. Click the plus sign next to a policy number for more information. The premium and invoice totals of all the policies are shown here.
| |
| − | | |
| − | [[File:training1-basictab-activepolicies.png]]
| |
| − | ==== Policy Express ====
| |
| − | Click a policy number to open the Policy Express window. The Policy Express window is divided into three main ideas: [[#Create Item|Create Item]], [[#View Existing Items|View Existing Items]], and [[#Automated Procedures|Automated Procedures]], such as renewal. The central area displays downloaded risk information from the carrier.
| |
| − | | |
| − | [[File:training1-basictab-polexpress.png]]
| |
| − | ===== Create Item =====
| |
| − | The Create Item menu:
| |
| − | *Acord form
| |
| − | *Certificate
| |
| − | *Auto ID card
| |
| − | *Claim
| |
| − | *Diaries creates a Diary attached to the policy.
| |
| − | *Memo creates a Memo attached to the policy. You will set up your library of memos, or letters, later in training.
| |
| − | *Activity
| |
| − | *Email allows you to send an e-mail and select recipients from clients, companies, producers, or policy interests. You can also choose recipients from your Microsoft Outlook address book.
| |
| − | *Payment
| |
| − | *Attachment
| |
| − | *Invoice
| |
| − | *Policy Interest
| |
| − | *Policy View takes you directly to a carrier’s website to look up policy data online in seconds.
| |
| − | | |
| − | ===== View Existing Items =====
| |
| − | Click View Existing Items to pull up:
| |
| − | *Acord forms
| |
| − | *Claims
| |
| − | *Accounting
| |
| − | *Policy Transactions
| |
| − | *[[#Policy Activity|Policy Activity]]
| |
| − | *[[#Memos|Memos]]
| |
| − | *[[#E-mails|E-mails]]
| |
| − | *[[#Attachments|Attachments]]
| |
| − | *[[#Diaries|Diaries]]
| |
| − | *Policy Interests
| |
| − | *Downloaded Risk information
| |
| − | ===== Automated Procedures =====
| |
| − | Automated Procedures are labor-saving shortcuts for common tasks.
| |
| − | *Batch Print allows you to select letters, invoices, Acord forms, and policy attachments and print, fax, or e-mail them in a single batch.
| |
| − | *Endorse, renew, and cancel policies easily with updated effective dates and activity.
| |
| − | *Change Policy Number
| |
| − | *Move to New Client - Move the policy. If the option is not available, it means the policy has already been invoiced, and you must correct the accounting data before moving the policy.
| |
| − | *Charge Fee - Launch the fee wizard.
| |
| − | *Convert Quote/Binder - Convert a quote or binder into a policy.
| |
| − | ==== Expired Policies ====
| |
| − | Click the plus sign next to Expired Policies to expand this section and see expired policies.
| |
| − | ==== Claims ====
| |
| − | Click the plus sign next to Active Claims to see Claims. To create a claim, open a policy and create the claim from [[#Policy Express|Policy Express]].
| |
| − | | |
| − | [[File:training1-basictab-claims.png]]
| |
| − | ==== Drivers, Equipment, Vehicles, and Properties ====
| |
| − | One reason it is so easy to create and manage forms in Newton is that information like Drivers, Vehicles, and Properties are stored into schedules that can be imported into any form. These schedules are automatically created by download, or you can add and update them by hand. Thus the information is entered only once, rather than being retyped into every applicable form, and can easily be seen from the client’s Basic screen.
| |
| − | | |
| − | [[File:training1-basictab-schedules.png]]
| |
| − | ==== Memos ====
| |
| − | Memos are word-processing documents. They can range from expiration notices to marketing campaigns. You will set up your library of memo templates later in training.
| |
| − | | |
| − | [[File:training1-basictab-memos.png]]
| |
| − | ==== Emails ====
| |
| − | Click '''Emails''' to show e-mails you have sent to the client. '''Click to show all Emails''' to show e-mails you have attached to the client by dragging and dropping them from Outlook. To attach an e-mail to a client, drag and drop it from Outlook first onto your desktop, then onto the client’s Basic tab. To attach an e-mail to a policy, drag and drop it onto the Policy Express window.
| |
| − | | |
| − | [[File:training1-basictab-emails.png]]
| |
| − | ==== Attachments ====
| |
| − | Click the plus sign next to '''Attachments''' to see attachments to the client and policies. Click '''Add Attachment''' to add an attachment from your computer or scan an image. Or, like an e-mail, just drag and drop a file or photo et cetera from your computer, onto a client’s Basic tab to attach to a client; or to attach to a policy, drag and drop a file onto the [[#Policy Express|Policy Express]] window.
| |
| − | | |
| − | [[File:training1-basictab-attach.png]]
| |
| − | == Company Tab ==
| |
| − | {{#ev:youtube|A-WZ4gSmgmA|300|right|Part 3: Company Tab}}
| |
| − | === Load a Company ===
| |
| − | To the right of the Client tabs and the Dashboard tab is the Company tab. To search for a company, click the name of the current company at the high-top left. If you have never searched for a company before, this will say All Companies. From here on out, it will display the name of the last company you were on.
| |
| − | | |
| − | [[File:training1-companytab.png]]
| |
| − | === Company Information ===
| |
| − | The information bar at the top left displays the company’s address, phone number, and website. Click '''Edit Company''' to edit the company information, including default commission rates and web information. You can enter a company website here for Newton to use for Policy View, and set up your username and password.
| |
| − | === Contacts ===
| |
| − | Beneath the company information is the contact information. You can edit or add a contact. Set contact-specific phone and extension, and enter an e-mail address. The e-mail address is searchable later on when sending company e-mails from Newton.
| |
| − | === Attachments, E-mails, and Memos ===
| |
| − | The next section displays Attachments, E-mails, and Memos. You can drag and drop an attachment or e-mail from your computer onto this tab, or '''Create''' a new Memo, Email, or Attachment.
| |
| − | === Active Policies ===
| |
| − | Click the plus sign to see Active Policies for this company. Click a policy to open the Policy Express window, or click the plus sign next to a policy to see more information.
| |
| − | === Active Submissions and Diaries ===
| |
| − | You can also see active Submissions and Diaries. Click an item to open or edit it. Past-due items appear in red. You can see closed Submissions beneath active Submissions.
| |
| − | === Company Notes ===
| |
| − | Click the plus sign to see company notes. Click a note to open and highlight/un-highlight it, or '''Create''' to create one.
| |
| − | === Using the Company Tab ===
| |
| − | Click any of the columns to sort the band. Click the plus and minus signs to expand and collapse the sections. Click the flashlight icon to search for a word or words on the tab. Click '''New''' to create a new company. Click '''Search''' to select from companies.
| |
| − | == Management Tab and the Rest of the Tabs ==
| |
| − | {{#ev:youtube|iwhJi_0yPQA|300|right|Part 4: Other Tabs}}
| |
| − | This overview will review the remaining tabs in the Client Explorer. We’ve already seen the Basic tab; now we will look at the other tabs that display information on a client. We’ll also look at the Management tab, which provides quick-access information for agency managers.
| |
| − | === Basic Tab and More ===
| |
| − | When you load a client, the Basic tab is displayed. At the bottom of the screen are 13 tabs for browsing more in-depth information about a client, including closed and expired items. Most of the time, the Basic tab is all you will need, but if you need to look up archival information you may need to go to these tabs. For example, active policies and recently expired ones are displayed on the Basic tab, but to look up information on policies that are more than 3 years expired, you would consult the Policy tab.
| |
| − | | |
| − | [[File:training1-basictab-bottomtabs.png]]
| |
| − | ==== Account Tab and Invoice Tab ====
| |
| − | The Account tab displays all accounting information for the client. By default only items with a balance are displayed; to see all items, click '''Options''' and check '''Include zero balances'''.
| |
| − | | |
| − | The invoice tab shows all invoices regardless of paid status. You can double-click a line to open the Express Billing window. We will cover Express Billing and invoicing more in later training sessions.
| |
| − | ==== Activity, Claims, Forms, Attachments, and Memo Tabs ====
| |
| − | The Activity tab shows client activity. This is the same as the Activity on the Basic tab but without the filter to show only correspondence or notes; so you see all items.
| |
| − | | |
| − | The Claims, Attachments, and Memo tabs display the same information that can be found in the corresponding bands on the Basic tab.
| |
| − | | |
| − | The Forms tab displays forms for all policies like the information shown for a particular policy in Policy Express.
| |
| − | Policy, Quote,
| |
| − | ==== Policy, Quote, Diary, and Submissions Tabs ====
| |
| − | The Policy tab is useful for finding old, expired, or replaced policies. If you cannot locate a policy on the Basic tab, but you are sure it is in the system, this is where you would look. Click '''Options''' to choose the cut-off date for showing old policies, and you can check '''Show Replaced Policies'''.
| |
| − | | |
| − | The Quote tab functions the same way.
| |
| − | | |
| − | The Diary and Submissions tabs are also useful for looking up old, closed items. You can click '''Options''' to filter the page; for example, to show only Submissions on a particular policy number, or class code. Check '''Use filter''' to use the options.
| |
| − | ==== DL Risk Tab ====
| |
| − | The DL Risk tab displays downloaded risk information about the client. This is the same information that appears in the Policy Express window, but for all polices. The important thing to remember about the DL Risk tab is that this shows all of the raw information sent by the carrier. This is exactly what they sent, unmodified and unparsed.
| |
| − | === Management Tab ===
| |
| − | The Management tab provides several instant reports for agency managers, including a book of business that can easily be broken down by policy or line of business, and a bar graph of income and expense over time. The Management Tab is available only to operators with sufficient security to see the Balance Sheet.
| |
| − | ==== Operator Tab ====
| |
| − | When you select the Management tab, you will first see the Operator sub-tab. Click a producer for a list of all his active policies. Click the plus-sign next to his name for his personal information.
| |
| − | | |
| − | Click '''All Summary''' for a breakdown of all policies by operator.
| |
| − | | |
| − | [[File:training1-management-operator.png]]
| |
| − | ==== Company Tab ====
| |
| − | On the Company tab, you can click a company for a breakdown of policies and attachments for that company. You can click a policy to open Policy Express, or click the plus-sign for more information.
| |
| − | | |
| − | Click '''All Summary''' for a breakdown of all policies by company, or click '''All Details''' for a complete book of business list.
| |
| − | | |
| − | Right-click and select Copy List to copy the information shown, then paste it into a spreadsheet or word-processing document.
| |
| − | | |
| − | [[File:training1-management-company.png]]
| |
| − | ==== Class Tab ====
| |
| − | On the Class tab you can click a class for a breakdown of policies in that line of business. Click '''All Summary''' for a breakdown of policies by class.
| |
| − | | |
| − | [[File:training1-management-class.png]]
| |
| − | ==== Management Summary Tab ====
| |
| − | Click Management Summary for a breakdown of current, past, and future Cash, Invoice, Receivable, Payable, and Commission data. Select the drop-downs on the right for current balances of Cash in Banks, Client Receivables, Company Receivables, Company Payables, and Producer Payables.
| |
| − | | |
| − | [[File:training1-management-summary.png]]
| |
| − | ==== Reporting Tab ====
| |
| − | The reporting tab displays bar graphs of Client Receivables, Company Receivables, Cash Flow, and Income vs Expense. You can see history for the past 6, 12, or 24 months.
| |
| − | | |
| − | [[File:training1-management-reporting.png]]
| |
| − | == Related Wiki Pages ==
| |
| − | [[Newton Release Notes: July 2013|New Features Released July 2013]]
| |
This page provides an overview of the navigation for Newton by Agency Systems.
The Main Menu, User Dashboard Tab, Client Tab, Policy Dashboard, Policy & Billing, Company Tab, Vendor Tab, and Management Tab are the primary interfaces and dashboards within Newton.
Before you begin
You must first log in to Newton by Agency Systems.
 See: Log in to Newton by Agency Systems for more information.
Main Menu
Newton's main menu is always available above the primary tab and includes categories organized by agency functions. The main menu also includes easy access to the user-defined favorites list and each of the powerful keyword search options, available with a single mouse click or a simple keyboard shortcut.

Find Insured is only visible for General Agencies (GAs) or retail agencies with Broker Billed clients who have enabled the user preference.
Report Shortcuts
The Client, Company, Producer, and Vendor menus contain report shortcuts that pre-fill filters providing faster access to common reports.

Selecting a report shortcut will display the full reports menu with the required menu items automatically selected. (Pictured below in red.)
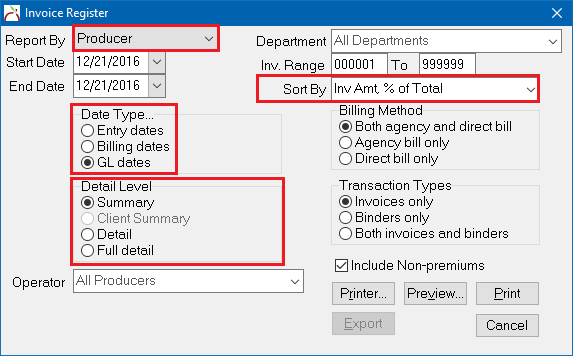
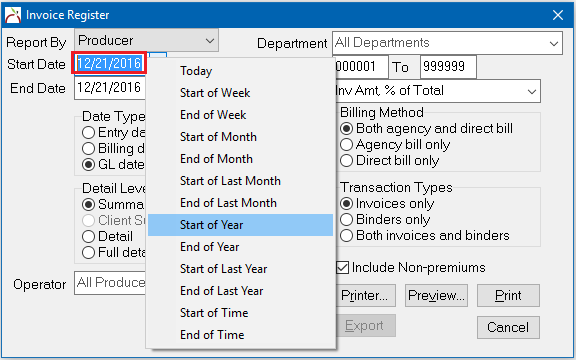
Select the desired date range, optionally using the right-click shortcuts within each field to quickly jump to specific days, and run the report.
There are dozens of report shortcuts available for premium production reports, expiration lists, claims reports, client or company cash reports and more.
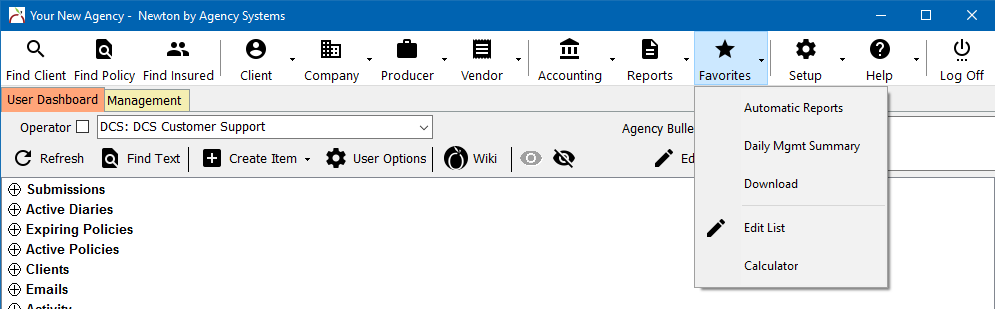
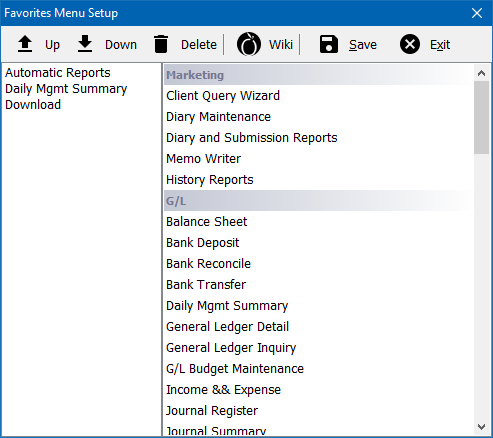
Favorites
The Favorites drop-down can be customized by the current user. Favorites for common reports such as the balance sheet or income and expense can be selected, or other menu items such as reconcile receivables or payables.
Select Favorites -> Edit List to choose the desired menu options. Double-click on each menu to add it to the favorites list on the left. Highlight a specific item and select Up or Down to update the order of the list. When finished, select Save.
Tabs
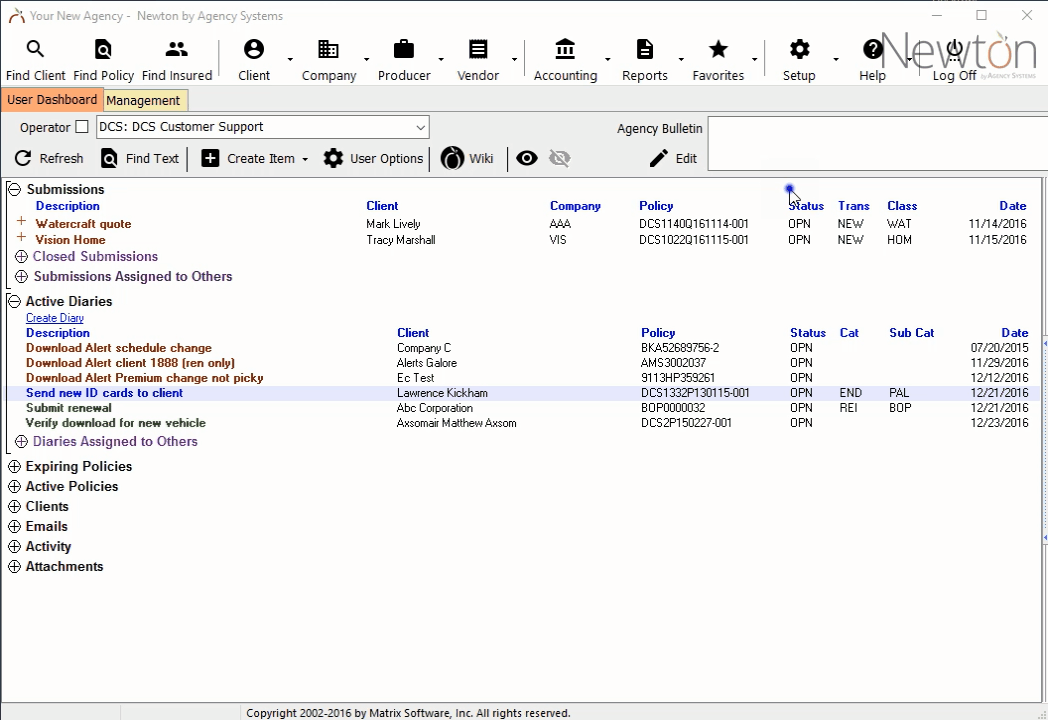
User Dashboard Tab
The dashboard tab consolidates all of your active tasks in one location. This includes open follow-up items (Submissions and Diaries), active and expiring policies, active clients, as well as information on e-mails, activity, and attachments.
See User Dashboard Tab for additional details.
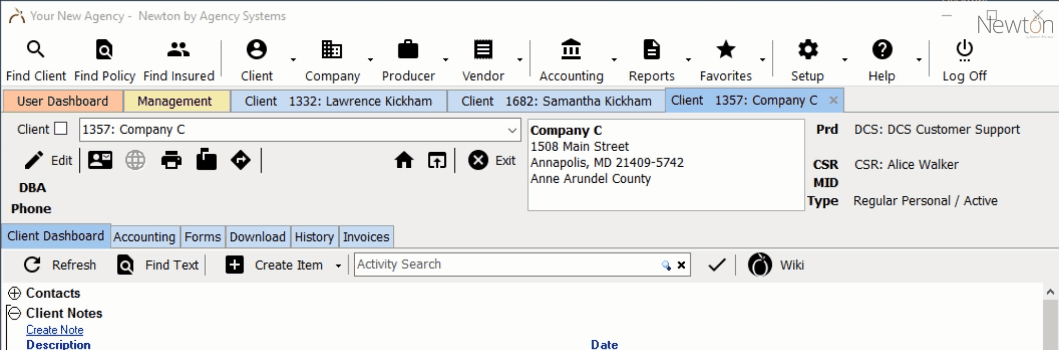
Client Tab
The client tab contains client information such as contact numbers and client type, and data tabs for different data types. The client sub-tabs are Client Dashboard, Accounting, Forms, Download, History, and Invoices.
See Client Tab for more information.
Policy Dashboard
The Policy Dashboard is the primary interface for Policy Tasks such as renewals, endorsements, and cancellations. There are multiple tabs for rich content such as ACORD Forms, and company Download data.
The Policy Dashboard contains multiple expandable bands on each tab to organize content such as activity, emails, and attachments.
See Policy Dashboard for more information.
Policy & Billing
Policy & Billing is the primary interface used to create new policies and invoices in Newton.
See Policy & Billing for more information.
Company Tab
The company tab contains a top toolbar of global options, a profile drop-down box to change the selected company, and information such as contact numbers and company address.
See Company Tab for more information.
Vendor Tab
The vendor tab has a Vendor Dashboard Tab, similar to the Company Tab, and an Vendor Accounting Tab which lists Vouchers, and vendor checks.
See Vendor Tab for more information.
Management Tab
The management tab provides several instant reports for agency managers, including a book of business that can easily be broken down by policy or line of business, and a bar graph of income and expense over time. The management tab is available only to operators with sufficient security to see the Balance Sheet.
See Management Tab for more information.
Navigating tabs and sub-tabs
Multitasking between multiple clients, and multiple policies within each client has never been easier. Policies and client diaries automatically open as sub-tabs on a client.
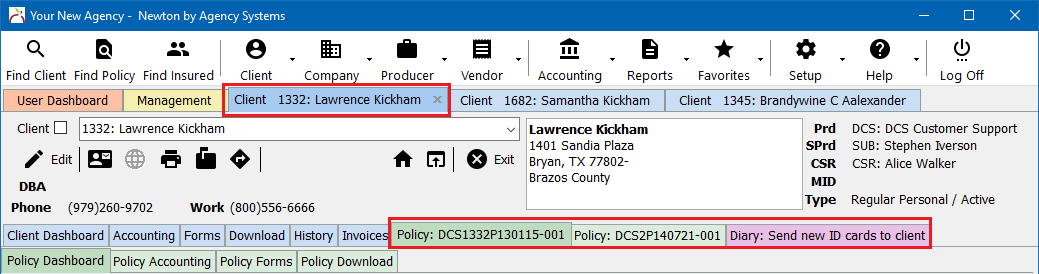
If a policy or diary is selected from the User Dashboard Tab, Management Tab, or Company Tab, Newton will automatically load the client tab first, then the selected item as a sub-tab.
- Multiple policies or diaries can be opened on the same client.
- When a Client Tab is closed, all sub-tabs will be automatically closed.
Optionally, the diary and policy dashboard windows can still be configured to open as a window by selecting the user preference within Setup -> Preferences -> User Options.
Closing Tabs
When a tab is closed, the system will automatically switch to the tab to the right. When there are no tabs remaining, the system will automatically switch to the first tab.

To close all open client tabs quickly, select the first client tab and select Exit. Without moving the mouse, continue selecting Exit until all tabs are closed.