Difference between revisions of "Agency Profile"
| (7 intermediate revisions by 2 users not shown) | |||
| Line 2: | Line 2: | ||
<table class="infobox" cellspacing="5" style="background-color: #FFFFFF; width:27em; text-align:left; border-spacing: 2px; line-height:1.5em;"> | <table class="infobox" cellspacing="5" style="background-color: #FFFFFF; width:27em; text-align:left; border-spacing: 2px; line-height:1.5em;"> | ||
<tr> | <tr> | ||
| − | <td>[[File: | + | <td>[[File:Ic_description_black_24dp.png|link=Newton User Guide#Setup Profiles]] Newton User Guide: [[Newton User Guide#Setup Profiles|Setup Profiles]]</td> |
</tr> | </tr> | ||
<tr> | <tr> | ||
| − | <td>[[File: Ic_settings_backup_restore_black_24dp.png]] Legacy Instructions Available: [http://wiki.agencysystems.com/mediawiki/index.php?title=Agency_Profile&oldid= | + | <td>[[File:Ic_info_black_24dp.png]] Required Software Version: [[:Category:Release Notes|Summer 2018]]</td> |
| + | </tr> | ||
| + | <tr> | ||
| + | <td>[[File: Ic_settings_backup_restore_black_24dp.png]] Legacy Instructions Available: [http://wiki.agencysystems.com/mediawiki/index.php?title=Agency_Profile&oldid=5345 Click Here]</td> | ||
</tr> | </tr> | ||
<tr style="background-color: #bdbdbd; text-align: center; font-weight:bold;"> | <tr style="background-color: #bdbdbd; text-align: center; font-weight:bold;"> | ||
| Line 14: | Line 17: | ||
<td> | <td> | ||
<ul> | <ul> | ||
| − | |||
<li>[[Order Printable Checks]]</li> | <li>[[Order Printable Checks]]</li> | ||
</ul> | </ul> | ||
| Line 32: | Line 34: | ||
</tr> | </tr> | ||
</table> | </table> | ||
| − | The Agency Profile screen is a list of codes which represent each of the datasets, separated by agency code, within a Newton database. When an operator first opens Newton, the Agency Code is the first field entered on the login screen. | + | The Agency Profile screen is a list of codes which represent each of the datasets, separated by agency code, within a Newton database. When an operator first opens Newton, the [[Log in to Newton by Agency Systems|Agency Code is the first field entered on the login screen]]. |
| + | |||
| + | == Before You Begin == | ||
| + | Access to view the Agency Profile requires the current operator to have [[Security System|Security System: Profiles -> Agency -> View]] access. | ||
| + | |||
| + | [[File:Ic_info_black_24dp.png]] See: [[Security System]] for more information. | ||
| − | == | + | == Create an Agency == |
| − | + | A new Agency Profile is only required for additional locations with separate client databases, or separate [[Report: Balance Sheet|Balance Sheet]] and [[Report: Income and Expense|Income & Expense]] report requirements. | |
| − | [[ | + | Most clients only need a single Agency Profile, typically "01". To edit your existing Agency Profile, see [[#Edit an Agency|the section below]]. |
| − | + | #From the '''[[Main Menu and Tab Navigation|Main Menu]]''', select '''Setup''' -> '''Agency'''. | |
| − | + | #Select '''Create New'''. | |
| − | + | #Enter the desired two digit code. Capital letters and numbers are both available. (Examples: '''02''', '''WA''', '''TX''') | |
| − | + | #Enter the name for the agency. | |
| − | + | #Select the '''Agency Type''' as '''Retail''', '''MGA''', or '''Test'''. (See [[#Basic Info Tab|the section below]] for more information) | |
| − | + | #Select '''Save'''. (Requires [[Security System|Security System: Profiles -> Agency -> Entry]] access.) | |
| − | + | #Select '''Yes''' when prompted to initialize profiles. | |
| + | #Exit Newton, and [[Log_in_to_Newton_by_Agency_Systems#Log_in_to_Newton_by_Agency_Systems|enter the new agency code and default operator at the login window]]. | ||
| − | === Agency Profile | + | The login window will automatically remember the most recent code used on the computer. To switch between agencies, enter the new Agency Profile code after starting Newton. |
| − | + | ||
| − | ==== Basic Info | + | ==== Create a Test Agency ==== |
| + | A test agency profile can be created allowing any users to practice entering data into Newton, without affecting the "live" database. All clients, policies, and accounting transactions entered into a test database will not affect the live data. | ||
| + | |||
| + | A test agency's financial transactions '''are not included''' in combined financial reports for all agencies such as the [[Report: Balance Sheet|Balance Sheet]], and [[Report: Income and Expense|Income & Expense]] reports. | ||
| + | |||
| + | To create a test database, [[#Create an Agency|follow the instructions above]] and select the '''Agency Type''' as '''Test'''. | ||
| + | |||
| + | == Edit an Agency == | ||
| + | #From the '''[[Main Menu and Tab Navigation|Main Menu]]''', select '''Setup''' -> '''Agency'''. | ||
| + | #The Agency Profile [[Log_in_to_Newton_by_Agency_Systems#Log_in_to_Newton_by_Agency_Systems|entered at the login window]] will be automatically loaded. | ||
| + | #Select the [[#Basic Info Tab|Basic Info Tab]], [[#Forms/Numbering Setups Tab|Forms/Numbering Setups Tab]], or [[#Accounting Setups Tab|Accounting Setups Tab]]. | ||
| + | #Enter or select any desired changes. (Examples: [[#Basic Info Tab|Agency name and address]], [[#Forms/Numbering Setups Tab|print format options]], [[#Accounting Setups Tab|fiscal year month]], [[#Accounting Setups Tab|default banks for cash and checks]]). | ||
| + | #Select '''Save'''. (Requires [[Security System|Security System: Profiles -> Agency -> Edit]] access.) | ||
| + | #Select '''Exit'''. | ||
| + | |||
| + | Some changes may require restarting Newton. | ||
| + | |||
| + | == Delete an Agency == | ||
| + | Deleting an Agency is not typically required. To exclude the Agency Profile financials from the combined financial reports, change the [[#Basic Info Tab|'''Agency Type''' to '''Test''']]. | ||
| + | #From the '''[[Main Menu and Tab Navigation|Main Menu]]''', select '''Setup''' -> '''Agency'''. | ||
| + | #The Agency Profile [[Log_in_to_Newton_by_Agency_Systems#Log_in_to_Newton_by_Agency_Systems|entered at the login window]] will be automatically loaded. | ||
| + | #To select a different Agency Profile, select '''Find''', then select the correct code. | ||
| + | #Select '''Delete'''. (Requires [[Security System|Security System: Profiles -> Agency -> Global]] access.) | ||
| + | #Confirm '''Yes''' when prompted. | ||
| + | #Enter the password provided by [[Help:Contents|Agency Systems Support]]. | ||
| + | |||
| + | == Agency Profile Interface == | ||
| + | From the '''[[Main Menu and Tab Navigation|Main Menu]]''', select '''Setup''' -> '''Agency'''. | ||
| + | |||
| + | [[File:Setup-agency-basic.png]] | ||
| + | ;Agency Profile Toolbar | ||
| + | *'''Find:''' - Find an agency code. | ||
| + | *'''First:''' - Skip to the first agency. | ||
| + | *'''Previous:''' - Skip to the previous agency. | ||
| + | *'''Next:''' - Skip to the next agency. | ||
| + | *'''Last:''' - Skip to the last agency. | ||
| + | *'''Create New:''' - Create a new agency. | ||
| + | *'''Print List:''' - Print a list of agency profiles. | ||
| + | *'''History:''' - View agency profile history. | ||
| + | *'''Delete:''' - Delete agency profile. | ||
| + | *'''Wiki:''' - Wiki Help Documentation. | ||
| + | *'''Save:''' - Save the current profile item. (ALT + S) | ||
| + | *'''Exit:''' - Exit the profile windows. (ALT + X) | ||
| + | |||
| + | === Basic Info Tab === | ||
The first tab contains the '''Agency Name''', and '''Agency Address'''. This information will display at the top of the Newton system, and on any printed reports. | The first tab contains the '''Agency Name''', and '''Agency Address'''. This information will display at the top of the Newton system, and on any printed reports. | ||
The '''Agency Type''' can be configured as a '''Retail''', '''MGA''', or a '''Test''' agency. A test agency's financial transactions are not included in combined financial reports for all agencies such as the [[Report: Balance Sheet|Balance Sheet]], and [[Report: Income and Expense|Income & Expense]] reports. | The '''Agency Type''' can be configured as a '''Retail''', '''MGA''', or a '''Test''' agency. A test agency's financial transactions are not included in combined financial reports for all agencies such as the [[Report: Balance Sheet|Balance Sheet]], and [[Report: Income and Expense|Income & Expense]] reports. | ||
| − | === | + | |
| + | === Forms/Numbering Setups Tab === | ||
The second tab contains print options for invoices and statements, and print formats for [[#Invoice Form Type|invoices]] and [[#Check Form Type|checks]]. | The second tab contains print options for invoices and statements, and print formats for [[#Invoice Form Type|invoices]] and [[#Check Form Type|checks]]. | ||
| − | [[File: | + | [[File:Setup-agency-formsnum.png]] |
===== Invoice Form Type ===== | ===== Invoice Form Type ===== | ||
| − | + | '''Laser''' - Default retail format that prints without prompting the operator for comments. | |
| − | + | ||
| + | '''Laser with Comments''' - Very similar to Laser format with the additional ability of three comment lines when printed. | ||
| + | |||
| + | [[File:Ic_info_black_24dp.png]] See: [[Invoice: Print An Invoice]] for more information. | ||
| + | |||
===== Check Form Type ===== | ===== Check Form Type ===== | ||
| − | + | '''Default (Top)''' - Prints at the top of the page in the Quickbooks check format. | |
| − | + | ||
| + | '''Laser (Middle)''' - Prints in the middle of the page. (Legacy format). | ||
| + | |||
| + | [[File:Ic_info_black_24dp.png]] See: [[Order Printable Checks]] for more information. | ||
| + | |||
===== Statement Form Type ===== | ===== Statement Form Type ===== | ||
| − | + | '''Default''' - The [[Newton_Release_Notes:_September_2015#Client_Statement_.282015.29|default statement introduced in 2015]]. | |
| − | + | ||
| + | '''Laser''' - The legacy statements available prior to the September 2015 release. | ||
| − | + | === Accounting Setups Tab === | |
The final tab controls when the '''Fiscal Year Begins''', and which [[General Ledger Profile|General Ledger Accounts are associated with certain ledger entries]]. | The final tab controls when the '''Fiscal Year Begins''', and which [[General Ledger Profile|General Ledger Accounts are associated with certain ledger entries]]. | ||
| − | In addition, the default [[Bank Profile|Cash and Check bank profiles]] can be configured. | + | In addition, the default [[Bank Profile|Cash and Check bank profiles]] can be configured and the '''default client statement delivery''' option can be selected. |
| − | [[File: | + | [[File:Setup-agency-accounting-2020.PNG]] |
Latest revision as of 18:05, 9 April 2020
| Related Pages |
| Related Categories |
The Agency Profile screen is a list of codes which represent each of the datasets, separated by agency code, within a Newton database. When an operator first opens Newton, the Agency Code is the first field entered on the login screen.
Contents
Before You Begin
Access to view the Agency Profile requires the current operator to have Security System: Profiles -> Agency -> View access.
![]() See: Security System for more information.
See: Security System for more information.
Create an Agency
A new Agency Profile is only required for additional locations with separate client databases, or separate Balance Sheet and Income & Expense report requirements.
Most clients only need a single Agency Profile, typically "01". To edit your existing Agency Profile, see the section below.
- From the Main Menu, select Setup -> Agency.
- Select Create New.
- Enter the desired two digit code. Capital letters and numbers are both available. (Examples: 02, WA, TX)
- Enter the name for the agency.
- Select the Agency Type as Retail, MGA, or Test. (See the section below for more information)
- Select Save. (Requires Security System: Profiles -> Agency -> Entry access.)
- Select Yes when prompted to initialize profiles.
- Exit Newton, and enter the new agency code and default operator at the login window.
The login window will automatically remember the most recent code used on the computer. To switch between agencies, enter the new Agency Profile code after starting Newton.
Create a Test Agency
A test agency profile can be created allowing any users to practice entering data into Newton, without affecting the "live" database. All clients, policies, and accounting transactions entered into a test database will not affect the live data.
A test agency's financial transactions are not included in combined financial reports for all agencies such as the Balance Sheet, and Income & Expense reports.
To create a test database, follow the instructions above and select the Agency Type as Test.
Edit an Agency
- From the Main Menu, select Setup -> Agency.
- The Agency Profile entered at the login window will be automatically loaded.
- Select the Basic Info Tab, Forms/Numbering Setups Tab, or Accounting Setups Tab.
- Enter or select any desired changes. (Examples: Agency name and address, print format options, fiscal year month, default banks for cash and checks).
- Select Save. (Requires Security System: Profiles -> Agency -> Edit access.)
- Select Exit.
Some changes may require restarting Newton.
Delete an Agency
Deleting an Agency is not typically required. To exclude the Agency Profile financials from the combined financial reports, change the Agency Type to Test.
- From the Main Menu, select Setup -> Agency.
- The Agency Profile entered at the login window will be automatically loaded.
- To select a different Agency Profile, select Find, then select the correct code.
- Select Delete. (Requires Security System: Profiles -> Agency -> Global access.)
- Confirm Yes when prompted.
- Enter the password provided by Agency Systems Support.
Agency Profile Interface
From the Main Menu, select Setup -> Agency.
- Agency Profile Toolbar
- Find: - Find an agency code.
- First: - Skip to the first agency.
- Previous: - Skip to the previous agency.
- Next: - Skip to the next agency.
- Last: - Skip to the last agency.
- Create New: - Create a new agency.
- Print List: - Print a list of agency profiles.
- History: - View agency profile history.
- Delete: - Delete agency profile.
- Wiki: - Wiki Help Documentation.
- Save: - Save the current profile item. (ALT + S)
- Exit: - Exit the profile windows. (ALT + X)
Basic Info Tab
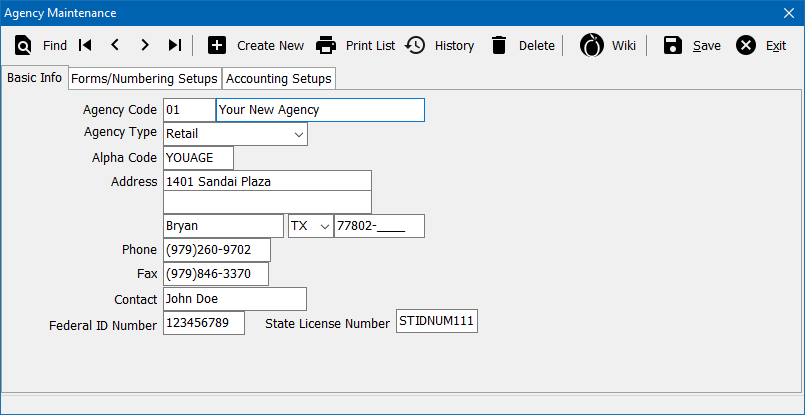
The first tab contains the Agency Name, and Agency Address. This information will display at the top of the Newton system, and on any printed reports.
The Agency Type can be configured as a Retail, MGA, or a Test agency. A test agency's financial transactions are not included in combined financial reports for all agencies such as the Balance Sheet, and Income & Expense reports.
Forms/Numbering Setups Tab
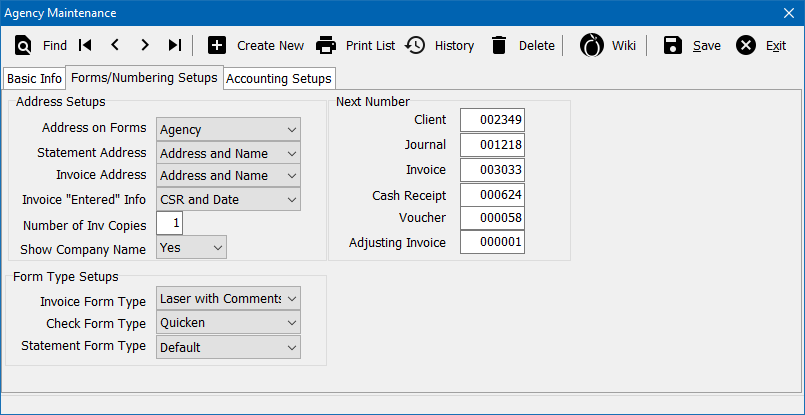
The second tab contains print options for invoices and statements, and print formats for invoices and checks.
Invoice Form Type
Laser - Default retail format that prints without prompting the operator for comments.
Laser with Comments - Very similar to Laser format with the additional ability of three comment lines when printed.
![]() See: Invoice: Print An Invoice for more information.
See: Invoice: Print An Invoice for more information.
Check Form Type
Default (Top) - Prints at the top of the page in the Quickbooks check format.
Laser (Middle) - Prints in the middle of the page. (Legacy format).
![]() See: Order Printable Checks for more information.
See: Order Printable Checks for more information.
Statement Form Type
Default - The default statement introduced in 2015.
Laser - The legacy statements available prior to the September 2015 release.
Accounting Setups Tab
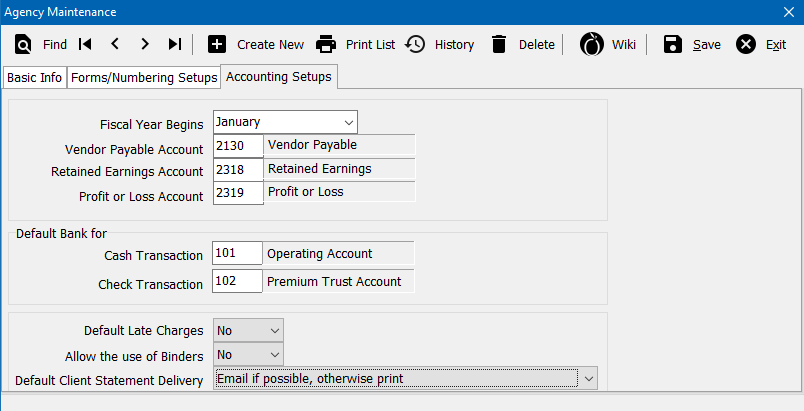
The final tab controls when the Fiscal Year Begins, and which General Ledger Accounts are associated with certain ledger entries.
In addition, the default Cash and Check bank profiles can be configured and the default client statement delivery option can be selected.


