Forms: Configure Forms
| Related Pages |
| Related Categories |
The Configure Forms administrative menu is used to modify global form behavior within Newton. An admin user can configure which forms are displayed by default in the create form list, options for hiding pages with no entry data, form date defaults, print settings, and New York ID bar code setup.
Contents
Before You Begin
Access to the administrative configure forms menu requires the current operator to have the highest Security System access, level 9. The menu will not be available for users without the necessary permission.
![]() See: Security System for more information.
See: Security System for more information.
Hide forms on the forms list
The list of forms available to any operator when a new form is created can be customized to hide items that are not needed. Forms can be removed from the list individually, or in bulk by state or line type. Although the form is hidden by default, hidden forms can be selected on-the-fly by selecting "Show hidden and replaced forms" when a new form is created.
![]() See: Forms for more information.
See: Forms for more information.
Hide an individual form
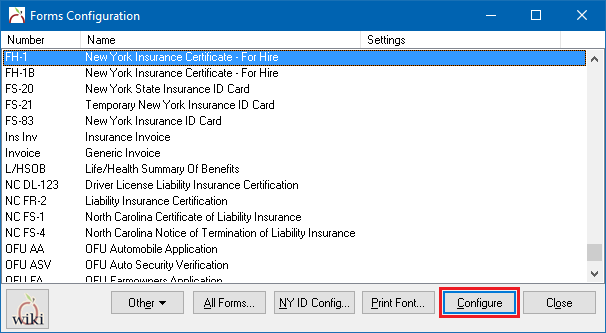
- Select Setup -> Configure Forms.
- Select the desired form and select Configure.
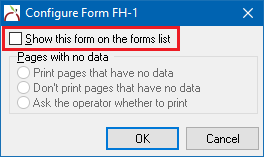
- Deselect Show this form on the forms list and select OK.
- The settings column will now list the form as "Hidden" by default.
- Repeat the process for other forms and select Close when finished.
Hide a group of forms
- Select Setup -> Configure Forms.
- Select Other and select one of the following.
- Hide All State Specific Except __: Hides all forms specific to a state that does not match the Agency Profile state.
- Hide All Commercial/Personal: Hides all commercial lines or personal lines forms.
- Hide All/Show All: Hides all forms or shows all forms. Select this to hide all forms, then individually show only the desired forms.
- Select Close when finished.
Hide pages with no data
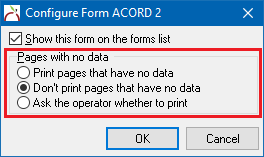
Some forms contain pages with no entry data. Forms which include pages with no data can be configured to never print the pages with no data, or ask the operator whether to print.
- Select Setup -> Configure Forms.
- Select the desired form and select Configure.
- Select either Don't print pages that have no data or Ask the operator whether to print. Select OK.
- The settings column will display the print setting.
- Repeat the process for other forms and select Close when finished.
If the option is disabled, suppressing pages is not available for that specific form.
Printed form dates
The date displayed on a printed or emailed form can be dynamically changed to the current date instead of using the date saved on form.
- Select Setup -> Configure Forms.
- Select All Forms....
- Choose one of the following Printed Form Dates options.
- Use date on form: Default option, which will continue to print the saved form date visible on the saved form.
- Always use current date, unless policy is expired: When a form is printed/emailed, the date will automatically show the current date, as long as one of the policies is active.
- Use current date when printed from My Insurance Dashboard, unless expired: Only forms generated by My Insurance Dashboard will automatically show the current date.
- Select Ok, then select Close.
Print settings
The print margins for all users can be modified for both portrait and landscape printers. Select Setup -> Configure Forms -> All Forms to override the default values.
The font used to print data on forms can be modified, including the display color. The setting will customize any printed, previewed, or emailed forms.
- Select Setup -> Configure Forms.
- Select Printer Font.
- Select the desired font and color, and select OK.
- Select Close.
![]() See: Display Issues Printing Forms or Viewing Window Buttons or contact support for technical issues.
See: Display Issues Printing Forms or Viewing Window Buttons or contact support for technical issues.
Schedule window size
Increasing the Schedule Window Size will adjust the text and field display size for schedule entry fields such as drivers, vehicles, properties and equipment.
![]() See:Make Text and Other Items Larger or Smaller for more information.
See:Make Text and Other Items Larger or Smaller for more information.
NY ID Config
The state of New York requires propriety ID cards that contain bar codes. Newton by Agency Systems is certified to produce the forms without needing any additional software.
![]() See: Forms: New York Driver ID Card Configuration for more information
See: Forms: New York Driver ID Card Configuration for more information


