Difference between revisions of "Attachments"
m (Mlively moved page Attachment Integration to Attachments) |
m |
||
| Line 36: | Line 36: | ||
</tr> | </tr> | ||
</table> | </table> | ||
| − | Newton provides you with the ability to attach electronic documents to your management system. Emails, PDF documents, and other scanned images can all be attached to Newton through drag-and-drop. A document can be attached to a given client, to a specific policy or submission, or to a | + | Newton provides you with the ability to attach electronic documents to your management system. Emails, PDF documents, and other scanned images can all be attached to Newton through drag-and-drop. A document can be attached to a given client, to a specific policy or submission, a company, or to a vendor. Once attached, an attachment can be shared using an [[Email Integration|email]], [[Batch Send]], or [[MyInsuranceDashboard.com Integration|My Insurance Dashboard]]. |
== Create an Attachment == | == Create an Attachment == | ||
Revision as of 20:59, 27 April 2018
| Related Pages |
| Related Categories |
Newton provides you with the ability to attach electronic documents to your management system. Emails, PDF documents, and other scanned images can all be attached to Newton through drag-and-drop. A document can be attached to a given client, to a specific policy or submission, a company, or to a vendor. Once attached, an attachment can be shared using an email, Batch Send, or My Insurance Dashboard.
Contents
Create an Attachment
Attachments and emails are both created through drag-and-drop.
Create a client attachment
- Search for and load the client or prospect.
- Left-click the mouse on the document (on your desktop) and hold down the mouse button.
- Drag the selected document onto the Client Dashboard tab and release the mouse button.
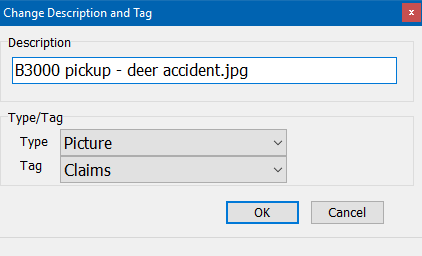
- Edit the Description for the file when prompted.
- Select the desired Type and/or Tag.
- Select Okay.
![]() See: Client Tab: Client Dashboard for more information.
See: Client Tab: Client Dashboard for more information.
Create a policy attachment
- Search for and load the client or prospect.
- On the Client Dashboard tab select the (+) next to Policies. (To expand the band by default, see: Preferences)
- Left-click the mouse on the document (on your desktop) and hold down the mouse button.
- Drag the selected document onto the Policy Dashboard and release the mouse button.
- Edit the Description for the file when prompted.
- Select the desired Type and/or Tag.
- Select Okay.
![]() See: Policy Dashboard for more information.
See: Policy Dashboard for more information.
Create a company attachment
A Company Tab is created by selecting Company -> Add Company Tab from the Main Menu.
- Load the company on a Company Tab.
- Left-click the mouse on the document (on your desktop) and hold down the mouse button.
- Drag the selected document onto the Company Tab and release the mouse button.
- Edit the Description for the file when prompted.
- Select the desired Type and/or Tag.
- Select Okay.
![]() See: Company Tab for more information.
See: Company Tab for more information.
Create a vendor attachment
A Vendor Tab is created by selecting Vendor -> Add Vendor Tab from the Main Menu.
- Load the vendor on a Vendor Tab.
- Left-click the mouse on the document (on your desktop) and hold down the mouse button.
- Drag the selected document onto the Vendor Tab and release the mouse button.
- Edit the Description for the file when prompted.
- Select the desired Type and/or Tag.
- Select Okay.
![]() See: Vendor Tab for more information.
See: Vendor Tab for more information.
Create a secure attachment
Anything attached through drag-and-drop from within the management tab is only visible from the management tab as a secure attachment.
Existing company and vendor attachments can be converted as secure attachments using the instructions below.
![]() See: Management Tab for more information.
See: Management Tab for more information.
Attachment types and user tags
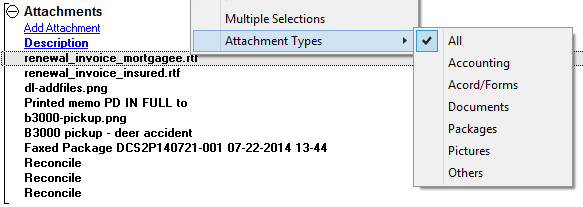
In addition to being saved to a policy, Attachments can be assigned a Type and User-Defined Tag. View filters can be applied for the types, similar to activity filters
Attachment type and tag setup
New attachments with common file extensions (.jpg, .docx, .pdf) will automatically be assigned an Attachment Type. Attachment types can also be manually assigned to user-created attachments. Attachment Type profiles cannot be modified.
| Type | Automatically Assigned To |
|---|---|
| Accounting | Client/Company Reconcile Reports, Commission Download/Commission Builder Reports |
| Document | Printed Memo Writer documents. |
| ACORD/Forms | Previewed or Printed ACORD forms. |
| Picture | |
| Other | |
| Packages | Batch print generated PDF packages. |
Attachment tag profiles are user-defined, created by office administrators.
![]() See: Attachments: Tag Setup for more information
See: Attachments: Tag Setup for more information
Filter attachment list by type
|
Attachment Type and Tag columns are displayed in the following locations:
|
- Search for and load the client or prospect.
- On the Client Dashboard tab select the (+) next to Attachments.
- Right-Click on the attachment and select Attachment Types. (By default, All will be selected).
- Select the desired Attachment Type from the list.
- The attachment list will be automatically filtered to only include attachments saved as the selected Attachment Type.
- Multiple attachment types can be selected by choosing additional types.
Rename, move, or remove an attachment
Rename an Attachment
- Search for and load the client, prospect, policy, company or vendor.
- Expand the Attachments Band.
- Right-Click on the attachment and select Edit Description.
- Enter a new Description.
- Select the desired Type and/or Tag.
- Select OK.
Move an attachment
Existing attachments can be moved from the client file, to a specific policy on the client. In addition, attachments can be moved between two policies, or removed from a policy.
- Search for and load the client or prospect.
- On the Client Dashboard tab select the (+) next to Attachments.
- Right-Click on the attachment and select Move to policy.
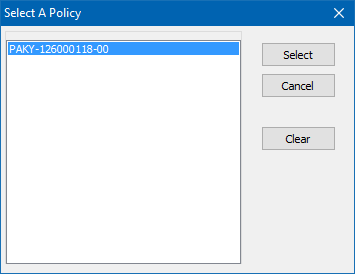
- Highlight the correct policy number by left-clicking on the number within the list, and choose Select. (To remove the attachment from the policy, select Clear.)
- Confirm Yes to move the attachment.
![]() See: Policy Dashboard for more information
See: Policy Dashboard for more information
Move multiple attachments
Attachments can be moved individually using the steps above or multiple items can be moved in a batch.
- Search for and load the client or prospect.
- On the Client Dashboard tab select the (+) next to Attachments.
- Right-Click on the attachment and select Multiple Selections.
- After enabling Multiple Selections, choose the items by clicking on the check boxes or the attachment descriptions.
- After the items are selected, Right-Click on an attachment and select Move to policy.
- Highlight the correct policy number by left-clicking on the number within the list, and choose Select. (To remove the attachments from the policy, select Clear.)
- Confirm Yes to move the attachments.
![]() See: Policy Dashboard for more information
See: Policy Dashboard for more information
Convert company and vendor secure attachments
Company and Vendor attachments can be converted to secure attachments.
- Load a Company Tab or Vendor Tab.
- Select the (+) next to Attachments.
- Right-Click on the attachment and select Convert to Secure Attachment.
- Select Yes to confirm.
- The attachment will be removed from the company or vendor tabs, and only available from the Management Tab.
![]() See: Management Tab for more information
See: Management Tab for more information
Delete an attachment
Attachments links can be removed from clients, policies, vendors or companies.
![]() You cannot recover a deleted attachment link.
You cannot recover a deleted attachment link.
- Load a client on one of the client tabs, or load a Company Tab or Vendor Tab.
- Select the (+) next to Attachments.
- Right-Click on the attachment and select Remove Link or Delete. (Requires Security System: AR -> Policy Transaction -> Global access.)
- Confirm Yes to remove the attachment.
Any activity corresponding to the original attachment will be unchanged, with a new activity created representing the delete action.
Delete multiple attachments
Attachments can be removed individually using the steps above or multiple items can be removed in a batch.
![]() You cannot recover a deleted attachment link.
You cannot recover a deleted attachment link.
- Load a client on one of the client tabs, or load a Company Tab or Vendor Tab.
- Select the (+) next to Attachments.
- Right-Click on the attachment and select Multiple Selections.
- After enabling Multiple Selections, choose the items by clicking on the check boxes or the attachment descriptions.
- After the items are selected, Right-Click on an attachment again and select Remove Link or Delete. (Requires Security System: AR -> Policy Transaction -> Global access.)
- Confirm Yes to remove the attachments.


