Difference between revisions of "Cash Payment Fee Wizard"
m (updated 'policy express' with 'policy dashboard') |
|||
| (12 intermediate revisions by 2 users not shown) | |||
| Line 1: | Line 1: | ||
| − | [[Category:Cash]] | + | [[Category:Cash]][[Category:Profiles]][[Category:Receivables]] |
| − | The cash payment fee wizard allows the operator to easily add multiple fees while taking a | + | <table class="infobox" cellspacing="5" style="background-color: #FFFFFF; width:27em; text-align:left; border-spacing: 2px; line-height:1.5em;"> |
| + | <tr style="background-color: #bdbdbd; text-align: center; font-weight:bold;"> | ||
| + | <td>Related Pages</td> | ||
| + | </tr> | ||
| + | |||
| + | <tr> | ||
| + | <td> | ||
| + | <ul> | ||
| + | <li>[[Agency Fee Wizard]]</li> | ||
| + | <li>[[Training 6: Accounting]]</li> | ||
| + | </ul> | ||
| + | </td> | ||
| + | </tr> | ||
| + | |||
| + | <tr style="background-color: #d3d3d3; text-align: center; "> | ||
| + | <td>Related Categories</td> | ||
| + | </tr> | ||
| + | |||
| + | <tr> | ||
| + | <td> | ||
| + | <ul> | ||
| + | <li>[[:Category:Cash|Cash]]</li> | ||
| + | <li>[[:Category:Profiles|Profiles]]</li> | ||
| + | <li>[[:Category:Receivables|Receivables]]</li> | ||
| + | </ul> | ||
| + | </td> | ||
| + | </tr> | ||
| + | </table> | ||
| + | The cash payment fee wizard allows the operator to easily add multiple fees while taking a payment. Multiple user-defined templates can be used for the same transaction creating a quick-and-easy process, with the complex adjustments automated in the background. | ||
== Payment Fee Wizard Templates == | == Payment Fee Wizard Templates == | ||
| − | Access to the payment fee setup screen requires the operator to have '''Security System -> AR -> Late Charge Setups -> Read & Entry''' access. | + | Access to the payment fee setup screen requires the operator to have '''[[Security System]] -> AR -> Late Charge Setups -> Read & Entry''' access. |
| − | The available fee profiles are configured by selecting ''' | + | The available fee profiles are configured by selecting '''Setup -> Other -> Payment Fee Setup'''. |
| − | [[File: | + | [[File:setup-other-cashfee-empty.png]] |
| − | === Create A New Fee Wizard Template For | + | === Create A New Fee Wizard Template For Income === |
| − | #Select ''' | + | #Select '''Create New'''. |
#Enter a Fee Name. | #Enter a Fee Name. | ||
| − | #Select the fee invoice line '''Transaction''' code. ''(Select | + | #Select the fee invoice line '''Transaction''' code. ''(Select Setup -> Transaction to create a new code)'' |
| − | #Select the fee invoice line '''Class''' code. ''(Select | + | #Select the fee invoice line '''Class''' code. ''(Select Setup -> Class to create a new code)'' |
| − | #Select the '''Fee Type''' as | + | #Select the '''Fee Type''' as Income. |
| − | #:''' | + | #:'''Income''': Records the entire receivable as GL 4110 (Agency Bill income). A portion of the invoice can be optionally split with a producer and/or sub-producer. The income can be optionally moved to a separate GL account. |
#Enter a '''Default Fee''' amount. If '''Editable''' is selected, the amount can be altered when a fee is entered. | #Enter a '''Default Fee''' amount. If '''Editable''' is selected, the amount can be altered when a fee is entered. | ||
#The '''Producer''' code will default to the current policy producer unless a specific code is selected. Enter a producer commission percentage if desired. | #The '''Producer''' code will default to the current policy producer unless a specific code is selected. Enter a producer commission percentage if desired. | ||
#The '''Sub Producer''' code will default to the current policy sub-producer unless a specific code is selected. Enter a sub-producer commission percentage if desired. | #The '''Sub Producer''' code will default to the current policy sub-producer unless a specific code is selected. Enter a sub-producer commission percentage if desired. | ||
#Select '''Save -> Exit'''. | #Select '''Save -> Exit'''. | ||
| − | [[File: | + | [[File:setup-other-cashfee-cm-ppf-noteditable.png]] |
To automatically move the income from 4110 to another GL account, select '''Offset GL''' to specify the account. | To automatically move the income from 4110 to another GL account, select '''Offset GL''' to specify the account. | ||
=== Create A New Fee Wizard Template For Expense === | === Create A New Fee Wizard Template For Expense === | ||
| − | #Select ''' | + | #Select '''Create New'''. |
#Enter a Fee Name. | #Enter a Fee Name. | ||
| − | #Select the fee invoice line '''Transaction''' code. ''(Select | + | #Select the fee invoice line '''Transaction''' code. ''(Select Setup -> Transaction to create a new code)'' |
| − | #Select the fee invoice line '''Class''' code. ''(Select | + | #Select the fee invoice line '''Class''' code. ''(Select Setup -> Class to create a new code)'' |
#Select the '''Fee Type''' Expense. | #Select the '''Fee Type''' Expense. | ||
#:'''Expense''': Automatically moves the entire fee amount from 4110 (Agency Bill Income) to a user-specified offset GL. | #:'''Expense''': Automatically moves the entire fee amount from 4110 (Agency Bill Income) to a user-specified offset GL. | ||
#Enter a '''Default Fee''' amount. If '''Editable''' is selected, the amount can be altered when a fee is entered. | #Enter a '''Default Fee''' amount. If '''Editable''' is selected, the amount can be altered when a fee is entered. | ||
| − | #Select the '''Offset | + | #Select the '''Offset GL''' where the Agency Bill Income (4110) balance will be offset. |
#Select '''Save -> Exit'''. | #Select '''Save -> Exit'''. | ||
| − | [[File: | + | [[File:Setup-other-cashfee-exp-bnk-noteditable.png]] |
| + | |||
=== Edit or Delete an Existing Fee Wizard Template === | === Edit or Delete an Existing Fee Wizard Template === | ||
| − | Select ''' | + | Select '''Setup -> Other -> Payment Fee Setup'''. |
To edit an existing template, select the fee name from the drop-down to make changes. | To edit an existing template, select the fee name from the drop-down to make changes. | ||
| Line 42: | Line 71: | ||
== How To Add A Fee To A Cash Payment == | == How To Add A Fee To A Cash Payment == | ||
#The new cash payment fee wizard can be accessed from any of the Attach Payment screens including: | #The new cash payment fee wizard can be accessed from any of the Attach Payment screens including: | ||
| − | #*Policy | + | #*Policy Dashboard -> Create Item -> Client Payment |
| − | #* | + | #*Client Dashboard -> Policies Band -> Right-Click -> Client Payment |
| − | #* | + | #*Accounting Tab -> Right-Click -> Attach Cash |
| − | #* | + | #*Policy & Billing -> Invoice -> Payment -> Client Payment ''(Optionally, select Create Client Payment on Policy & Billing)'' |
#Select '''Fees'''. | #Select '''Fees'''. | ||
#Enter the customer's check # or select F2 for cash. | #Enter the customer's check # or select F2 for cash. | ||
| Line 54: | Line 83: | ||
#The total fee amount and total receivable will be displayed. | #The total fee amount and total receivable will be displayed. | ||
#Select the desired '''Print Items''', and select '''Ok'''. | #Select the desired '''Print Items''', and select '''Ok'''. | ||
| − | [[File: | + | [[File:client-cashfee-entry.png]] |
== Example Fee Processing == | == Example Fee Processing == | ||
=== Attach A Cash Transmittal to a 0.00 Invoice === | === Attach A Cash Transmittal to a 0.00 Invoice === | ||
| − | It is very common for direct bill payments to be left on-account before a policy is invoiced. The policy | + | It is very common for direct bill payments to be left on-account before a policy is invoiced. The policy dashboard -> client payment option will only attach the transmittals to an invoice if it is attached to the current (last) sequence. The majority of users leave the items on-account, since the accounting transactions offset to create a 0.00 balance. |
If your office prefers to always have the cash transmittals attached to an invoice, the new payment fee wizard can be used to create a 0.00 invoice on-the-fly. | If your office prefers to always have the cash transmittals attached to an invoice, the new payment fee wizard can be used to create a 0.00 invoice on-the-fly. | ||
==== Cash Transmittal 0.00 Invoice Setup ==== | ==== Cash Transmittal 0.00 Invoice Setup ==== | ||
Create a class code for the 0.00 invoice. | Create a class code for the 0.00 invoice. | ||
| − | #Select ''' | + | #Select '''Setup -> Class'''. |
| − | #Select ''' | + | #Select '''Create New'''. |
#Enter a 3 digit class code, and name. (''From Example: PAY - PAYMENT'') | #Enter a 3 digit class code, and name. (''From Example: PAY - PAYMENT'') | ||
#Select <TAB> to populate the alpha code. | #Select <TAB> to populate the alpha code. | ||
#Select Class Type Other. | #Select Class Type Other. | ||
#Select '''Save''' then '''Exit'''. | #Select '''Save''' then '''Exit'''. | ||
| − | |||
| − | Create a [[#Create A New Fee Wizard For | + | Create a [[#Create A New Fee Wizard Template For Income|payment fee wizard template]] to generate the 0.00 invoice. |
| − | #Select ''' | + | #Select '''Setup -> Other -> Payment Fee Setup'''. |
| − | #Select ''' | + | #Select '''Create New'''. |
#Enter a name to display in the fee wizard. (''From example: Direct Bill Payment'') | #Enter a name to display in the fee wizard. (''From example: Direct Bill Payment'') | ||
| − | #Select '''Transaction code: Fee'''. (''You could alternatively create a new transaction code under | + | #Select '''Transaction code: Fee'''. (''You could alternatively create a new transaction code under Setup -> Transaction if desired'') |
#Select '''Class -> PAY: PAYMENT'''. | #Select '''Class -> PAY: PAYMENT'''. | ||
#Select the '''Editable''' check box. | #Select the '''Editable''' check box. | ||
#Select '''Save''' then '''Exit'''. | #Select '''Save''' then '''Exit'''. | ||
| − | #:[[File:feesetup-0-payment.png]] | + | #:[[File:client-feesetup-0-payment.png]] |
==== Cash Transmittal 0.00 Invoice Processing ==== | ==== Cash Transmittal 0.00 Invoice Processing ==== | ||
#Load the policy on the client's basic tab. | #Load the policy on the client's basic tab. | ||
| − | #'''Right-Click''' on the policy number and select ''' | + | #'''Right-Click''' on the policy number and select '''Client Payment'''. (''Optionally, open the Policy Dashboard and select Create Item -> Client Payment'') |
#Select '''Fees'''. | #Select '''Fees'''. | ||
| − | #:[[File:create-cash-fee | + | #:[[File:client-create-cash-fee.png]] |
#Enter the amount for the transmittal payment. | #Enter the amount for the transmittal payment. | ||
#Verify the Transaction code for the payment fee wizard is set to '''Fee'''. (''You only have to do this once per computer as it will be remembered for future fees.'') | #Verify the Transaction code for the payment fee wizard is set to '''Fee'''. (''You only have to do this once per computer as it will be remembered for future fees.'') | ||
| Line 91: | Line 119: | ||
#Select the desired items to automatically print. | #Select the desired items to automatically print. | ||
#Select '''Ok'''. | #Select '''Ok'''. | ||
| − | #:[[File:payment-wiz-create-0-pay.png]] | + | #:[[File:client-payment-wiz-create-0-pay.png]] |
Latest revision as of 14:04, 17 April 2019
| Related Pages |
| Related Categories |
The cash payment fee wizard allows the operator to easily add multiple fees while taking a payment. Multiple user-defined templates can be used for the same transaction creating a quick-and-easy process, with the complex adjustments automated in the background.
Contents
Payment Fee Wizard Templates
Access to the payment fee setup screen requires the operator to have Security System -> AR -> Late Charge Setups -> Read & Entry access.
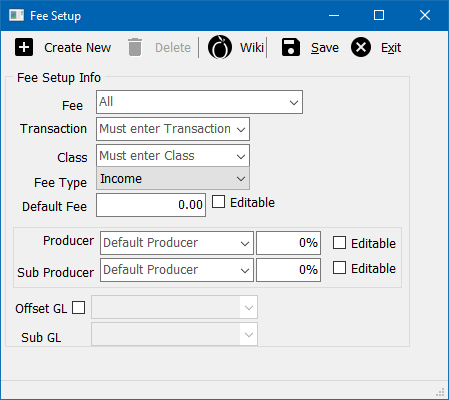
The available fee profiles are configured by selecting Setup -> Other -> Payment Fee Setup.
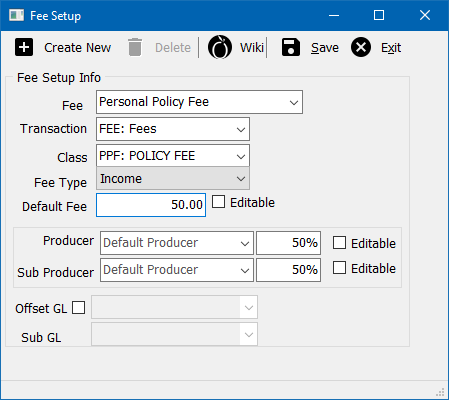
Create A New Fee Wizard Template For Income
- Select Create New.
- Enter a Fee Name.
- Select the fee invoice line Transaction code. (Select Setup -> Transaction to create a new code)
- Select the fee invoice line Class code. (Select Setup -> Class to create a new code)
- Select the Fee Type as Income.
- Income: Records the entire receivable as GL 4110 (Agency Bill income). A portion of the invoice can be optionally split with a producer and/or sub-producer. The income can be optionally moved to a separate GL account.
- Enter a Default Fee amount. If Editable is selected, the amount can be altered when a fee is entered.
- The Producer code will default to the current policy producer unless a specific code is selected. Enter a producer commission percentage if desired.
- The Sub Producer code will default to the current policy sub-producer unless a specific code is selected. Enter a sub-producer commission percentage if desired.
- Select Save -> Exit.
To automatically move the income from 4110 to another GL account, select Offset GL to specify the account.
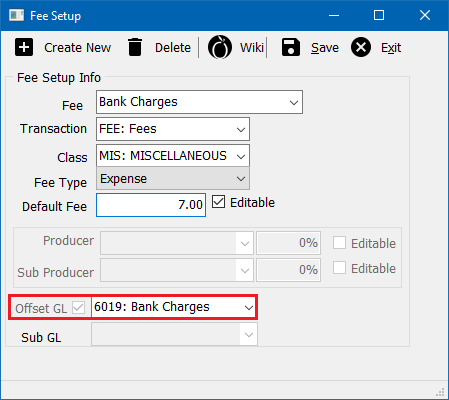
Create A New Fee Wizard Template For Expense
- Select Create New.
- Enter a Fee Name.
- Select the fee invoice line Transaction code. (Select Setup -> Transaction to create a new code)
- Select the fee invoice line Class code. (Select Setup -> Class to create a new code)
- Select the Fee Type Expense.
- Expense: Automatically moves the entire fee amount from 4110 (Agency Bill Income) to a user-specified offset GL.
- Enter a Default Fee amount. If Editable is selected, the amount can be altered when a fee is entered.
- Select the Offset GL where the Agency Bill Income (4110) balance will be offset.
- Select Save -> Exit.
Edit or Delete an Existing Fee Wizard Template
Select Setup -> Other -> Payment Fee Setup.
To edit an existing template, select the fee name from the drop-down to make changes.
To delete an existing template, select the fee name from the drop-down and select Delete.
How To Add A Fee To A Cash Payment
- The new cash payment fee wizard can be accessed from any of the Attach Payment screens including:
- Policy Dashboard -> Create Item -> Client Payment
- Client Dashboard -> Policies Band -> Right-Click -> Client Payment
- Accounting Tab -> Right-Click -> Attach Cash
- Policy & Billing -> Invoice -> Payment -> Client Payment (Optionally, select Create Client Payment on Policy & Billing)
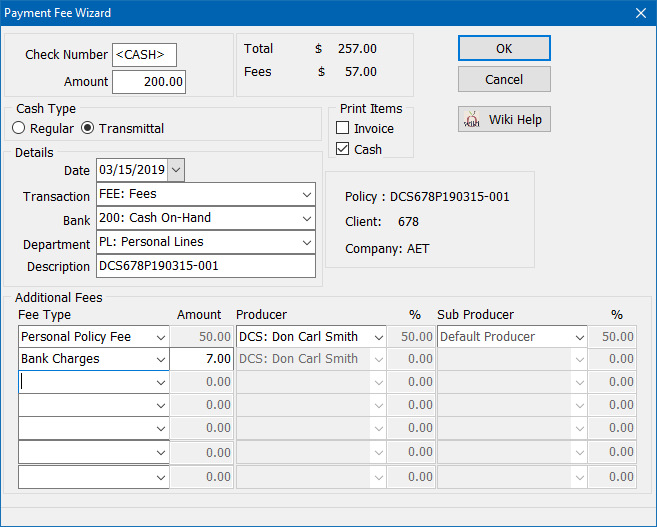
- Select Fees.
- Enter the customer's check # or select F2 for cash.
- Enter the policy premium payment Amount.
- Select the policy Transaction code. (Typically FEE). The previously selected code will be automatically loaded.
- Select the desired Fee Types.
- Edit the fee amount for each if desired or available.
- The total fee amount and total receivable will be displayed.
- Select the desired Print Items, and select Ok.
Example Fee Processing
Attach A Cash Transmittal to a 0.00 Invoice
It is very common for direct bill payments to be left on-account before a policy is invoiced. The policy dashboard -> client payment option will only attach the transmittals to an invoice if it is attached to the current (last) sequence. The majority of users leave the items on-account, since the accounting transactions offset to create a 0.00 balance.
If your office prefers to always have the cash transmittals attached to an invoice, the new payment fee wizard can be used to create a 0.00 invoice on-the-fly.
Cash Transmittal 0.00 Invoice Setup
Create a class code for the 0.00 invoice.
- Select Setup -> Class.
- Select Create New.
- Enter a 3 digit class code, and name. (From Example: PAY - PAYMENT)
- Select <TAB> to populate the alpha code.
- Select Class Type Other.
- Select Save then Exit.
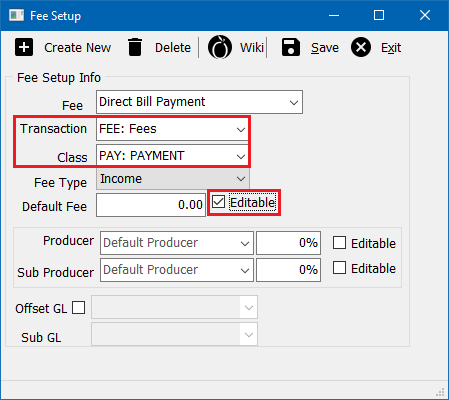
Create a payment fee wizard template to generate the 0.00 invoice.
- Select Setup -> Other -> Payment Fee Setup.
- Select Create New.
- Enter a name to display in the fee wizard. (From example: Direct Bill Payment)
- Select Transaction code: Fee. (You could alternatively create a new transaction code under Setup -> Transaction if desired)
- Select Class -> PAY: PAYMENT.
- Select the Editable check box.
- Select Save then Exit.
Cash Transmittal 0.00 Invoice Processing
- Load the policy on the client's basic tab.
- Right-Click on the policy number and select Client Payment. (Optionally, open the Policy Dashboard and select Create Item -> Client Payment)
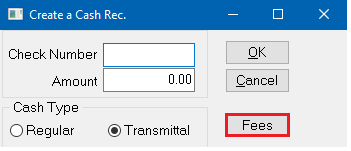
- Select Fees.
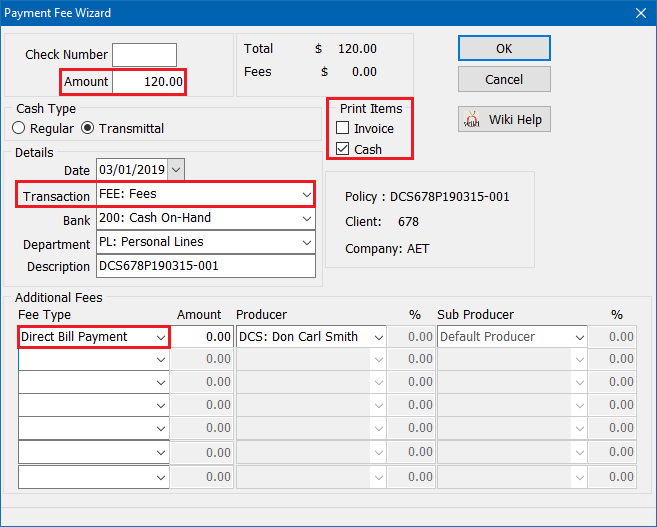
- Enter the amount for the transmittal payment.
- Verify the Transaction code for the payment fee wizard is set to Fee. (You only have to do this once per computer as it will be remembered for future fees.)
- Select the Fee Type. (From Example: Direct Bill Payment)
- Select the desired items to automatically print.
- Select Ok.
