Difference between revisions of "Newton Release Notes: March 2014"
(→Adjust Direct Bill Commission for Fees or Agency Bill Payable: added anchor link to cm adjust download settings) |
|||
| (9 intermediate revisions by the same user not shown) | |||
| Line 1: | Line 1: | ||
[[Category:Release Notes]] | [[Category:Release Notes]] | ||
| − | A new [[#Cash Payment Fee Wizard|cash payment fee wizard]] has been added which allows the operator to easily add multiple fees while taking a | + | A new [[#Cash Payment Fee Wizard|cash payment fee wizard]] has been added which allows the operator to easily add multiple fees while taking a payment. Multiple user-defined templates can be used for the same transaction creating a quick-and-easy process, with the complex adjustments automated in the background. |
A major revision to forms management is now available called [[#Form Bundles|Form Bundles]]. A Form Bundle allows the user to group ACORD forms, vehicles, properties, drivers, or equipment, specific to a policy transaction. A Form Bundle provides a clear management tool designed specifically, but not limited to commercial lines accounts that do not offer risk download. | A major revision to forms management is now available called [[#Form Bundles|Form Bundles]]. A Form Bundle allows the user to group ACORD forms, vehicles, properties, drivers, or equipment, specific to a policy transaction. A Form Bundle provides a clear management tool designed specifically, but not limited to commercial lines accounts that do not offer risk download. | ||
| Line 12: | Line 12: | ||
== Cash == | == Cash == | ||
=== Cash Payment Fee Wizard === | === Cash Payment Fee Wizard === | ||
| − | The new cash payment fee wizard allows the operator to easily add multiple fees while taking a direct payment. Multiple user-defined templates can be used for the same transaction creating a quick-and-easy process, with the complex adjustments automated in the background. | + | The new [[Cash Payment Fee Wizard|cash payment fee wizard]] allows the operator to easily add multiple fees while taking a direct payment. Multiple user-defined templates can be used for the same transaction creating a quick-and-easy process, with the complex adjustments automated in the background. |
==== Payment Fee Wizard Templates ==== | ==== Payment Fee Wizard Templates ==== | ||
Access to the payment fee setup screen requires the operator to have '''Security System -> AR -> Late Charge Setups -> Read & Entry''' access. | Access to the payment fee setup screen requires the operator to have '''Security System -> AR -> Late Charge Setups -> Read & Entry''' access. | ||
| Line 19: | Line 19: | ||
[[File:profiles-cashfee-empty.png]] | [[File:profiles-cashfee-empty.png]] | ||
| − | ===== Create A New Fee Wizard Template For | + | ===== Create A New Fee Wizard Template For Income ===== |
#Select '''Add'''. | #Select '''Add'''. | ||
#Enter a Fee Name. | #Enter a Fee Name. | ||
#Select the fee invoice line '''Transaction''' code. ''(Select Profiles -> Transaction to create a new code)'' | #Select the fee invoice line '''Transaction''' code. ''(Select Profiles -> Transaction to create a new code)'' | ||
#Select the fee invoice line '''Class''' code. ''(Select Profiles -> Class to create a new code)'' | #Select the fee invoice line '''Class''' code. ''(Select Profiles -> Class to create a new code)'' | ||
| − | #Select the '''Fee Type''' as | + | #Select the '''Fee Type''' as Income. |
| − | #:''' | + | #:'''Income''': Records the entire receivable as GL 4110 (Agency Bill income). A portion of the invoice can be optionally split with a producer and/or sub-producer. The income can be optionally moved to a separate GL account. |
#Enter a '''Default Fee''' amount. If '''Editable''' is selected, the amount can be altered when a fee is entered. | #Enter a '''Default Fee''' amount. If '''Editable''' is selected, the amount can be altered when a fee is entered. | ||
#The '''Producer''' code will default to the current policy producer unless a specific code is selected. Enter a producer commission percentage if desired. | #The '''Producer''' code will default to the current policy producer unless a specific code is selected. Enter a producer commission percentage if desired. | ||
| Line 68: | Line 68: | ||
#Select the desired '''Print Items''', and select '''Ok'''. | #Select the desired '''Print Items''', and select '''Ok'''. | ||
[[File:Cashfee-entry.png]] | [[File:Cashfee-entry.png]] | ||
| + | |||
| + | === Cash Receipt === | ||
| + | The cash receipt has been updated with additional details. ([[Media:Cash_Receipt_With_Signature.pdf|Click here to view an example .PDF cash receipt.]]) | ||
| + | *Displays the company name and policy number for all single-invoice receipts, not just transmittals. | ||
| + | *Adds an operator signature above the operator name. The signature will be the forms signature saved to the producer profile. | ||
| + | *Adds the agency phone number below the agency name and address block. | ||
| + | *Adds a policy class name (''Example: Homeowners, Dwelling Fire, etc''). | ||
| + | *Adds the Transaction Name for the policy. (Example: ''Renewal, New Business, etc.'') | ||
| + | *Adds a text field which allows the agency to add static text to all cash receipts, such as a disclaimer. | ||
| + | |||
| + | ==== Which Policy Sequence Is Saved To The Cash Receipt? ==== | ||
| + | Policy details are only saved for client cash receipts. Some policy details, such as the transaction code and date range, are based on the assigned policy sequence. The policy sequence will either be the the very last sequence on file for the policy, or a specific transaction depending on how the client cash receipt is created. | ||
| + | |||
| + | ;Policy Details + Specific Policy Sequence Saved To Cash Receipt (Both Regular & Transmittal) | ||
| + | *Client Account Tab -> Right Click On An Invoice -> Attach Payment. | ||
| + | *Express Billing -> Save Payment | ||
| + | *Express Billing -> Payments -> Attach Cash -> Create New Client Receipt | ||
| + | |||
| + | ;Policy Details (Last Policy Sequence) Saved to Cash Receipt (Both Regular & Transmittal) | ||
| + | *Policy Express -> Create Item-> Payment | ||
| + | *Client Basic Tab -> Right Click On An Active Policy -> Attach Payment. | ||
| + | *AR -> Cash Transaction -> GL 1120 | ||
| + | |||
| + | ;Policy Details Not Saved to Cash Receipt | ||
| + | *Reconcile Client Receivables | ||
| + | *Cash Receipts posted to anything other than 1120. | ||
| + | *AR -> Cash Transaction receipts where the policy number and company code are not specified. | ||
| + | |||
| + | ==== Cash Receipt Options ==== | ||
| + | Select '''Other -> Client Explorer Options -> Cash Options'''. (''Requires operator security level 9'') | ||
| + | *Check '''Show Signature On Receipt''' to enable the cash receipt signature | ||
| + | *Un-Check '''Show Policy Details on Regular and Transmittal Receipts''' to disable including policy details on regular cash receipts. | ||
| + | *Enter any desired text to be printed on every cash receipt. (''Line-breaks are not currently supported'') | ||
| + | |||
| + | [[File:menu-clientexpopt-cashoptions.png]] | ||
=== Cash Deposit Report === | === Cash Deposit Report === | ||
| Line 170: | Line 205: | ||
Adjustments can now be made to direct bill commission within Commission Download. The adjustments can include a reduction for MVR expense, 2110 Agency Bill payable for combined statements, or other fees charged by the company. | Adjustments can now be made to direct bill commission within Commission Download. The adjustments can include a reduction for MVR expense, 2110 Agency Bill payable for combined statements, or other fees charged by the company. | ||
| − | From the Cash Details screen within Commission Download, select '''Adjust Commission Received...''' | + | From the Cash Details screen within Commission Download, select '''Adjust Commission Received...'''. ''(The option will not be available until the [[#Download Options - Commission Adjustments|new commission adjustment download settings]] are configured.)'' |
[[File:commissiondownload-editcash-adjustcommission.png]] | [[File:commissiondownload-editcash-adjustcommission.png]] | ||
| Line 223: | Line 258: | ||
[[File:downloadoptions-defaultcheckbank.png]] | [[File:downloadoptions-defaultcheckbank.png]] | ||
| − | + | ==== Download Options - Commission Adjustments ==== | |
A new tab is available for Commission Adjustments. These options are used when a [[#Adjust Direct Bill Commission for Fees or Agency Bill Payable|Direct Bill Adjustment is processed through Commission Download]]. | A new tab is available for Commission Adjustments. These options are used when a [[#Adjust Direct Bill Commission for Fees or Agency Bill Payable|Direct Bill Adjustment is processed through Commission Download]]. | ||
| Line 267: | Line 302: | ||
With the new release, Agency Systems has been optimized to allow the operator to continue working while the email is processed in the background. | With the new release, Agency Systems has been optimized to allow the operator to continue working while the email is processed in the background. | ||
| + | |||
| + | === Client Explorer Options: Email Options Tab === | ||
| + | A new Email Options tab is now available by selecting '''Other -> Client Explorer Options -> Email Options'''. (''Requires operator security level 9'') | ||
| + | |||
| + | All of the options were previously available, however they required support to enable. | ||
| + | |||
| + | [[File:Menu-clientexpopt-emailoptions.png]] | ||
== Forms == | == Forms == | ||
| Line 298: | Line 340: | ||
|Insurance Binder | |Insurance Binder | ||
|(2013/09) | |(2013/09) | ||
| + | |- | ||
| + | |90-VI | ||
| + | |Personal Automobile Application | ||
| + | |(2011/12) | ||
|- | |- | ||
|NC DL-123 | |NC DL-123 | ||
| Line 458: | Line 504: | ||
The merge code will only work when a memo is selected as the body of an outgoing email message. If the memo is used outside the email system, a user-defined text input field will display. | The merge code will only work when a memo is selected as the body of an outgoing email message. If the memo is used outside the email system, a user-defined text input field will display. | ||
| + | |||
| + | == Producer Profile == | ||
| + | === Dashboard Security === | ||
| + | Previously, the only way to limit an operator to view only their dashboard was to enable '''Only CSR Access'''” in the producer profile. '''Only CSR Access''' also blocked access to the company tab, and prevented loading the basic tab if the operator was not assigned to the client. | ||
| + | |||
| + | There are now 3 levels for each producer located under '''Profiles -> Producer'''. | ||
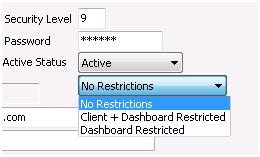
| + | *'''No Restrictions''' – Does not apply restrictions to the dashboard, the client basic tab, or the company tab. | ||
| + | *'''Client + Dashboard Restricted''' was previously "Only CSR Access”. Restricts dashboard access, client basic tab access, and company tab access. | ||
| + | *'''Dashboard Restricted''' – NEW option which locks the operator to only their dashboard. It does not restrict client basic tab access or company tab access. | ||
| + | |||
| + | [[File:profiles-producer-restrictions.png]] | ||
| + | === Selecting a Forms Signature / Cash Receipt Signature === | ||
| + | Attaching a digital signature to a producer profile has been simplified and will also be used to display the operator signature for printed cash receipts. | ||
| + | #Select '''Profiles -> Producer'''. | ||
| + | #Select '''Forms Signature'''. | ||
| + | #Select '''Browse''' and choose the image file containing the producer’s signature. | ||
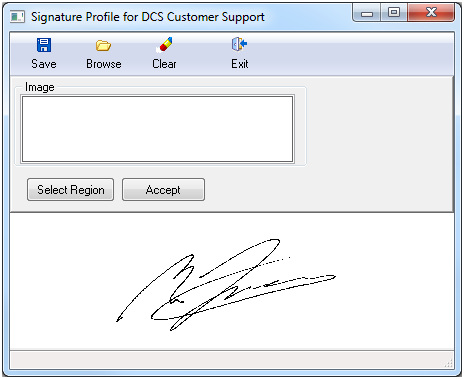
| + | #The image will be displayed: | ||
| + | #:[[File:profiles-producer-formssig-1.png]] | ||
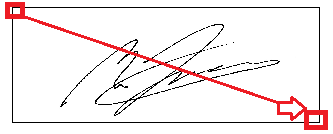
| + | #To select a specific region, '''left-click''' in the top left corner, but '''do not release the mouse click'''. Drag the mouse to the bottom right-hand corner, and release the mouse click. | ||
| + | #:[[File:profiles-producer-formssig-2.png]] | ||
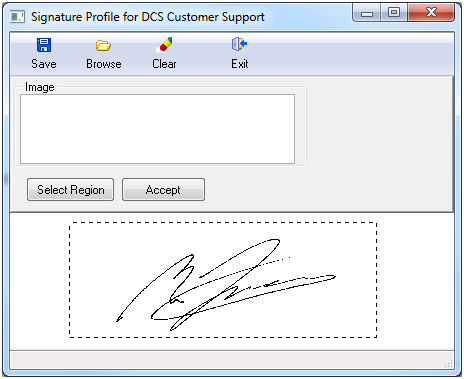
| + | #The selected area will be displayed. | ||
| + | #:[[File:profiles-producer-formssig-3.png]] | ||
| + | #Select '''Accept''', then '''Save''' when finished. | ||
| + | #:[[File:profiles-producer-formssig-4.png]] | ||
== Other == | == Other == | ||
| Line 512: | Line 582: | ||
*Add Attachment browse method from the client basic tab or policy express will automatically remember the last folder location. | *Add Attachment browse method from the client basic tab or policy express will automatically remember the last folder location. | ||
*Express Check batch transmittals will automatically set the override payee to the selected invoice company. The amount columns also sort correctly. | *Express Check batch transmittals will automatically set the override payee to the selected invoice company. The amount columns also sort correctly. | ||
| + | *'''Marketing -> Query Wizard''' has been changed to “Client Query Wizard”. | ||
| + | *'''Marketing -> Diary Reports''' has been changed to “Diary and Submission Reports”. | ||
=== Performance Enhancements === | === Performance Enhancements === | ||
| Line 524: | Line 596: | ||
[[#Email Performance With Microsoft Exchange|Email performance with Microsoft Exchange]] | [[#Email Performance With Microsoft Exchange|Email performance with Microsoft Exchange]] | ||
| + | |||
| + | === Security Settings === | ||
| + | *'''Client basic tab -> Attachment Band -> Right-Click -> Move to Policy''' now only requires '''Other -> Security System -> AR -> Policy Transaction -> Edit'''. | ||
| + | ==== Reconcile Payables Security ==== | ||
| + | The reconcile payables security system has been modified to allow a user who only has entry security for checks to process reconcile payables (''Other -> Security System -> AP -> Check Transaction''). This change will allow a user to be able to enter checks when taking a cash transmittal client payment, and process company payable reconciles without the ability to view all checks. | ||
| + | |||
| + | In additional to the required check transaction security level, access to the reconcile window is controlled by '''Other -> Security System -> AP -> Reconcile Payables''', and each type of reconcile payable now requires view access for the type of reconcile being performed. | ||
| + | |||
| + | For Example: | ||
| + | *To reconcile producer payables you need '''Other -> Security System -> Profiles -> Producer''' view access. | ||
| + | *To reconcile company payables you need '''Other -> Security System -> Profiles -> Company''' view access. | ||
| + | |||
=== Submissions === | === Submissions === | ||
Retail Submission window contains buttons to quickly change the suspense date in addition to the existing calendar drop-down. | Retail Submission window contains buttons to quickly change the suspense date in addition to the existing calendar drop-down. | ||
[[File:retail-submission-datebuttons.png]] | [[File:retail-submission-datebuttons.png]] | ||
Latest revision as of 20:07, 15 May 2014
A new cash payment fee wizard has been added which allows the operator to easily add multiple fees while taking a payment. Multiple user-defined templates can be used for the same transaction creating a quick-and-easy process, with the complex adjustments automated in the background.
A major revision to forms management is now available called Form Bundles. A Form Bundle allows the user to group ACORD forms, vehicles, properties, drivers, or equipment, specific to a policy transaction. A Form Bundle provides a clear management tool designed specifically, but not limited to commercial lines accounts that do not offer risk download.
Direct Bill Commission Download can now create multi-line invoices, create adjustments to direct bill commission on-the-fly, and create checks for return commission.
Many performance enhancements have been completed including Microsoft Exchange email optimization, and improved performance when changing policy numbers.
My Insurance Dashboard has been updated with additional features. MyInsuranceDashboard Release Notes: February 2014
Contents
- 1 Cash
- 2 Download
- 3 Email
- 4 Forms
- 5 Memowriter
- 6 Producer Profile
- 7 Other
Cash
Cash Payment Fee Wizard
The new cash payment fee wizard allows the operator to easily add multiple fees while taking a direct payment. Multiple user-defined templates can be used for the same transaction creating a quick-and-easy process, with the complex adjustments automated in the background.
Payment Fee Wizard Templates
Access to the payment fee setup screen requires the operator to have Security System -> AR -> Late Charge Setups -> Read & Entry access.
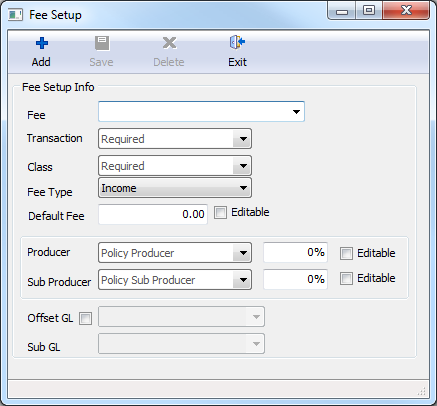
The available fee profiles are configured by selecting Profiles -> Payment Fee Setup.
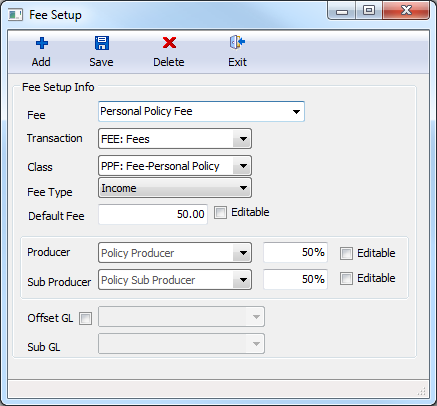
Create A New Fee Wizard Template For Income
- Select Add.
- Enter a Fee Name.
- Select the fee invoice line Transaction code. (Select Profiles -> Transaction to create a new code)
- Select the fee invoice line Class code. (Select Profiles -> Class to create a new code)
- Select the Fee Type as Income.
- Income: Records the entire receivable as GL 4110 (Agency Bill income). A portion of the invoice can be optionally split with a producer and/or sub-producer. The income can be optionally moved to a separate GL account.
- Enter a Default Fee amount. If Editable is selected, the amount can be altered when a fee is entered.
- The Producer code will default to the current policy producer unless a specific code is selected. Enter a producer commission percentage if desired.
- The Sub Producer code will default to the current policy sub-producer unless a specific code is selected. Enter a sub-producer commission percentage if desired.
- Select Save -> Exit.
To automatically move the income from 4110 to another GL account, select Offset GL to specify the account.
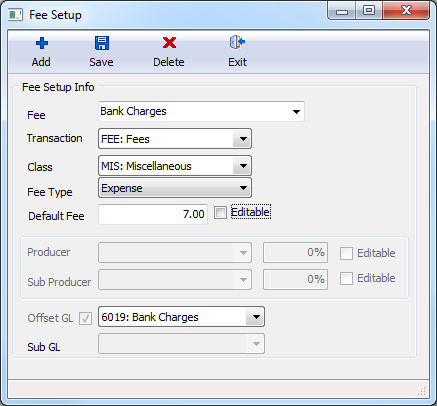
Create A New Fee Wizard Template For Expense
- Select Add.
- Enter a Fee Name.
- Select the fee invoice line Transaction code. (Select Profiles -> Transaction to create a new code)
- Select the fee invoice line Class code. (Select Profiles -> Class to create a new code)
- Select the Fee Type Expense.
- Expense: Automatically moves the entire fee amount from 4110 (Agency Bill Income) to a user-specified offset GL.
- Enter a Default Fee amount. If Editable is selected, the amount can be altered when a fee is entered.
- Select the Offset GL where the Agency Bill Income (4110) balance will be offset.
- Select Save -> Exit.
Edit or Delete an Existing Fee Wizard Template
Select Profiles -> Payment Fee Setup.
To edit an existing template, select the fee name from the drop-down to make changes.
To delete an existing template, select the fee name from the drop-down and select Delete.
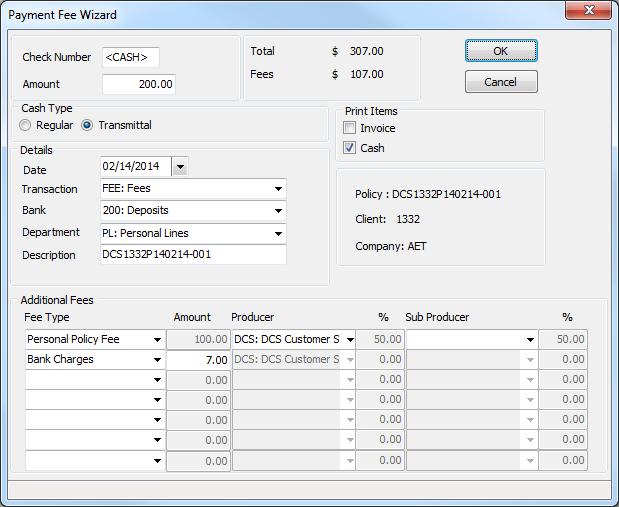
How To Add A Fee To A Cash Payment
- The new cash payment fee wizard can be accessed from any of the Attach Payment screens including:
- Policy Express -> Create Item -> Payment
- Basic Tab -> Active Policies Band -> Right-Click -> Attach Payment
- Account Tab -> Right-Click -> Attach Payment
- Express Billing -> Payments -> Attach Cash -> Create New Client Cash Receipt
- Select Fees.
- Enter the customer's check # or select F2 for cash.
- Enter the policy premium payment Amount.
- Select the policy Transaction code. (Typically FEE). The previously selected code will be automatically loaded.
- Select the desired Fee Types.
- Edit the fee amount for each if desired or available.
- The total fee amount and total receivable will be displayed.
- Select the desired Print Items, and select Ok.
Cash Receipt
The cash receipt has been updated with additional details. (Click here to view an example .PDF cash receipt.)
- Displays the company name and policy number for all single-invoice receipts, not just transmittals.
- Adds an operator signature above the operator name. The signature will be the forms signature saved to the producer profile.
- Adds the agency phone number below the agency name and address block.
- Adds a policy class name (Example: Homeowners, Dwelling Fire, etc).
- Adds the Transaction Name for the policy. (Example: Renewal, New Business, etc.)
- Adds a text field which allows the agency to add static text to all cash receipts, such as a disclaimer.
Which Policy Sequence Is Saved To The Cash Receipt?
Policy details are only saved for client cash receipts. Some policy details, such as the transaction code and date range, are based on the assigned policy sequence. The policy sequence will either be the the very last sequence on file for the policy, or a specific transaction depending on how the client cash receipt is created.
- Policy Details + Specific Policy Sequence Saved To Cash Receipt (Both Regular & Transmittal)
- Client Account Tab -> Right Click On An Invoice -> Attach Payment.
- Express Billing -> Save Payment
- Express Billing -> Payments -> Attach Cash -> Create New Client Receipt
- Policy Details (Last Policy Sequence) Saved to Cash Receipt (Both Regular & Transmittal)
- Policy Express -> Create Item-> Payment
- Client Basic Tab -> Right Click On An Active Policy -> Attach Payment.
- AR -> Cash Transaction -> GL 1120
- Policy Details Not Saved to Cash Receipt
- Reconcile Client Receivables
- Cash Receipts posted to anything other than 1120.
- AR -> Cash Transaction receipts where the policy number and company code are not specified.
Cash Receipt Options
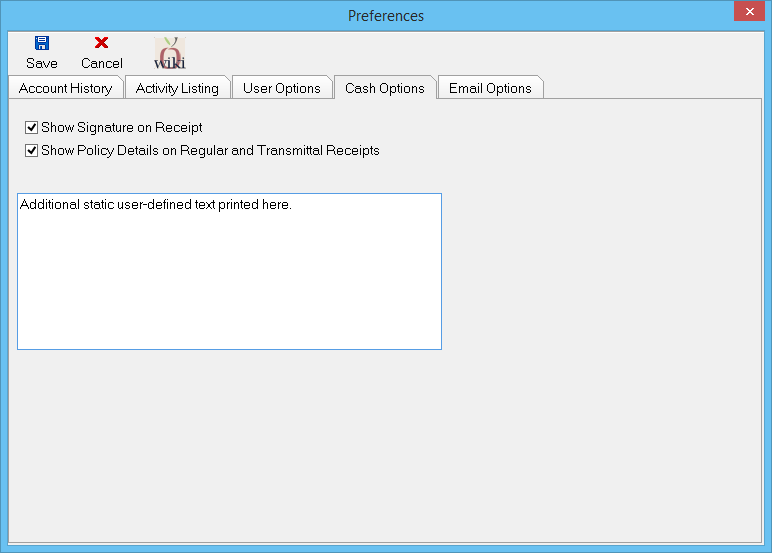
Select Other -> Client Explorer Options -> Cash Options. (Requires operator security level 9)
- Check Show Signature On Receipt to enable the cash receipt signature
- Un-Check Show Policy Details on Regular and Transmittal Receipts to disable including policy details on regular cash receipts.
- Enter any desired text to be printed on every cash receipt. (Line-breaks are not currently supported)
Cash Deposit Report
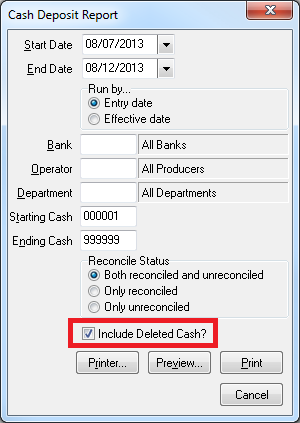
The cash deposit report will now hide deleted and non-deposited cash receipts by default. Instead, an option has been added to include deleted cash.
Selecting the option will include deleted and non-deposited cash items, however they will still not be included in the report totals.
Download
Risk Download
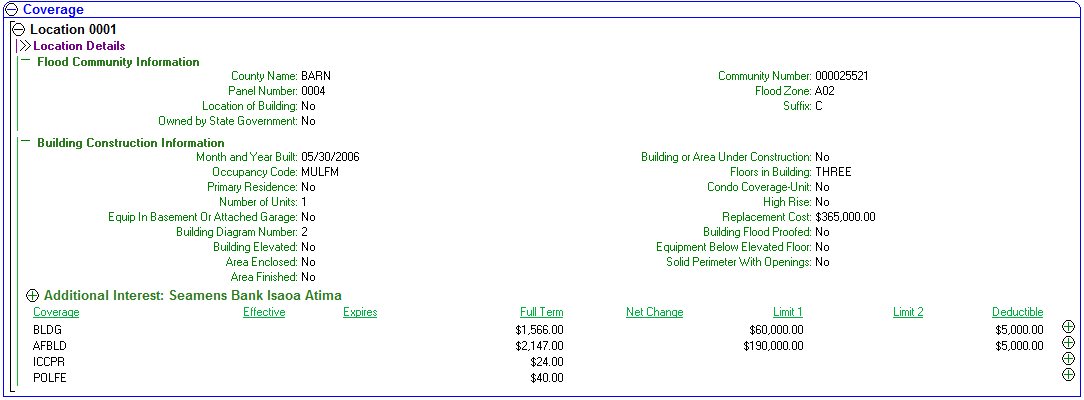
Flood policies now display two additional information sections. The new risk details will be automatically displayed for previous and new downloads which contain the data records.
- Flood Community Information
- Building Construction Information
Commission Download
Multi-Line Invoices
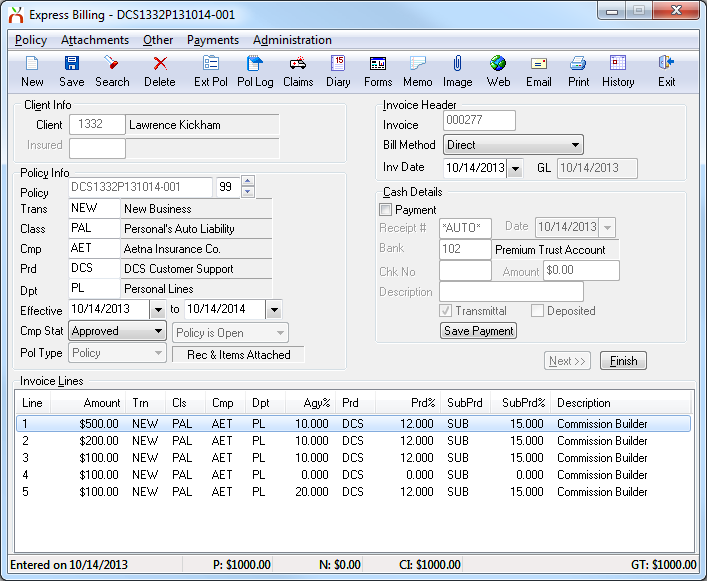
Commission Download is now capable of creating multi-line invoices. Previously, each invoice line would create an individual policy transaction and invoice. Some company statements included between five and ten lines for a single renewal transaction.
Now, the system automatically detects invoice lines that refer to the same transaction and combines each into a single action. The combined lines are easily identified with text indicating which line in the Commission Download they are applied to.
The first transaction in a combined set will list the total premium and commission for all lines. Hovering the mouse over the blue text will detail the amount of the first line in addition to the combined total.
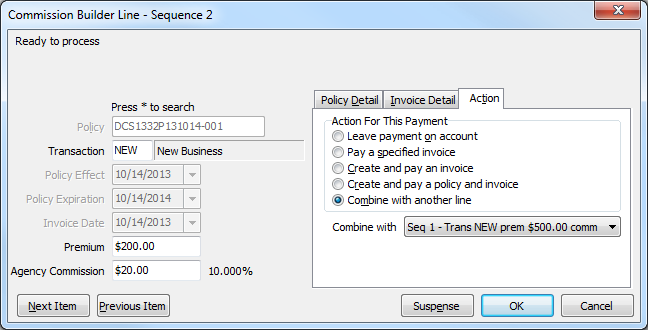
The invoice line details includes an additional action, "Combine with another line". If selected, the drop down lists available matching lines and the currently matched line.
Requirements to Combine Invoice Lines
Invoice lines are automatically combined if the following are true:
- The policy number is the same.
- The policy term dates are the same.
- The transaction effect date is the same.
Additionally the transaction codes are checked to make sure their types are compatible:
| Transaction of line | Transaction types it can be combined with |
|---|---|
| New Issue | New Issue |
| Renewal | Renewal |
| Cancellation, Non Renewal | Cancellation, Non Renewal |
| Reinstatement | Reinstatement |
| Endorsement, Audit, Installment, Tax, Adjustment, Miscellaneous, Synchronize | Endorsement, Audit, Installment, Tax, Adjustment, Miscellaneous, Synchronize, New Issue, Renewal, Reinstatement |
Commission Download Notes and Errors
Commission Download will automatically combine matching invoice lines, however items entered through Commission Builder are not combined automatically. Instead, matching lines will be marked with a note recommending action.
The N707 / N708 text has been altered to recommend combining lines instead of changing the second line to an endorsement.
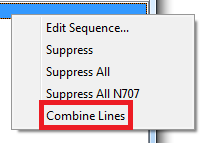
In addition, there is a Right-Click option to combine a flagged line from either the Show Errors list, or the initial detail view.
Multi-Line Invoice Results After Processing
A single invoice is generated for every 7 invoice lines in a combined set.
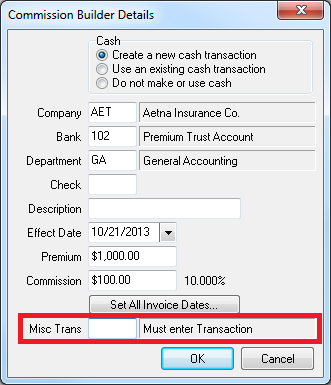
If more than 7 invoice lines are combined, an additional invoice and policy transaction are created. The policy transaction code is specified in the cash details screen of Commission Builder.
The additional invoice lines will retain their original transaction code(s).
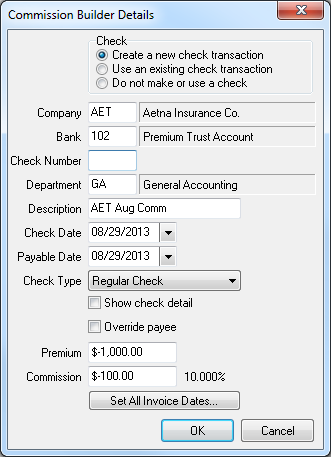
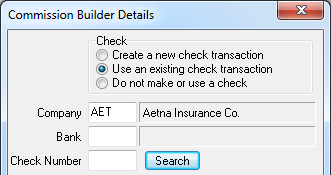
Create A Check For Return Commission
Previously, when a return commission statement was processed, either a negative cash receipt would be created, or the commission download would need to be processed without creating payment, and the check later created through reconcile receivables.
Commission download can now create a check transaction or use an existing check to pay return commission. Agency Systems will automatically detect a return commission balance and change the default pay option from a cash transaction, to a check transaction.
To view or change the check details, select Edit Details.
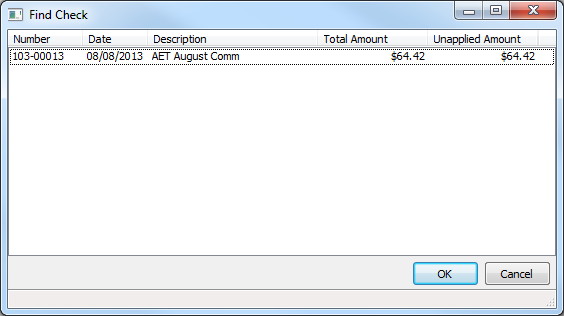
To use an existing on-account check, select Use an existing check transation.
Enter the bank code and check number, or select search to find the on-account check.
Adjust Direct Bill Commission for Fees or Agency Bill Payable
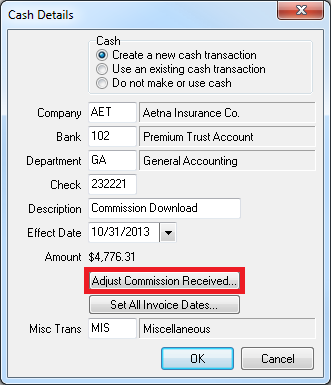
Adjustments can now be made to direct bill commission within Commission Download. The adjustments can include a reduction for MVR expense, 2110 Agency Bill payable for combined statements, or other fees charged by the company.
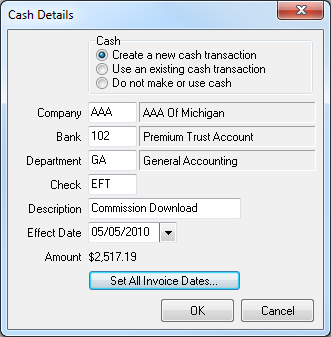
From the Cash Details screen within Commission Download, select Adjust Commission Received.... (The option will not be available until the new commission adjustment download settings are configured.)
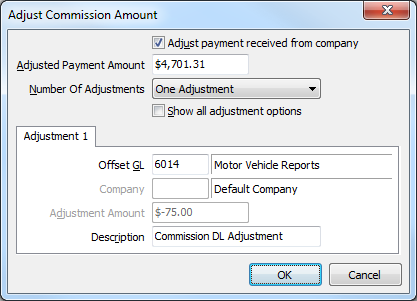
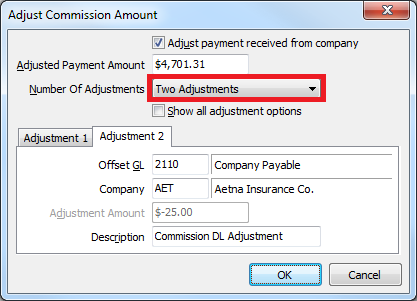
Select Adjust payment received from company and enter the Adjusted Payment Amount. The adjustment amount will be automatically calculated.
Enter the Offset GL. Examples include an MVR Expense, or 2110 to reduce the amount of commission for an Agency Bill payable.
Multiple adjustments can be created for a single commission statement. Select Number of Adjustments to enter multiple items.
If multiple adjustments are set, the last adjustment amount is automatically calculated, while the first adjustment amounts are specified by the operator.
When the commission download is processed, any adjustments will create journal transactions attached to invoices saved to the client configured in Download Options.
If the MVR Expense General Ledger account is configured with Sub-Account -> Company, it is possible to easily track the MVR fee by company code.
Invoice Date
The invoice date for invoices created by Commission Download is specified by the transaction date sent by the carrier. Any invoice in a closed period is flagged, and typically automatically changed to the current date by the download operator.
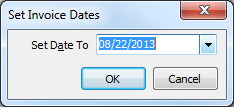
Commission Builder and Commission Download now include a new option to set all invoices to a user-specified date. Selecting the option will update each invoice line in the download to a single invoice date regardless of the transaction effective date.
Download Report
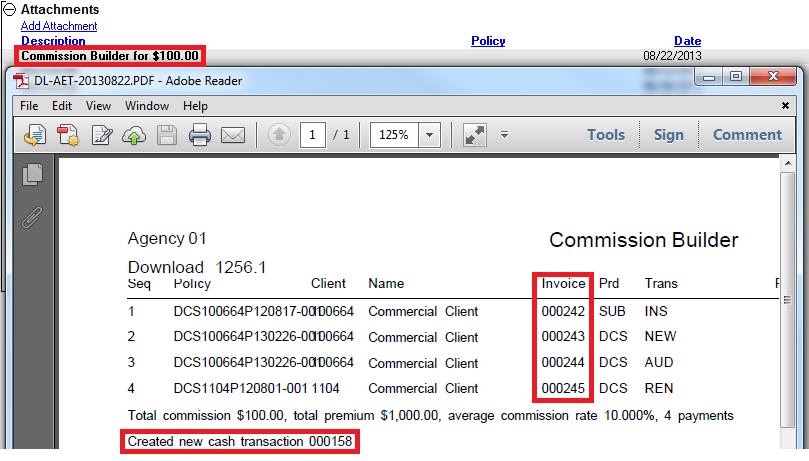
An attachment is automatically added to the company tab after a Commission Download or Commission Builder is processed.
The following changes to the report are now included:
- Attachment name now includes the amount of commission.
- Attachment name now includes any adjustments to the commission.
- Attached report file now contains the invoice numbers created by the download.
- Attached report file now contains the cash/check number created by the download.
- Attached report file now contains the adjustment journal transactions, invoices, and policy numbers created by the download.
In addition, Multi-Line invoice sets are detailed displaying the amount for each individual line.

Download Options
Select Other -> Download -> Options.
A new option "Leave lines with no commission on account" is enabled by default. Premium items with $0.00 in commission will not be created and paid unless they are combined with another invoice line which contains commission.
Commission Notes -> "Don't allow cash transactions with a negative amount (N500, E014") has been removed. Commission Download can now Create A Check For Return Commission.
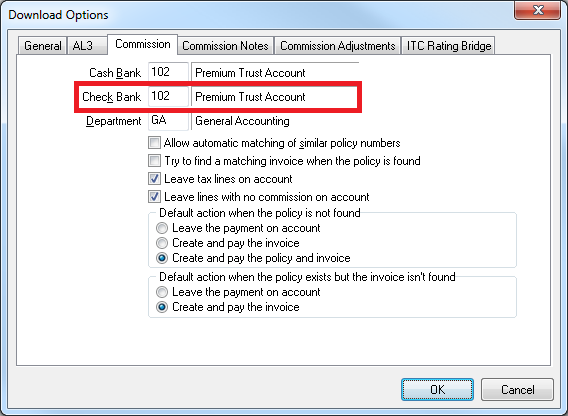
To configure the default check bank for return commission statements, select the Commission tab and enter the bank profile code.
Download Options - Commission Adjustments
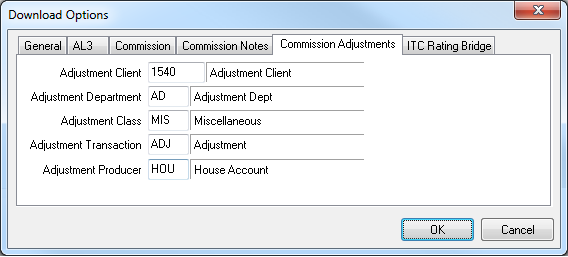
A new tab is available for Commission Adjustments. These options are used when a Direct Bill Adjustment is processed through Commission Download.
Adjustments created within Commission Download create journal transactions attached to invoices that are saved to single-day policies. The single-day policies are defined by the options configured below.
It is recommended that a new client record be created for the adjustments, configured as type Prospect.
The email system has been enhanced with new compose options, including the option to send emails from multiple accounts. In addition, significant performance improvements for Microsoft Exchange users have been completed.
Compose Email Window Options
The memowriter component used within the compose email window has been upgraded and now includes options for number or bullet lists.
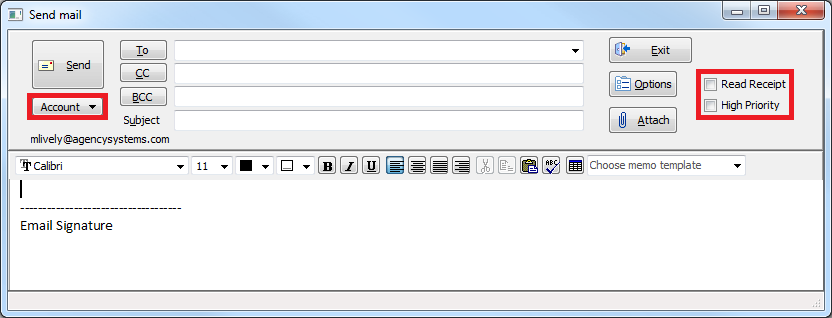
A message can be marked as High Priority, and the Read Receipt option has been moved to the main screen.
Email From Multiple Outlook Accounts
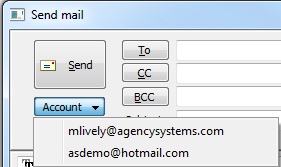
Compose email window has been enhanced to support multiple email accounts. (This feature is not available with Microsoft Outlook 2003)
To send an email from a different email account, select the Account drop down, and select the desired account.
Email Signature and Font Enhancements
Current operator's default email signature will be automatically placed at the top of email forwards or replies.
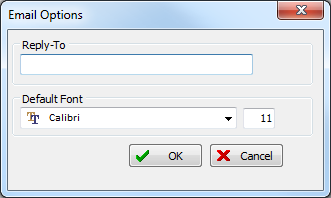
The Options menu contains an option to specify the default font and font size for composing emails.
Email Address Recipient Selection
The To: email address look-up window has been optimized for performance, reducing the amount of time in larger databases before the list of client contacts are displayed.
The To: email history list drop-down will no longer list an email sent to multiple recipients as a single string. Each address will be listed individually.
If an email is sent to an invalid address, the system will prompt the user to correct the invalid entry, and complete the email.
Email Performance With Microsoft Exchange
Users with Microsoft Exchange email, such as Microsoft Office 365 will benefit from significant performance enhancements. Previously, once an email was completed in Agency Systems, the program was forced to wait for the entire email to leave the Microsoft Exchange Outbox before another process could be started. This delay primarily occurred when emails were generated with large or multiple attachments.
With the new release, Agency Systems has been optimized to allow the operator to continue working while the email is processed in the background.
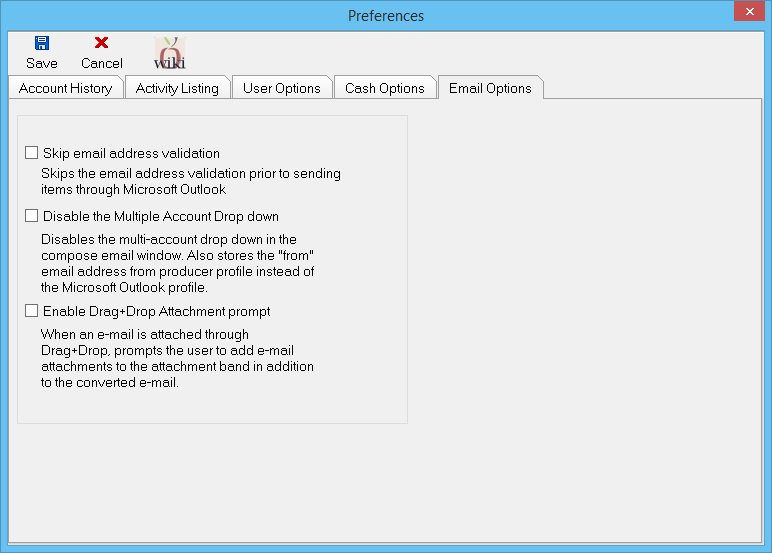
Client Explorer Options: Email Options Tab
A new Email Options tab is now available by selecting Other -> Client Explorer Options -> Email Options. (Requires operator security level 9)
All of the options were previously available, however they required support to enable.
Forms
Updated ACORD Forms
| 25 | Certificate of Liability Insurance | (2014/01) |
| 30 | Certificate of Garage Insurance | (2014/01) |
| 36 | Agent/Broker of Record Change | (2007/01) |
| 50-NJ | Insurance Identification Card | (2005/05) |
| 50-OK | Owners Security Verification Form | (2009/08) |
| 61-PA | Auto Supplement | (2014/02) |
| 75 | Insurance Binder | (2013/09) |
| 90-VI | Personal Automobile Application | (2011/12) |
| NC DL-123 | Driver License Liability Insurance Certification | (2006/04) |
Form Function Updates
ACORD 2 Automobile Loss Notice
Bodily Injury limits will now transfer from the ACORD 90MA Personal Auto Application coverages Part 5.
Other Coverage & Deductibles will now transfer from the ACORD 90MA Personal Auto Application coverages Part 3, Part 10, Part 11, and Part 12.
ACORD 50-NJ Insurance Identification Card
Company Number field will now display the DOT code instead of the company NAIC code. The DOT code is saved on the company profile screen.
ACORD 75 Insurance Binder
Property Coverage limits will now transfer from the ACORD 80 Homeowners Application and ACORD 84 Dwelling Fire Application to the ACORD 75 Insurance Binder.
The property address for the description of operations will automatically populate if it is entered as different than the insured's address on either the ACORD 80, or ACORD 84.
ACORD 137TX Commercial Auto
Effective Date on page 1 will now auto-fill and can be edited by right-clicking.
Form Bundles
A Form Bundle is a way to structure risk information specific to a policy transaction. A Form Bundle may contain ACORD forms and schedule items including drivers, vehicles, properties, equipment, and workers. A Form Bundle provides the operator an easy to read view for drivers, vehicles, properties, equipment, or workers specific to a policy without opening an ACORD form, or requiring the company to download policy information.
Creating A Form Bundle Manually
A form can be manually added to a bundle by opening the form and selecting Other -> Bundle This Form.
- If a form bundle has not been created, this will establish a form bundle.
- Forms can only be added to a bundle on their current transaction/sequence.
- Each transaction/sequence can only have a single bundle.
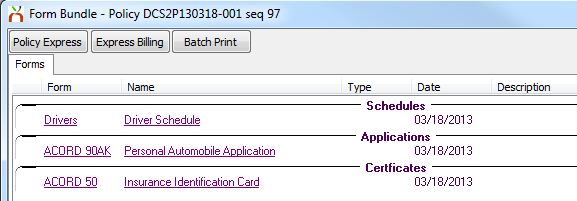
Once a Form Bundle is established, it can be viewed is a separate window. The window can be opened from the Forms tab, or from the form list in Policy Express by selecting View Form Bundle.
The Form Bundle initial view lists all ACORD forms for the bundle, organized by form category.
- The view Form bundle window will organize forms by the following categories.
Application Application for insurance Supplement Supplement for application Loss Notice Loss notice or claim Certificate Certificate of insurance Binder Binder of insurance Change Request Change request Schedule Schedule of property or interests Cancellation Cancellation notice
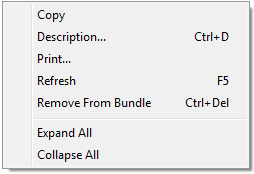
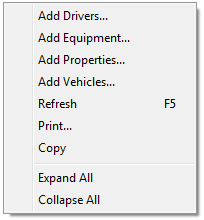
A Right-Click menu provides easy access to common functions including removing a selected form from the current bundle.
Adding Schedule Items To A Form Bundle
Schedule items including Vehicles, Drivers, Properties, Equipment, and Workers are listed on the second tab.
Schedule items will be automatically populated when a form is added to the bundle containing selected schedule items. For example, an existing ACORD 50 ID Card with 3 drivers and 2 vehicles will automatically add those schedule items to the bundle list by simply adding the ACORD 50 ID card to the bundle.
To add a schedule item manually, Right-Click and select the desired menu item to open the schedule selection window.
To remove a schedule item, Right-Click and select Remove From Bundle. Removing a schedule time from the bundle window will automatically remove it from any form saved to the bundle.
Creating and Updating Form Bundles with Automated Procedures
The Policy Express -> Automated Procedure processes currently prompt the user to update ACORD forms by copying selected forms to the newly created transaction. The form selection window has been updated to integrate directly with Form Bundles.
Start an automated process and select Next to continue to the forms selection step.
If there isn't a current form bundle, a Create Form Bundle checkbox is visible in the form list.
- Create Form Bundle is selected by default.
- The following form types are selected by default.
- Application
- Supplement
- Certificate
- Schedule
- If Create Form Bundle is selected, the system will make a bundle including all the selected forms.
- If Create Form Bundle is not selected, the system will update forms as it did previously without creating a bundle.
If the policy already has at least one Form Bundle, the system will default to always make a new bundle.
- If no forms are selected to copy, the system will not make a new bundle.
- All forms selected to copy will be copied to the new bundle.
Once additional interests and scheduled items are bundled, the newly made bundles will inherit them as well.
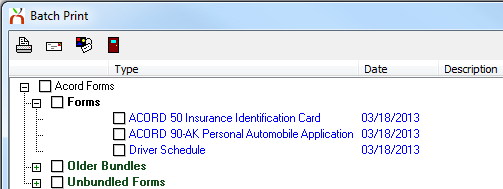
Batch Print and Form Bundles
The updated Batch Print screen automatically incorporates Form Bundles into the selection process.
Memowriter
Memowriter component has been upgraded including additional options directly on the toolbar for emailing or saving the current document as a .PDF file.
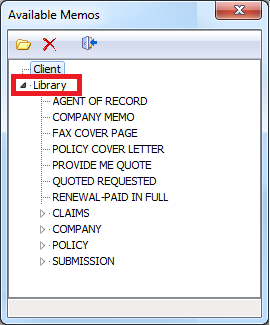
When a new memo is started, the memo template library selection window will automatically open. The template library list will also automatically expand the library tree showing all categories available for selection.
Memowriter Merge Codes
Client Address Lines
Client address line 1 and client address line 2 merge codes now merge the entire string.
~ADD1~
~ADD2~
Previously only the full client address block would merge the entire strings.
Client Contacts
Additional merge codes have been added for client contacts.
Cell Phone ~CCCEL~
Email Address ~CCEML~
Title ~CCTITL~
Department ~CCDPT~
SSN  ~CCSSN~
Drivers License ~CCDL~
Date Of Birth ~CCDOB~
Gender ~CCGEN~
Marriage Status ~CCMAR~
Smokes? ~CCSMK~
Occupation ~CCOCC~
Employer ~CCEMP~
Income ~CCINC~
Net Worth ~CCNET~
Named Insured
The Named Insured merge code data will now populate in the compose email window if a memo is selected as the body of an email.
Email Signature
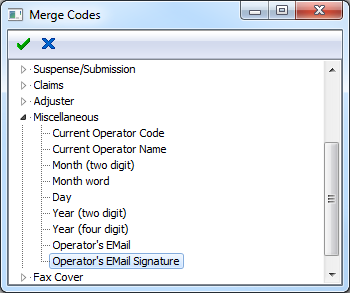
A new merge code is now available for the current operator's email signature. The merge code can be added to a memo template by typing the code directly, or selecting the menu from the merge code list. (Insert -> Merge Fields -> Miscellaneous -> Operator's Email Signature)
~EMLSIG~
When a user selects a memo template in the compose email window, it replaces the entire contents of the outgoing email with the selected memo. This action previously removed the default email signature.
With the new merge code included in the memo template, the email signature is automatically included with the merged memo text.
The merge code will only work when a memo is selected as the body of an outgoing email message. If the memo is used outside the email system, a user-defined text input field will display.
Producer Profile
Dashboard Security
Previously, the only way to limit an operator to view only their dashboard was to enable Only CSR Access” in the producer profile. Only CSR Access also blocked access to the company tab, and prevented loading the basic tab if the operator was not assigned to the client.
There are now 3 levels for each producer located under Profiles -> Producer.
- No Restrictions – Does not apply restrictions to the dashboard, the client basic tab, or the company tab.
- Client + Dashboard Restricted was previously "Only CSR Access”. Restricts dashboard access, client basic tab access, and company tab access.
- Dashboard Restricted – NEW option which locks the operator to only their dashboard. It does not restrict client basic tab access or company tab access.
Selecting a Forms Signature / Cash Receipt Signature
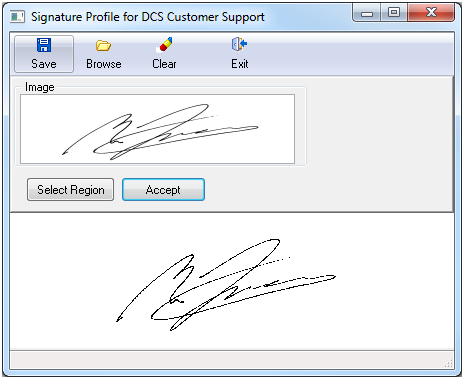
Attaching a digital signature to a producer profile has been simplified and will also be used to display the operator signature for printed cash receipts.
- Select Profiles -> Producer.
- Select Forms Signature.
- Select Browse and choose the image file containing the producer’s signature.
- The image will be displayed:
- To select a specific region, left-click in the top left corner, but do not release the mouse click. Drag the mouse to the bottom right-hand corner, and release the mouse click.
- The selected area will be displayed.
- Select Accept, then Save when finished.
Other
AL3 Rating Uploads
Rating integration is now available with Evolution (Capital Rating).
Click Here For Additional Details Regarding Rating Integration
Client Basic Tab
Activity Band
Activity band on the client basic tab now contains a column for operator. The operator currently logged into Newton will be assigned to any activity items performed from that workstation.
Email Band
Email band on the client basic tab now contains a column for operator. The operator currently logged into Newton will be assigned to any email items performed from that workstation.
Client Keyword Search
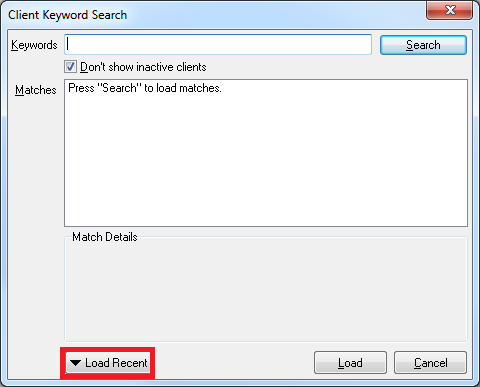
Client Keyword search window now retains a recent history drop-down for the last ten clients.
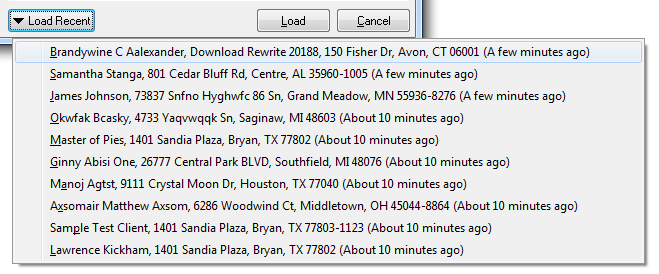
To load a previously viewed client, open the client keyword search window and select Load Recent.
The history list contains the client name, address, and the amount of time passed since the client was opened.
Select the desired client from the history list to automatically load the client's basic tab.
- How is the list populated and stored?
- The list is populated when a client is loaded from either the client or policy keyword search windows.
- Loading clients by typing the client number, searching by client alpha code, or by right-clicking from the dashboard will not update the history list.
- The client list is stored on local computer and cannot be accessed from other workstations.
Client Keyword search window position is now stored.
Diaries
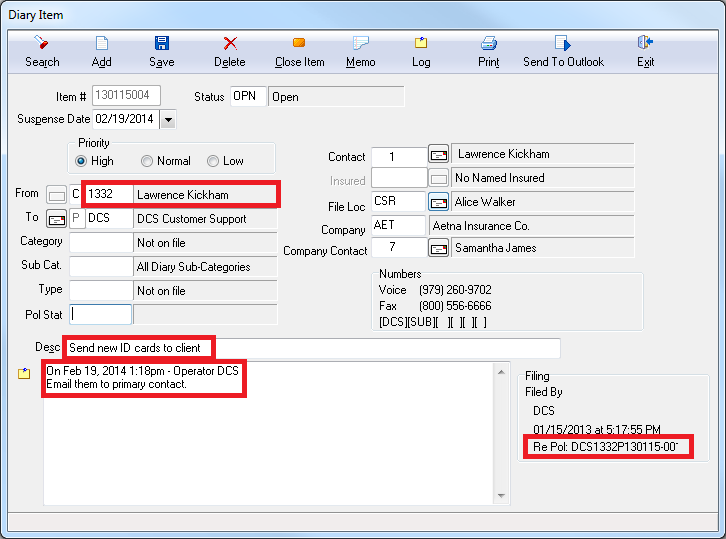
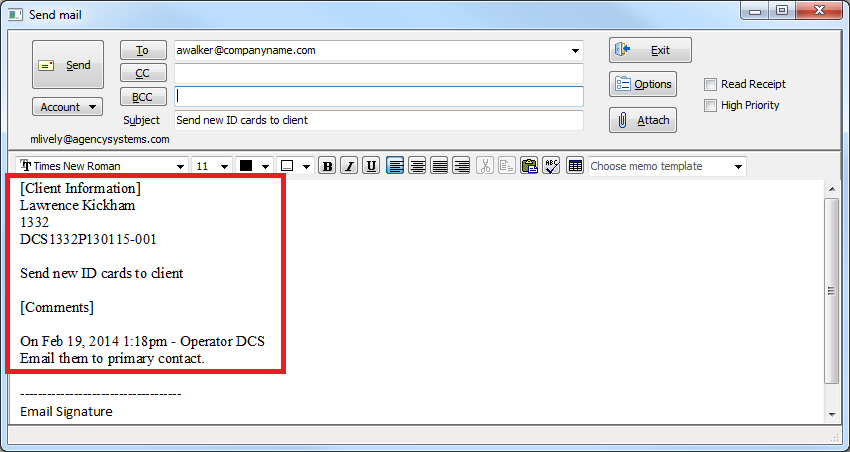
Emails sent from a diary will now include additional details:
- Client Name
- Client Number
- Policy Number
- Diary Description
The additional details are automatically placed in the body of the email above the diary comments.
Express Billing
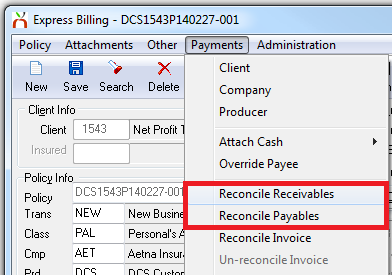
The Express Billing window now contains menu options to open Reconcile Receivables and Reconcile Payables.
Miscellaneous
- Newton log in Agency Code and Operator code is now stored based on the driver letter where Newton is installed. If more than one installation of Newton is present, the log in screen will default the most recent setting for each data set.
- Printed and previewed ACORD .PDF attachments will no longer move to the new policy or quote number if changed. This includes converting a quote to a new policy number, or renewing a policy to a new number.
- Invoice Register Export now contains "Policy Company Code" and "Policy Company Name" columns. It will also open automatically in Microsoft Excel after the export is completed.
- Add Attachment browse method from the client basic tab or policy express will automatically remember the last folder location.
- Express Check batch transmittals will automatically set the override payee to the selected invoice company. The amount columns also sort correctly.
- Marketing -> Query Wizard has been changed to “Client Query Wizard”.
- Marketing -> Diary Reports has been changed to “Diary and Submission Reports”.
Performance Enhancements
Changing A Policy Number Performance
Any function in Agency Systems which copied data from one policy to another has been significantly enhanced to reduce the amount of total processing time.
- Changing a policy number.
- Renewing a policy to a new number.
- Converting a quote to a new number.
- Moving a policy from one client to another.
Email Performance
Displaying all available client contact email addresses in large databases
Email performance with Microsoft Exchange
Security Settings
- Client basic tab -> Attachment Band -> Right-Click -> Move to Policy now only requires Other -> Security System -> AR -> Policy Transaction -> Edit.
Reconcile Payables Security
The reconcile payables security system has been modified to allow a user who only has entry security for checks to process reconcile payables (Other -> Security System -> AP -> Check Transaction). This change will allow a user to be able to enter checks when taking a cash transmittal client payment, and process company payable reconciles without the ability to view all checks.
In additional to the required check transaction security level, access to the reconcile window is controlled by Other -> Security System -> AP -> Reconcile Payables, and each type of reconcile payable now requires view access for the type of reconcile being performed.
For Example:
- To reconcile producer payables you need Other -> Security System -> Profiles -> Producer view access.
- To reconcile company payables you need Other -> Security System -> Profiles -> Company view access.
Submissions
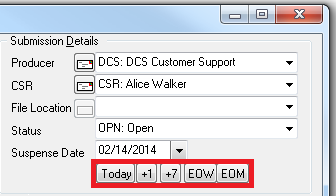
Retail Submission window contains buttons to quickly change the suspense date in addition to the existing calendar drop-down.
