Difference between revisions of "Cash Payment Fee Wizard"
(Created page with "Category:Cash The cash payment fee wizard allows the operator to easily add multiple fees while taking a direct payment. Multiple user-defined templates can be used for th...") |
(added 0.00 transmittal example) |
||
| Line 1: | Line 1: | ||
[[Category:Cash]] | [[Category:Cash]] | ||
The cash payment fee wizard allows the operator to easily add multiple fees while taking a direct payment. Multiple user-defined templates can be used for the same transaction creating a quick-and-easy process, with the complex adjustments automated in the background. | The cash payment fee wizard allows the operator to easily add multiple fees while taking a direct payment. Multiple user-defined templates can be used for the same transaction creating a quick-and-easy process, with the complex adjustments automated in the background. | ||
| − | + | == Payment Fee Wizard Templates == | |
Access to the payment fee setup screen requires the operator to have '''Security System -> AR -> Late Charge Setups -> Read & Entry''' access. | Access to the payment fee setup screen requires the operator to have '''Security System -> AR -> Late Charge Setups -> Read & Entry''' access. | ||
| Line 7: | Line 7: | ||
[[File:profiles-cashfee-empty.png]] | [[File:profiles-cashfee-empty.png]] | ||
| − | + | === Create A New Fee Wizard Template For Commission === | |
#Select '''Add'''. | #Select '''Add'''. | ||
#Enter a Fee Name. | #Enter a Fee Name. | ||
| Line 21: | Line 21: | ||
To automatically move the income from 4110 to another GL account, select '''Offset GL''' to specify the account. | To automatically move the income from 4110 to another GL account, select '''Offset GL''' to specify the account. | ||
| − | + | === Create A New Fee Wizard Template For Expense === | |
#Select '''Add'''. | #Select '''Add'''. | ||
#Enter a Fee Name. | #Enter a Fee Name. | ||
| Line 32: | Line 32: | ||
#Select '''Save -> Exit'''. | #Select '''Save -> Exit'''. | ||
[[File:Profiles-cashfee-exp-bnk-noteditable.png]] | [[File:Profiles-cashfee-exp-bnk-noteditable.png]] | ||
| − | + | === Edit or Delete an Existing Fee Wizard Template === | |
Select '''Profiles -> Payment Fee Setup'''. | Select '''Profiles -> Payment Fee Setup'''. | ||
| Line 39: | Line 39: | ||
To delete an existing template, select the fee name from the drop-down and select '''Delete'''. | To delete an existing template, select the fee name from the drop-down and select '''Delete'''. | ||
| − | + | == How To Add A Fee To A Cash Payment == | |
#The new cash payment fee wizard can be accessed from any of the Attach Payment screens including: | #The new cash payment fee wizard can be accessed from any of the Attach Payment screens including: | ||
#*Policy Express -> Create Item -> Payment | #*Policy Express -> Create Item -> Payment | ||
| Line 54: | Line 54: | ||
#Select the desired '''Print Items''', and select '''Ok'''. | #Select the desired '''Print Items''', and select '''Ok'''. | ||
[[File:Cashfee-entry.png]] | [[File:Cashfee-entry.png]] | ||
| + | |||
| + | == Example Fee Processing == | ||
| + | === Attach A Cash Transmittal to a 0.00 Invoice === | ||
| + | It is very common for direct bill payments to be left on-account before a policy is invoiced. The policy express -> payment option will only attach the transmittals to an invoice if it is attached to the current (last) sequence. The majority of users leave the items on-account, since the accounting transactions offset to create a 0.00 balance. | ||
| + | |||
| + | If your office prefers to always have the cash transmittals attached to an invoice, the new payment fee wizard can be used to create a 0.00 invoice on-the-fly. | ||
| + | ==== Cash Transmittal 0.00 Invoice Setup ==== | ||
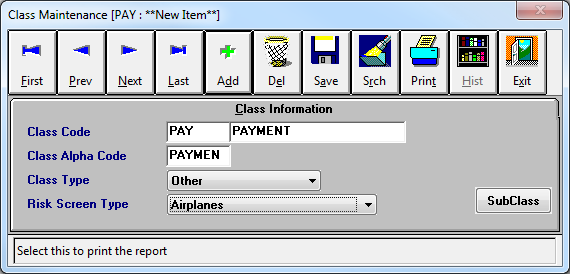
| + | Create a class code for the 0.00 invoice. | ||
| + | #Select '''Profiles -> Class'''. | ||
| + | #Select '''Add'''. | ||
| + | #Enter a 3 digit class code, and name. (''From Example: PAY - PAYMENT'') | ||
| + | #Select <TAB> to populate the alpha code. | ||
| + | #Select Class Type Other. | ||
| + | #Select '''Save''' then '''Exit'''. | ||
| + | #:[[File:Profiles-class-new-pay.png]] | ||
| + | |||
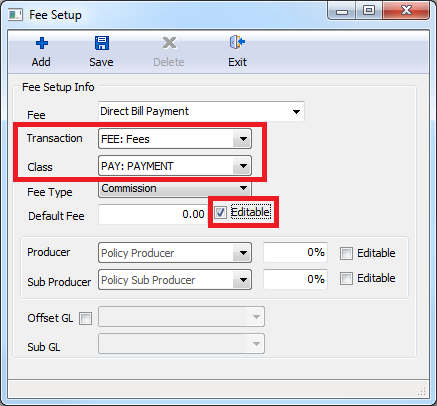
| + | Create a [[#Create A New Fee Wizard For Commission|payment fee wizard template]] to generate the 0.00 invoice. | ||
| + | #Select '''Profiles -> Payment Fee Setup'''. | ||
| + | #Select '''Add'''. | ||
| + | #Enter a name to display in the fee wizard. (''From example: Direct Bill Payment'') | ||
| + | #Select '''Transaction code: Fee'''. (''You could alternatively create a new transaction code under profiles -> Transaction if desired'') | ||
| + | #Select '''Class -> PAY: PAYMENT'''. | ||
| + | #Select the '''Editable''' check box. | ||
| + | #Select '''Save''' then '''Exit'''. | ||
| + | #:[[File:feesetup-0-payment.png]] | ||
| + | |||
| + | ==== Cash Transmittal 0.00 Invoice Processing ==== | ||
| + | #Load the policy on the client's basic tab. | ||
| + | #'''Right-Click''' on the policy number and select '''Attach Payment'''. (''Alternatively, open Policy Express and select Payment'') | ||
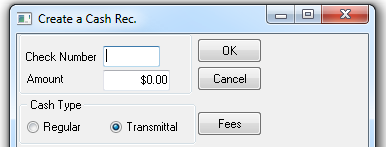
| + | #Select '''Fees'''. | ||
| + | #:[[File:create-cash-fee-snip.png]] | ||
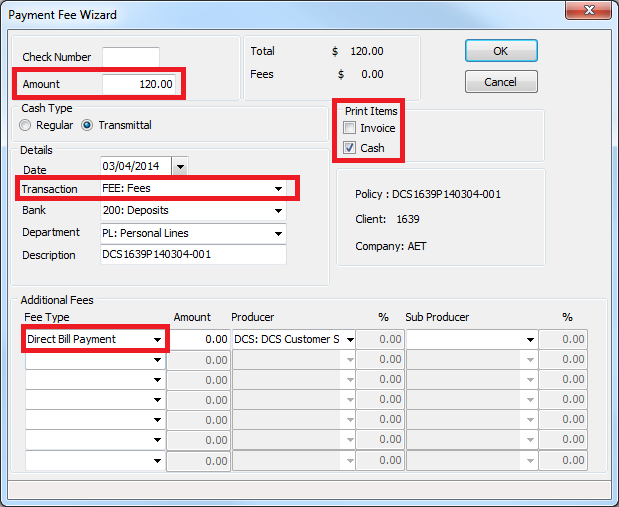
| + | #Enter the amount for the transmittal payment. | ||
| + | #Verify the Transaction code for the payment fee wizard is set to '''Fee'''. (''You only have to do this once per computer as it will be remembered for future fees.'') | ||
| + | #Select the [[#Cash Transmittal 0.00 Invoice Setup|'''Fee Type''']]. (''From Example: Direct Bill Payment'') | ||
| + | #Select the desired items to automatically print. | ||
| + | #Select '''Ok'''. | ||
| + | #:[[File:payment-wiz-create-0-pay.png]] | ||
Revision as of 19:33, 13 March 2014
The cash payment fee wizard allows the operator to easily add multiple fees while taking a direct payment. Multiple user-defined templates can be used for the same transaction creating a quick-and-easy process, with the complex adjustments automated in the background.
Contents
Payment Fee Wizard Templates
Access to the payment fee setup screen requires the operator to have Security System -> AR -> Late Charge Setups -> Read & Entry access.
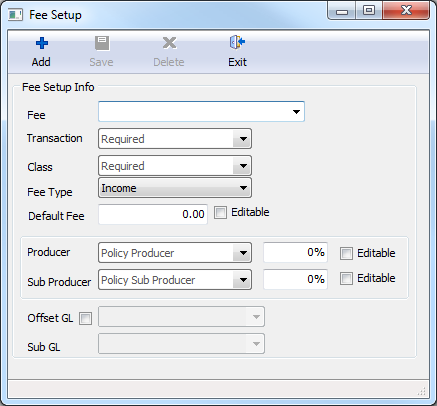
The available fee profiles are configured by selecting Profiles -> Payment Fee Setup.
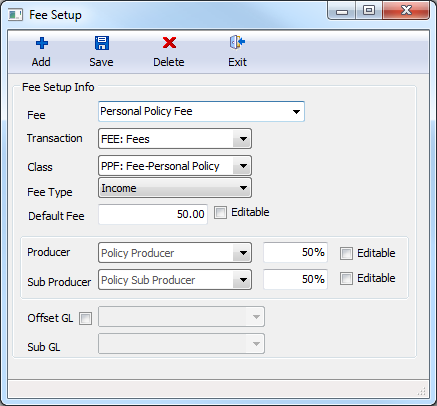
Create A New Fee Wizard Template For Commission
- Select Add.
- Enter a Fee Name.
- Select the fee invoice line Transaction code. (Select Profiles -> Transaction to create a new code)
- Select the fee invoice line Class code. (Select Profiles -> Class to create a new code)
- Select the Fee Type as either Commission.
- Commission: Records the entire receivable as GL 4110 (Agency Bill income). A portion of the invoice can be optionally split with a producer and/or sub-producer. The income can be optionally moved to a separate GL account.
- Enter a Default Fee amount. If Editable is selected, the amount can be altered when a fee is entered.
- The Producer code will default to the current policy producer unless a specific code is selected. Enter a producer commission percentage if desired.
- The Sub Producer code will default to the current policy sub-producer unless a specific code is selected. Enter a sub-producer commission percentage if desired.
- Select Save -> Exit.
To automatically move the income from 4110 to another GL account, select Offset GL to specify the account.
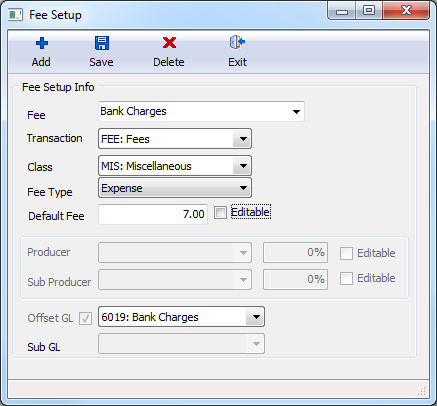
Create A New Fee Wizard Template For Expense
- Select Add.
- Enter a Fee Name.
- Select the fee invoice line Transaction code. (Select Profiles -> Transaction to create a new code)
- Select the fee invoice line Class code. (Select Profiles -> Class to create a new code)
- Select the Fee Type Expense.
- Expense: Automatically moves the entire fee amount from 4110 (Agency Bill Income) to a user-specified offset GL.
- Enter a Default Fee amount. If Editable is selected, the amount can be altered when a fee is entered.
- Select the Offset Gl where the Agency Bill Income (4110) balance will be offset.
- Select Save -> Exit.
Edit or Delete an Existing Fee Wizard Template
Select Profiles -> Payment Fee Setup.
To edit an existing template, select the fee name from the drop-down to make changes.
To delete an existing template, select the fee name from the drop-down and select Delete.
How To Add A Fee To A Cash Payment
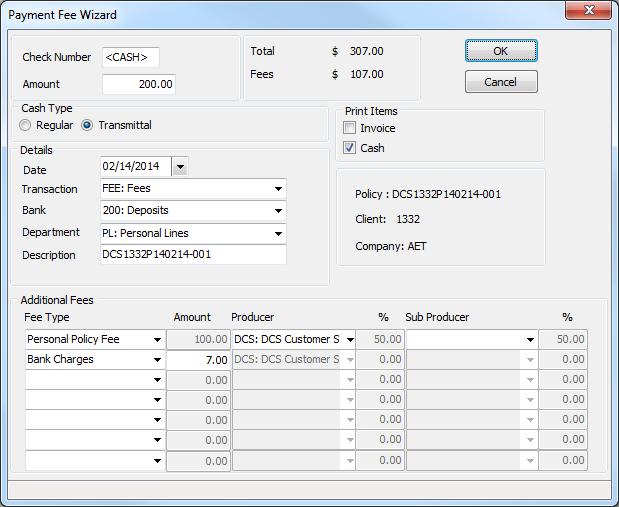
- The new cash payment fee wizard can be accessed from any of the Attach Payment screens including:
- Policy Express -> Create Item -> Payment
- Basic Tab -> Active Policies Band -> Right-Click -> Attach Payment
- Account Tab -> Right-Click -> Attach Payment
- Express Billing -> Payments -> Attach Cash -> Create New Client Cash Receipt
- Select Fees.
- Enter the customer's check # or select F2 for cash.
- Enter the policy premium payment Amount.
- Select the policy Transaction code. (Typically FEE). The previously selected code will be automatically loaded.
- Select the desired Fee Types.
- Edit the fee amount for each if desired or available.
- The total fee amount and total receivable will be displayed.
- Select the desired Print Items, and select Ok.
Example Fee Processing
Attach A Cash Transmittal to a 0.00 Invoice
It is very common for direct bill payments to be left on-account before a policy is invoiced. The policy express -> payment option will only attach the transmittals to an invoice if it is attached to the current (last) sequence. The majority of users leave the items on-account, since the accounting transactions offset to create a 0.00 balance.
If your office prefers to always have the cash transmittals attached to an invoice, the new payment fee wizard can be used to create a 0.00 invoice on-the-fly.
Cash Transmittal 0.00 Invoice Setup
Create a class code for the 0.00 invoice.
- Select Profiles -> Class.
- Select Add.
- Enter a 3 digit class code, and name. (From Example: PAY - PAYMENT)
- Select <TAB> to populate the alpha code.
- Select Class Type Other.
- Select Save then Exit.
Create a payment fee wizard template to generate the 0.00 invoice.
- Select Profiles -> Payment Fee Setup.
- Select Add.
- Enter a name to display in the fee wizard. (From example: Direct Bill Payment)
- Select Transaction code: Fee. (You could alternatively create a new transaction code under profiles -> Transaction if desired)
- Select Class -> PAY: PAYMENT.
- Select the Editable check box.
- Select Save then Exit.
Cash Transmittal 0.00 Invoice Processing
- Load the policy on the client's basic tab.
- Right-Click on the policy number and select Attach Payment. (Alternatively, open Policy Express and select Payment)
- Select Fees.
- Enter the amount for the transmittal payment.
- Verify the Transaction code for the payment fee wizard is set to Fee. (You only have to do this once per computer as it will be remembered for future fees.)
- Select the Fee Type. (From Example: Direct Bill Payment)
- Select the desired items to automatically print.
- Select Ok.
