Difference between revisions of "Attachments"
(added attachment type / tags) |
|||
| (20 intermediate revisions by 2 users not shown) | |||
| Line 1: | Line 1: | ||
| − | [[Category:Email]][[Category: | + | [[Category:Attachment]][[Category:Email]][[Category:Training Guides]] |
<table class="infobox" cellspacing="5" style="background-color: #FFFFFF; width:27em; text-align:left; border-spacing: 2px; line-height:1.5em;"> | <table class="infobox" cellspacing="5" style="background-color: #FFFFFF; width:27em; text-align:left; border-spacing: 2px; line-height:1.5em;"> | ||
| + | <tr> | ||
| + | <td>[[File:Ic_description_black_24dp.png|link=Newton User Guide#Correspondence]] Newton User Guide: [[Newton User Guide#Correspondence|Correspondence]]</td> | ||
| + | </tr> | ||
| + | <tr> | ||
| + | <td>[[File:Ic_info_black_24dp.png]] Required Software Version: [[:Category:Release Notes|Spring 2017]]</td> | ||
| + | </tr> | ||
| + | <tr> | ||
| + | <td>[[File: Ic_settings_backup_restore_black_24dp.png]] Legacy Instructions Available: [http://wiki.agencysystems.com/mediawiki/index.php?title=Attachment_Integration&oldid=4847 Click Here]</td> | ||
| + | </tr> | ||
<tr style="background-color: #bdbdbd; text-align: center; font-weight:bold;"> | <tr style="background-color: #bdbdbd; text-align: center; font-weight:bold;"> | ||
<td>Related Pages</td> | <td>Related Pages</td> | ||
| Line 8: | Line 17: | ||
<td> | <td> | ||
<ul> | <ul> | ||
| − | <li>[[ | + | <li>[[Attachments: Tag Setup]]</li> |
| − | <li>[[Batch | + | <li>[[Batch Send]]</li> |
| − | <li>[[ | + | <li>[[Email]]</li> |
| + | <li>[[MyInsuranceDashboard.com Integration]]</li> | ||
</ul> | </ul> | ||
</td> | </td> | ||
| Line 22: | Line 32: | ||
<td> | <td> | ||
<ul> | <ul> | ||
| + | <li>[[:Category:Attachment|Attachment]]</li> | ||
<li>[[:Category:Email|Email]]</li> | <li>[[:Category:Email|Email]]</li> | ||
| − | <li>[[:Category: | + | <li>[[:Category:Training Guides|Training Guides]]</li> |
</ul> | </ul> | ||
</td> | </td> | ||
</tr> | </tr> | ||
</table> | </table> | ||
| − | Newton provides you with the ability to attach electronic documents to your management system. Emails, PDF documents, and other scanned images can all be attached to Newton through drag-and-drop | + | Newton provides you with the ability to attach electronic documents to your management system. Emails, PDF documents, and other scanned images can all be attached to Newton through drag-and-drop. A document can be attached to a given client, to a specific policy or submission, a company, or to a vendor. Once attached, an attachment can be shared using an [[Email|email]], [[Batch Send]], or [[MyInsuranceDashboard.com Integration|My Insurance Dashboard]]. |
| − | == Create an | + | |
| − | + | == Create an attachment == | |
| − | + | ||
| − | + | Attachments and [[Email|emails]] are both created through drag-and-drop. Multiple items can be attached simultaneously to the same area instead of repeating the process for each file individually. | |
| − | === Create a | + | |
| − | # | + | === Create a client attachment === |
| + | #[[Client_Tab#Find_a_Client|Search for and load the client or prospect]]. | ||
| + | #'''Left-click''' the mouse on the document (on your desktop) and '''hold down the mouse button'''. | ||
| + | #Drag the selected document onto the [[Client Tab: Client Dashboard|Client Dashboard tab]] and '''release the mouse button'''. | ||
| + | #Edit the '''Description''' for the file when prompted. | ||
| + | #Select the desired '''Type''' and/or '''Tag'''. | ||
| + | #Select''' Okay'''. | ||
| + | |||
| + | [[File:Ic_info_black_24dp.png]] See: [[Client Tab: Client Dashboard]] for more information. | ||
| + | |||
| + | === Create a policy attachment === | ||
| + | #[[Client_Tab#Find_a_Client|Search for and load the client or prospect]]. | ||
| + | #On the [[Client Tab: Client Dashboard|Client Dashboard tab]] select the (+) next to '''Policies'''. ''(To expand the band by default, see: [[Preferences]])'' | ||
| + | #'''Left-Click''' the desired policy number to open the [[Policy Dashboard]]. | ||
| + | #:[[File:Clientdash-policies-selectpolicy.png]] | ||
#'''Left-click''' the mouse on the document (on your desktop) and '''hold down the mouse button'''. | #'''Left-click''' the mouse on the document (on your desktop) and '''hold down the mouse button'''. | ||
| − | #Drag the selected document onto the | + | #Drag the selected document onto the [[Policy Dashboard]] and '''release the mouse button'''. |
#Edit the '''Description''' for the file when prompted. | #Edit the '''Description''' for the file when prompted. | ||
| + | #Select the desired '''Type''' and/or '''Tag'''. | ||
#Select''' Okay'''. | #Select''' Okay'''. | ||
| − | === Create a | + | |
| − | + | [[File:Ic_info_black_24dp.png]] See: [[Policy Dashboard]] for more information. | |
| − | + | ||
| − | #'''Left- | + | === Create a company attachment === |
| − | #Drag the selected document onto [[ | + | A Company Tab is created by selecting '''Company''' -> '''Add Company Tab''' from the [[Main Menu and Tab Navigation|Main Menu]]. |
| + | |||
| + | #Load the [[Company Profile|company]] on a [[Company Tab]]. | ||
| + | #'''Left-click''' the mouse on the document (on your desktop) and '''hold down the mouse button'''. | ||
| + | #Drag the selected document onto the [[Company Tab]] and '''release the mouse button'''. | ||
#Edit the '''Description''' for the file when prompted. | #Edit the '''Description''' for the file when prompted. | ||
| + | #Select the desired '''Type''' and/or '''Tag'''. | ||
#Select''' Okay'''. | #Select''' Okay'''. | ||
| − | === Create a | + | |
| − | #Load the | + | [[File:Ic_info_black_24dp.png]] See: [[Company Tab]] for more information. |
| + | |||
| + | === Create a vendor attachment === | ||
| + | A Vendor Tab is created by selecting '''Vendor''' -> '''Add Vendor Tab''' from the [[Main Menu and Tab Navigation|Main Menu]]. | ||
| + | |||
| + | #Load the [[Vendor Profile|vendor]] on a [[Vendor Tab]]. | ||
#'''Left-click''' the mouse on the document (on your desktop) and '''hold down the mouse button'''. | #'''Left-click''' the mouse on the document (on your desktop) and '''hold down the mouse button'''. | ||
| − | #Drag the selected document onto the | + | #Drag the selected document onto the [[Vendor Tab]] and '''release the mouse button'''. |
#Edit the '''Description''' for the file when prompted. | #Edit the '''Description''' for the file when prompted. | ||
| + | #Select the desired '''Type''' and/or '''Tag'''. | ||
#Select''' Okay'''. | #Select''' Okay'''. | ||
| − | + | [[File:Ic_info_black_24dp.png]] See: [[Vendor Tab]] for more information. | |
| − | See [[ | ||
| − | == Attachment | + | === Create a secure attachment === |
| − | In addition to being saved to a policy, Attachments can be assigned a '''Type''' and User-Defined '''Tag'''. View filters can be applied for the types, similar to | + | Anything attached through drag-and-drop from within the management tab is only visible from the management tab as a secure attachment. |
| + | |||
| + | Existing company and vendor attachments can be converted as secure attachments using [[#Convert company and vendor secure attachments|the instructions below]]. | ||
| + | |||
| + | [[File:Ic_info_black_24dp.png]] See: [[Management Tab]] for more information. | ||
| + | |||
| + | === Create an attachment by browsing to a folder === | ||
| + | Attachments are attached primarily through drag-and-drop, however they can also be attached by browsing the Microsoft Windows file system and selecting a file. Utilizing the file picker is helpful for users with a single monitor where drag+drop is more difficult, or if all documents are always scanned and saved to a specific network folder. | ||
| + | |||
| + | #[[Client_Tab#Find_a_Client|Search for and load the client, prospect]], [[Policy Dashboard|policy]], [[Company Tab|company]] or [[Vendor Tab|vendor]]. | ||
| + | #Select '''Create Item''' -> '''Attachment''' within the top toolbar. ''(Optionally select the (+) next to Attachments and select '''Add Attachment'''.)'' | ||
| + | #:[[File:Clienttab-dashboard-toolbar.png]] | ||
| + | #Select '''Browse'''. | ||
| + | #:[[File:Attach-browse.png]] | ||
| + | #Choose the desired file and select '''Open'''. (When attaching multiple files at once, [[#Create an attachment|consider using drag-and-drop]] instead of browsing to each individually.) | ||
| + | #:[[File:Attach-browse-select.png]] | ||
| + | #Confirm the attachment info and select '''Okay'''. | ||
| + | #*The '''Description''' will default to the file name. Update the text if desired. | ||
| + | #*The '''Attachment Type''' will [[#Attachment type and tag setup|default based on common file types]]. Select a different '''Type''' as needed. | ||
| + | #*Optionally select an '''Attachment Tag'''. | ||
| + | #*Optionally choose to '''Remove original'''. Enabling this option will permanently delete the original file from the folder after copying it to Newton. | ||
| + | #*:[[File:Attach-browse-info.png]] | ||
| + | #Enter additional contextual information for the [[Client_Dashboard#Activity|activity log]]. This additional information can be used to find a signed document using the [[Client_Dashboard#Activity_Search|activity search]], in addition the description entered above. Select '''Save'''. | ||
| + | #:[[File:Attach-browse-pollog.png]] | ||
| + | |||
| + | Repeat this process for additional attachments if desired. The directory will automatically default to the last location selected by the user on that computer. | ||
| + | |||
| + | == Attachment types and user tags == | ||
| + | In addition to being saved to a policy, Attachments can be assigned a '''Type''' and User-Defined '''Tag'''. [[#Filter attachment list by type|View filters can be applied for the types]], similar to activity filters | ||
[[File:Basic-attch-typetag.PNG]] | [[File:Basic-attch-typetag.PNG]] | ||
| − | Attachment '''Type''' | + | === Attachment type and tag setup === |
| − | + | New attachments with common file extensions (.jpg, .docx, .pdf) will automatically be assigned an '''Attachment Type'''. Attachment types can also be manually assigned to user-created attachments. Attachment Type profiles cannot be modified. | |
| − | |||
| − | |||
| − | |||
| − | |||
| − | |||
| − | |||
| − | Attachment types can be manually assigned to user-created attachments | ||
{| class="wikitable" | {| class="wikitable" | ||
!Type | !Type | ||
| Line 94: | Line 151: | ||
|} | |} | ||
| − | |||
| − | + | Attachment tag profiles are user-defined, created by office administrators. | |
| − | Attachment tag profiles are user-defined, created by office administrators. | ||
| − | + | [[File:Ic_info_black_24dp.png]] See: [[Attachments: Tag Setup]] for more information | |
| − | |||
| − | |||
| − | |||
| − | |||
| − | ==== | + | === Filter attachment list by type === |
| − | + | <table class="infobox" cellspacing="5" style="background-color: #FFFFFF; width:27em; text-align:left; border-spacing: 2px; line-height:1.5em;"> | |
| − | # | + | <tr> |
| − | + | <td> | |
| − | + | Attachment '''Type''' and '''Tag''' columns are displayed in the following locations: | |
| − | + | *[[Dashboard Tab (User)|Dashboard Tab]] -> Attachments | |
| − | + | *[[Management Tab]] -> Attachments | |
| − | + | *[[Client_Tab:_Client_Dashboard#Attachments|Client Dashboard]] -> Attachments | |
| − | + | *[[Policy Dashboard]] -> Attachments | |
| − | + | *[[Company Tab]] -> Attachments | |
| − | + | *[[Vendor Tab]] -> Attachments | |
| − | + | </td> | |
| − | + | </tr> | |
| − | + | </table> | |
| − | + | #[[Client_Tab#Find_a_Client|Search for and load the client or prospect]]. | |
| − | + | #On the [[Client Tab: Client Dashboard|'''Client Dashboard''' tab]] select the (+) next to '''Attachments'''. | |
| − | |||
| − | |||
| − | |||
| − | |||
| − | |||
| − | |||
| − | |||
| − | |||
| − | |||
| − | |||
| − | |||
| − | |||
| − | |||
| − | |||
| − | |||
| − | |||
| − | |||
| − | |||
| − | |||
| − | |||
| − | # | ||
| − | # | ||
| − | |||
| − | # | ||
| − | |||
| − | |||
| − | |||
| − | |||
| − | |||
#'''Right-Click''' on the attachment and select '''Attachment Types'''. ''(By default, '''All''' will be selected)''. | #'''Right-Click''' on the attachment and select '''Attachment Types'''. ''(By default, '''All''' will be selected)''. | ||
#:[[File:Attch-attchtypes-all.png]] | #:[[File:Attch-attchtypes-all.png]] | ||
| Line 156: | Line 178: | ||
#:[[File:Attch-attchtypes-picture.png]] | #:[[File:Attch-attchtypes-picture.png]] | ||
#Multiple attachment types can be selected by choosing additional types. | #Multiple attachment types can be selected by choosing additional types. | ||
| + | |||
| + | == Rename, move, or remove an attachment == | ||
| + | === Rename an Attachment === | ||
| + | #[[Client_Tab#Find_a_Client|Search for and load the client, prospect]], [[Policy Dashboard|policy]], [[Company Tab|company]] or [[Vendor Tab|vendor]]. | ||
| + | #Select the (+) next to '''Attachments'''. | ||
| + | #'''Right-Click''' on the attachment and select '''Edit Description'''. | ||
| + | #Enter a new '''Description'''. | ||
| + | #Select the desired [[#Attachment types and user tags|'''Type''' and/or '''Tag''']]. | ||
| + | #Select '''OK'''. | ||
| + | #:[[File:Attach-edit-descortypetag.png]] | ||
| + | |||
| + | === Move an attachment === | ||
| + | Existing attachments can be moved from the client file, to a specific policy on the client. In addition, attachments can be moved between two policies, or removed from a policy. | ||
| + | #[[Client_Tab#Find_a_Client|Search for and load the client or prospect]]. | ||
| + | #On the [[Client Tab: Client Dashboard|Client Dashboard tab]] select the (+) next to '''Attachments'''. | ||
| + | #'''Right-Click''' on the attachment and select '''Move to policy'''. | ||
| + | #Highlight the correct policy number by left-clicking on the number within the list, and choose '''Select'''. ''(To remove the attachment from the policy, select '''Clear'''.)'' | ||
| + | #:[[File:Attachment-move-selectapolicy.png]] | ||
| + | #Confirm '''Yes''' to move the attachment. | ||
| + | |||
| + | [[File:Ic_info_black_24dp.png]] See: [[Policy Dashboard]] for more information | ||
| + | |||
| + | ==== Move multiple attachments ==== | ||
| + | Attachments can be moved individually using [[#Move an attachment|the steps above]] or multiple items can be moved in a batch. | ||
| + | #[[Client_Tab#Find_a_Client|Search for and load the client or prospect]]. | ||
| + | #On the [[Client Tab: Client Dashboard|Client Dashboard tab]] select the (+) next to '''Attachments'''. | ||
| + | #'''Right-Click''' on the attachment and select '''Multiple Selections'''. | ||
| + | #:[[File:releasenotes-basic-attachments-multipleselection.png]] | ||
| + | #After enabling '''Multiple Selections''', choose the items by clicking on the check boxes or the attachment descriptions. | ||
| + | #:[[File:releasenotes-basic-attachments-multipleselection-checks.png]] | ||
| + | #After the items are selected, '''Right-Click''' on an attachment and select '''Move to policy'''. | ||
| + | #Highlight the correct policy number by left-clicking on the number within the list, and choose '''Select'''. ''(To remove the attachments from the policy, select '''Clear'''.)'' | ||
| + | #:[[File:Attachment-move-selectapolicy.png]] | ||
| + | #Confirm '''Yes''' to move the attachments. | ||
| + | |||
| + | [[File:Ic_info_black_24dp.png]] See: [[Policy Dashboard]] for more information | ||
| + | |||
| + | === Convert company and vendor secure attachments === | ||
| + | [[Company Tab|Company]] and [[Vendor Tab|Vendor]] attachments can be converted to secure attachments. | ||
| + | #Load a [[Company Tab]] or [[Vendor Tab]]. | ||
| + | #Select the (+) next to '''Attachments'''. | ||
| + | #'''Right-Click''' on the attachment and select '''Convert to Secure Attachment'''. | ||
| + | #:[[File:Company-attach-convertsecure.png]] | ||
| + | #Select '''Yes''' to confirm. | ||
| + | #The attachment will be removed from the company or vendor tabs, and only available from the [[Management_Tab#Management:_Secure_Attachments|Management Tab]]. | ||
| + | |||
| + | [[File:Ic_info_black_24dp.png]] See: [[Management Tab]] for more information | ||
| + | |||
| + | === Delete an attachment === | ||
| + | Attachments links can be removed from clients, policies, vendors or companies. | ||
| + | |||
| + | [[File:Ic warning black 24dp.png]] You cannot recover a deleted attachment link. | ||
| + | |||
| + | #[[Client Tab#Find a Client|Load a client]] on one of the [[Client Tab|client tabs]], or load a [[Company Tab]] or [[Vendor Tab]]. | ||
| + | #Select the (+) next to '''Attachments'''. | ||
| + | #'''Right-Click''' on the attachment and select '''Remove Link''' or '''Delete'''. (Requires [[Security System|Security System: AR -> Policy Transaction -> Global]] access.) | ||
| + | #Confirm '''Yes''' to remove the attachment. | ||
| + | #:[[File:Attachment-removelinkconfirm.png]] | ||
| + | |||
| + | Any activity corresponding to the original attachment will be unchanged, with a new activity created representing the delete action. | ||
| + | |||
| + | ==== Delete multiple attachments ==== | ||
| + | Attachments can be removed individually using [[#Delete an attachment|the steps above]] or multiple items can be removed in a batch. | ||
| + | |||
| + | [[File:Ic warning black 24dp.png]] You cannot recover a deleted attachment link. | ||
| + | |||
| + | #[[Client Tab#Find a Client|Load a client]] on one of the [[Client Tab|client tabs]], or load a [[Company Tab]] or [[Vendor Tab]]. | ||
| + | #Select the (+) next to '''Attachments'''. | ||
| + | #'''Right-Click''' on the attachment and select '''Multiple Selections'''. | ||
| + | #:[[File:releasenotes-basic-attachments-multipleselection.png]] | ||
| + | #After enabling '''Multiple Selections''', choose the items by clicking on the check boxes or the attachment descriptions. | ||
| + | #:[[File:releasenotes-basic-attachments-multipleselection-checks.png]] | ||
| + | #After the items are selected, '''Right-Click''' on an attachment again and select '''Remove Link''' or '''Delete'''. (Requires [[Security System|Security System: AR -> Policy Transaction -> Global]] access.) | ||
| + | #Confirm '''Yes''' to remove the attachments. | ||
Latest revision as of 19:17, 19 July 2021
| Related Pages |
| Related Categories |
Newton provides you with the ability to attach electronic documents to your management system. Emails, PDF documents, and other scanned images can all be attached to Newton through drag-and-drop. A document can be attached to a given client, to a specific policy or submission, a company, or to a vendor. Once attached, an attachment can be shared using an email, Batch Send, or My Insurance Dashboard.
Contents
Create an attachment
Attachments and emails are both created through drag-and-drop. Multiple items can be attached simultaneously to the same area instead of repeating the process for each file individually.
Create a client attachment
- Search for and load the client or prospect.
- Left-click the mouse on the document (on your desktop) and hold down the mouse button.
- Drag the selected document onto the Client Dashboard tab and release the mouse button.
- Edit the Description for the file when prompted.
- Select the desired Type and/or Tag.
- Select Okay.
![]() See: Client Tab: Client Dashboard for more information.
See: Client Tab: Client Dashboard for more information.
Create a policy attachment
- Search for and load the client or prospect.
- On the Client Dashboard tab select the (+) next to Policies. (To expand the band by default, see: Preferences)
- Left-Click the desired policy number to open the Policy Dashboard.
- Left-click the mouse on the document (on your desktop) and hold down the mouse button.
- Drag the selected document onto the Policy Dashboard and release the mouse button.
- Edit the Description for the file when prompted.
- Select the desired Type and/or Tag.
- Select Okay.
![]() See: Policy Dashboard for more information.
See: Policy Dashboard for more information.
Create a company attachment
A Company Tab is created by selecting Company -> Add Company Tab from the Main Menu.
- Load the company on a Company Tab.
- Left-click the mouse on the document (on your desktop) and hold down the mouse button.
- Drag the selected document onto the Company Tab and release the mouse button.
- Edit the Description for the file when prompted.
- Select the desired Type and/or Tag.
- Select Okay.
![]() See: Company Tab for more information.
See: Company Tab for more information.
Create a vendor attachment
A Vendor Tab is created by selecting Vendor -> Add Vendor Tab from the Main Menu.
- Load the vendor on a Vendor Tab.
- Left-click the mouse on the document (on your desktop) and hold down the mouse button.
- Drag the selected document onto the Vendor Tab and release the mouse button.
- Edit the Description for the file when prompted.
- Select the desired Type and/or Tag.
- Select Okay.
![]() See: Vendor Tab for more information.
See: Vendor Tab for more information.
Create a secure attachment
Anything attached through drag-and-drop from within the management tab is only visible from the management tab as a secure attachment.
Existing company and vendor attachments can be converted as secure attachments using the instructions below.
![]() See: Management Tab for more information.
See: Management Tab for more information.
Create an attachment by browsing to a folder
Attachments are attached primarily through drag-and-drop, however they can also be attached by browsing the Microsoft Windows file system and selecting a file. Utilizing the file picker is helpful for users with a single monitor where drag+drop is more difficult, or if all documents are always scanned and saved to a specific network folder.
- Search for and load the client, prospect, policy, company or vendor.
- Select Create Item -> Attachment within the top toolbar. (Optionally select the (+) next to Attachments and select Add Attachment.)
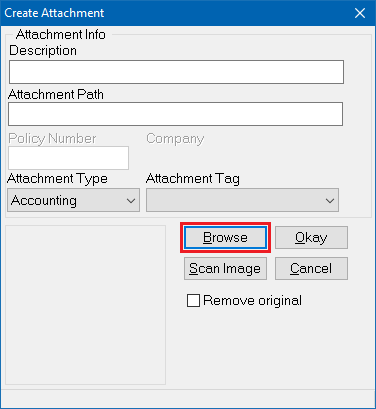
- Select Browse.
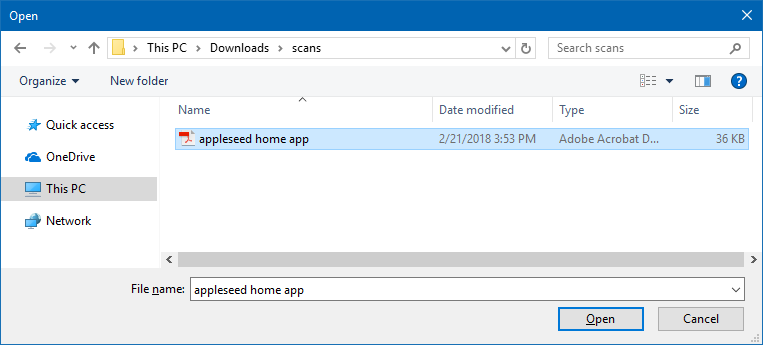
- Choose the desired file and select Open. (When attaching multiple files at once, consider using drag-and-drop instead of browsing to each individually.)
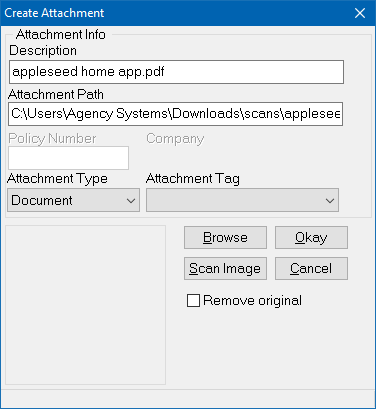
- Confirm the attachment info and select Okay.
- The Description will default to the file name. Update the text if desired.
- The Attachment Type will default based on common file types. Select a different Type as needed.
- Optionally select an Attachment Tag.
- Optionally choose to Remove original. Enabling this option will permanently delete the original file from the folder after copying it to Newton.
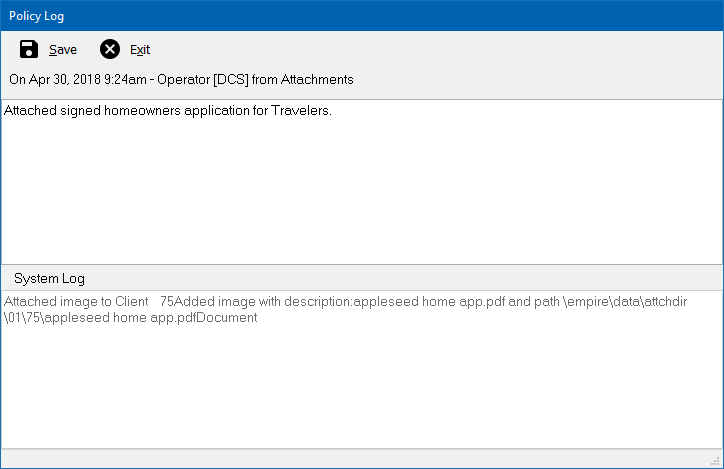
- Enter additional contextual information for the activity log. This additional information can be used to find a signed document using the activity search, in addition the description entered above. Select Save.
Repeat this process for additional attachments if desired. The directory will automatically default to the last location selected by the user on that computer.
Attachment types and user tags
In addition to being saved to a policy, Attachments can be assigned a Type and User-Defined Tag. View filters can be applied for the types, similar to activity filters
Attachment type and tag setup
New attachments with common file extensions (.jpg, .docx, .pdf) will automatically be assigned an Attachment Type. Attachment types can also be manually assigned to user-created attachments. Attachment Type profiles cannot be modified.
| Type | Automatically Assigned To |
|---|---|
| Accounting | Client/Company Reconcile Reports, Commission Download/Commission Builder Reports |
| Document | Printed Memo Writer documents. |
| ACORD/Forms | Previewed or Printed ACORD forms. |
| Picture | |
| Other | |
| Packages | Batch print generated PDF packages. |
Attachment tag profiles are user-defined, created by office administrators.
![]() See: Attachments: Tag Setup for more information
See: Attachments: Tag Setup for more information
Filter attachment list by type
|
Attachment Type and Tag columns are displayed in the following locations:
|
- Search for and load the client or prospect.
- On the Client Dashboard tab select the (+) next to Attachments.
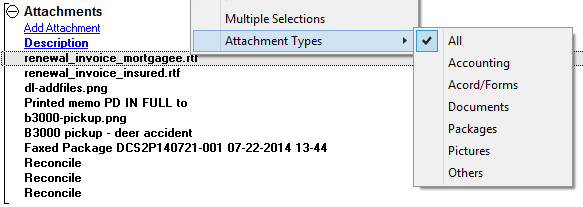
- Right-Click on the attachment and select Attachment Types. (By default, All will be selected).
- Select the desired Attachment Type from the list.
- The attachment list will be automatically filtered to only include attachments saved as the selected Attachment Type.
- Multiple attachment types can be selected by choosing additional types.
Rename, move, or remove an attachment
Rename an Attachment
- Search for and load the client, prospect, policy, company or vendor.
- Select the (+) next to Attachments.
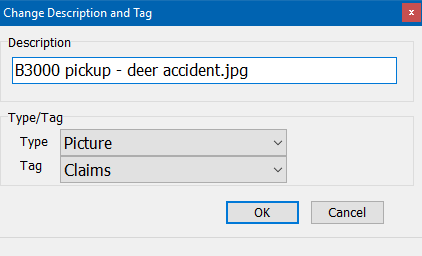
- Right-Click on the attachment and select Edit Description.
- Enter a new Description.
- Select the desired Type and/or Tag.
- Select OK.
Move an attachment
Existing attachments can be moved from the client file, to a specific policy on the client. In addition, attachments can be moved between two policies, or removed from a policy.
- Search for and load the client or prospect.
- On the Client Dashboard tab select the (+) next to Attachments.
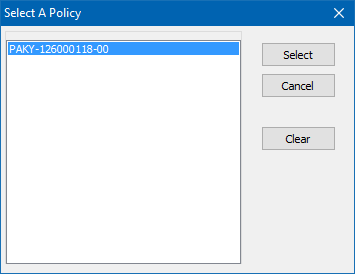
- Right-Click on the attachment and select Move to policy.
- Highlight the correct policy number by left-clicking on the number within the list, and choose Select. (To remove the attachment from the policy, select Clear.)
- Confirm Yes to move the attachment.
![]() See: Policy Dashboard for more information
See: Policy Dashboard for more information
Move multiple attachments
Attachments can be moved individually using the steps above or multiple items can be moved in a batch.
- Search for and load the client or prospect.
- On the Client Dashboard tab select the (+) next to Attachments.
- Right-Click on the attachment and select Multiple Selections.
- After enabling Multiple Selections, choose the items by clicking on the check boxes or the attachment descriptions.
- After the items are selected, Right-Click on an attachment and select Move to policy.
- Highlight the correct policy number by left-clicking on the number within the list, and choose Select. (To remove the attachments from the policy, select Clear.)
- Confirm Yes to move the attachments.
![]() See: Policy Dashboard for more information
See: Policy Dashboard for more information
Convert company and vendor secure attachments
Company and Vendor attachments can be converted to secure attachments.
- Load a Company Tab or Vendor Tab.
- Select the (+) next to Attachments.
- Right-Click on the attachment and select Convert to Secure Attachment.
- Select Yes to confirm.
- The attachment will be removed from the company or vendor tabs, and only available from the Management Tab.
![]() See: Management Tab for more information
See: Management Tab for more information
Delete an attachment
Attachments links can be removed from clients, policies, vendors or companies.
![]() You cannot recover a deleted attachment link.
You cannot recover a deleted attachment link.
- Load a client on one of the client tabs, or load a Company Tab or Vendor Tab.
- Select the (+) next to Attachments.
- Right-Click on the attachment and select Remove Link or Delete. (Requires Security System: AR -> Policy Transaction -> Global access.)
- Confirm Yes to remove the attachment.
Any activity corresponding to the original attachment will be unchanged, with a new activity created representing the delete action.
Delete multiple attachments
Attachments can be removed individually using the steps above or multiple items can be removed in a batch.
![]() You cannot recover a deleted attachment link.
You cannot recover a deleted attachment link.
- Load a client on one of the client tabs, or load a Company Tab or Vendor Tab.
- Select the (+) next to Attachments.
- Right-Click on the attachment and select Multiple Selections.
- After enabling Multiple Selections, choose the items by clicking on the check boxes or the attachment descriptions.
- After the items are selected, Right-Click on an attachment again and select Remove Link or Delete. (Requires Security System: AR -> Policy Transaction -> Global access.)
- Confirm Yes to remove the attachments.


