Difference between revisions of "Scan An Electronic Signature"
Jump to navigation
Jump to search
m |
|||
| (4 intermediate revisions by 2 users not shown) | |||
| Line 1: | Line 1: | ||
| − | [[Category:Forms]][[Category:Cash]][[Category:Profiles | + | [[Category:Forms]][[Category:Cash]][[Category:Profiles]] |
<table class="infobox" cellspacing="5" style="background-color: #FFFFFF; width:27em; text-align:left; border-spacing: 2px; line-height:1.5em;"> | <table class="infobox" cellspacing="5" style="background-color: #FFFFFF; width:27em; text-align:left; border-spacing: 2px; line-height:1.5em;"> | ||
<tr> | <tr> | ||
| − | <td>[[File:Ic_info_black_24dp.png]] Required Software Version: [[:Category:Release Notes|March | + | <td>[[File:Ic_description_black_24dp.png|link=Newton User Guide#Forms]] Newton User Guide: [[Newton User Guide#Forms|Forms]]</td> |
| + | </tr> | ||
| + | <tr> | ||
| + | <td>[[File:Ic_info_black_24dp.png]] Required Software Version: [[:Category:Release Notes|March 2017]]</td> | ||
| + | </tr> | ||
| + | <tr> | ||
| + | <td>[[File: Ic_settings_backup_restore_black_24dp.png]] Legacy Instructions Available: [http://wiki.agencysystems.com/mediawiki/index.php?title=Scan_An_Electronic_Signature&oldid=3116 Click Here]</td> | ||
</tr> | </tr> | ||
<tr style="background-color: #bdbdbd; text-align: center; font-weight:bold;"> | <tr style="background-color: #bdbdbd; text-align: center; font-weight:bold;"> | ||
| Line 10: | Line 16: | ||
<td> | <td> | ||
<ul> | <ul> | ||
| + | <li>[[Client Payment (disambiguation)|Client Payment]]</li> | ||
<li>[[Producer Profile]]</li> | <li>[[Producer Profile]]</li> | ||
| − | |||
</ul> | </ul> | ||
</td> | </td> | ||
| Line 21: | Line 27: | ||
<td> | <td> | ||
<ul> | <ul> | ||
| + | <li>[[:Category:Forms|Forms]]</li> | ||
<li>[[:Category:Profiles|Profiles]]</li> | <li>[[:Category:Profiles|Profiles]]</li> | ||
</ul> | </ul> | ||
| Line 27: | Line 34: | ||
</table> | </table> | ||
| − | Electronic signatures can be saved to the operator or producer profile. The electronic signature can be placed at the bottom of selected ACORD forms, or on the client cash receipt. | + | Electronic signatures can be saved to the [[Producer Profile|operator or producer profile]]. The electronic signature can be placed at the bottom of selected ACORD forms, or on the [[Client Payment (disambiguation)|client cash receipt]]. |
| − | + | ===Before you Begin === | |
| + | Access to edit the Producer Profile and add the signature requires the current operator to have [[Security System|Security System: Profiles -> Producer -> Edit]] access. | ||
| − | + | [[File:Ic_info_black_24dp.png]] See: [[Security System]] for more information. | |
| − | |||
| − | + | An email signature is different than a scanned electronic signature. See: [[Email: Email Signature|Email Signature]] for more information. | |
| − | #Sign a blank piece of paper with your signature. | + | |
| − | #Scan your signature and save the image file as a '''.JPG''' or '''.BMP''', on your PC. | + | === Process === |
| − | #Log | + | #Sign a blank piece of paper with your signature, such as the back of a business card. |
| − | # | + | #Scan your signature and save the image file as a '''.JPG''' or '''.BMP''', on your PC. |
| − | #Select ''' | + | #:If your scanner can only save as a .PDF file, use the Microsoft Snipping Tool to convert the scanned document to an image file. |
| − | #Select '''Forms Signature''' at the bottom of the window. | + | #[[Log in to Newton by Agency Systems]]. |
| + | #From the '''[[Main Menu and Tab Navigation|Main Menu]]''', select '''Setup''' -> '''Producer'''. | ||
| + | #Select '''Find'''. | ||
| + | #Select the desired producer number and select '''OK'''. | ||
| + | #Select the '''Forms Signature''' button at the bottom of the window. | ||
#Select '''Browse''' and locate the image file you saved in step 2. Select it and select '''Open'''. | #Select '''Browse''' and locate the image file you saved in step 2. Select it and select '''Open'''. | ||
#The scanned image will be displayed. | #The scanned image will be displayed. | ||
| − | |||
#To select a specific region, '''left-click''' in the top left corner, but '''do not release the mouse click'''. Drag the mouse to the bottom right-hand corner, and release the mouse click. | #To select a specific region, '''left-click''' in the top left corner, but '''do not release the mouse click'''. Drag the mouse to the bottom right-hand corner, and release the mouse click. | ||
#:[[File:Profiles-producer-formssig-2.png]] | #:[[File:Profiles-producer-formssig-2.png]] | ||
| − | + | #If you need to make adjustments to the selected area, select '''Select Region''' and repeat the prior selection step above. | |
| − | |||
| − | #If you need to make adjustments to the selected area, select '''Select Region''' and repeat step | ||
#Select the '''Accept''' button, then '''Save'''. Select '''Exit'''. | #Select the '''Accept''' button, then '''Save'''. Select '''Exit'''. | ||
| − | + | ||
| − | + | [[File:Setup-producers-formsig.gif]] | |
Latest revision as of 13:17, 15 March 2019
| Related Pages |
| Related Categories |
Electronic signatures can be saved to the operator or producer profile. The electronic signature can be placed at the bottom of selected ACORD forms, or on the client cash receipt.
Before you Begin
Access to edit the Producer Profile and add the signature requires the current operator to have Security System: Profiles -> Producer -> Edit access.
![]() See: Security System for more information.
See: Security System for more information.
An email signature is different than a scanned electronic signature. See: Email Signature for more information.
Process
- Sign a blank piece of paper with your signature, such as the back of a business card.
- Scan your signature and save the image file as a .JPG or .BMP, on your PC.
- If your scanner can only save as a .PDF file, use the Microsoft Snipping Tool to convert the scanned document to an image file.
- Log in to Newton by Agency Systems.
- From the Main Menu, select Setup -> Producer.
- Select Find.
- Select the desired producer number and select OK.
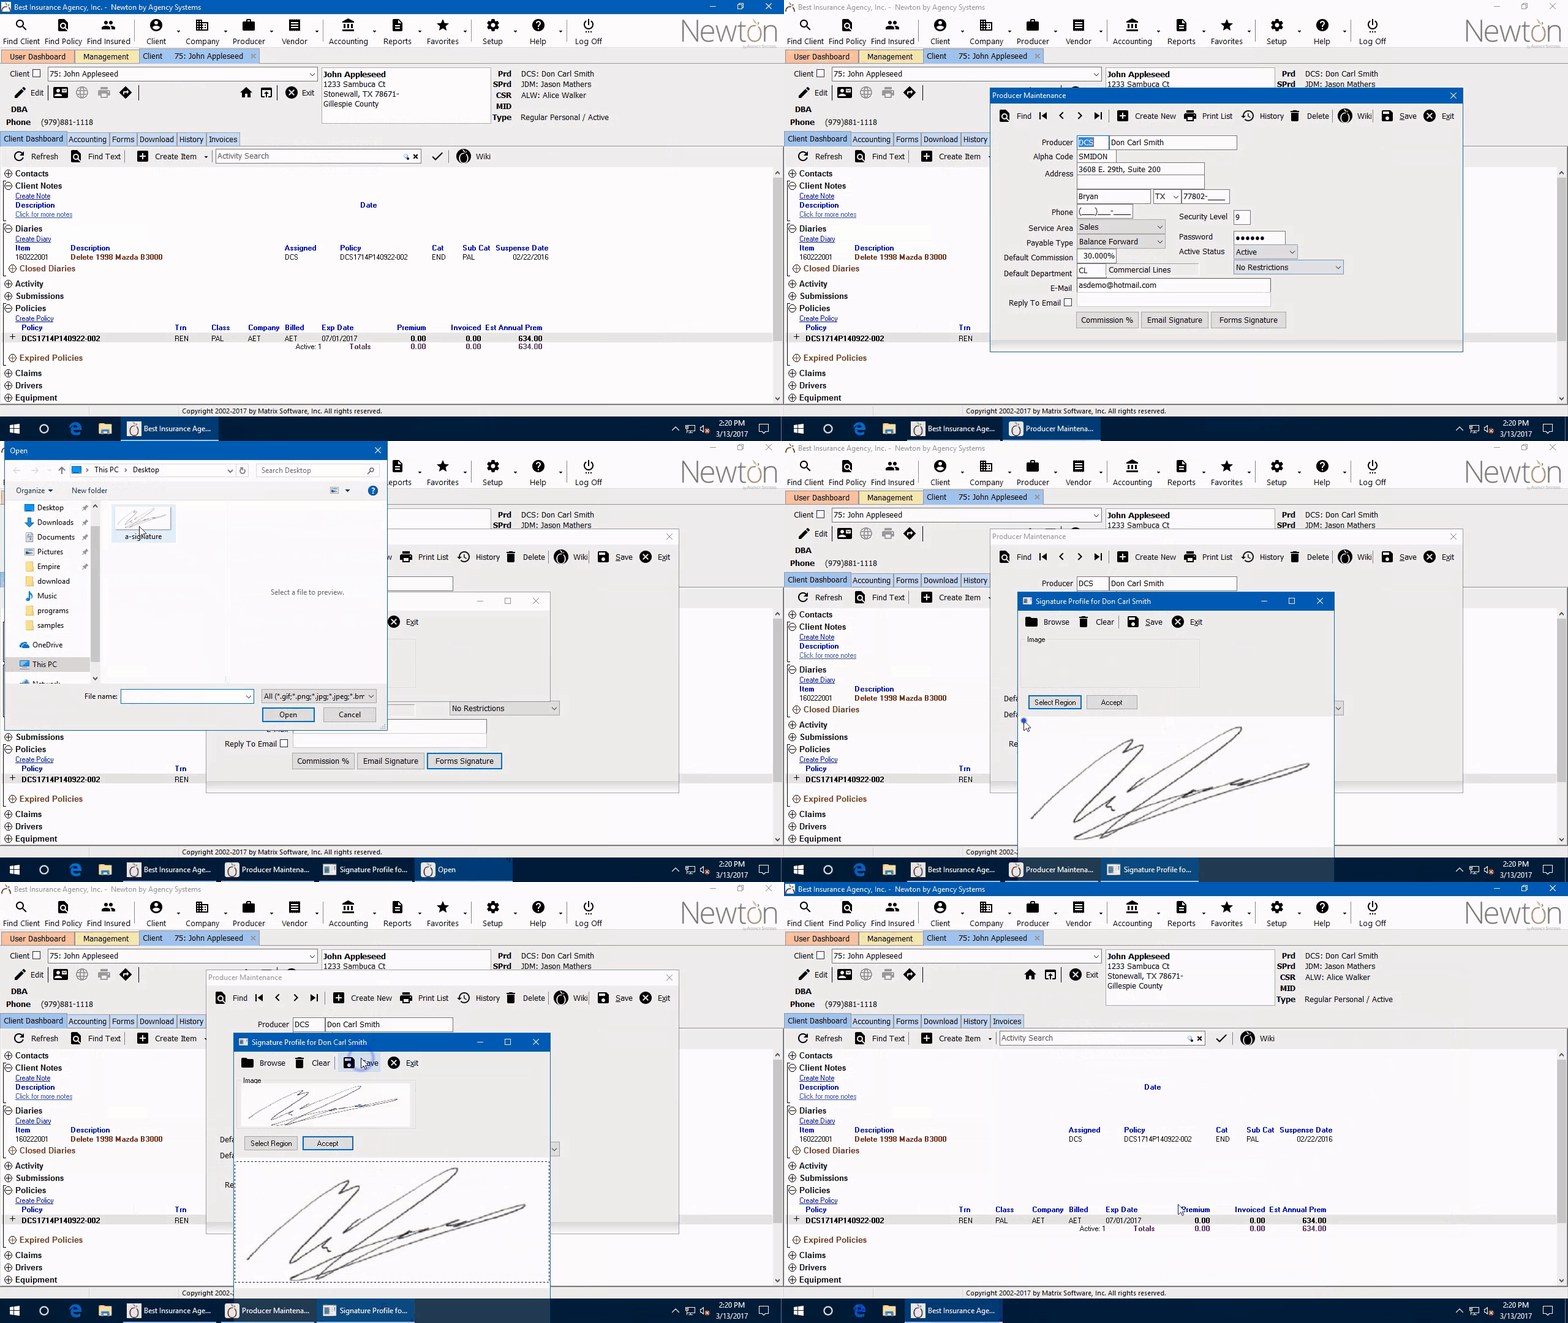
- Select the Forms Signature button at the bottom of the window.
- Select Browse and locate the image file you saved in step 2. Select it and select Open.
- The scanned image will be displayed.
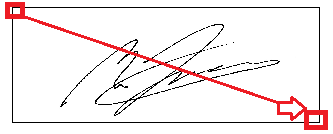
- To select a specific region, left-click in the top left corner, but do not release the mouse click. Drag the mouse to the bottom right-hand corner, and release the mouse click.
- If you need to make adjustments to the selected area, select Select Region and repeat the prior selection step above.
- Select the Accept button, then Save. Select Exit.

