Difference between revisions of "Policy: Reinstate A Policy"
(initial save) |
(added guide link) |
||
| (One intermediate revision by one other user not shown) | |||
| Line 2: | Line 2: | ||
[[Category:Policy Tasks]] | [[Category:Policy Tasks]] | ||
<table class="infobox" cellspacing="5" style="background-color: #FFFFFF; width:27em; text-align:left; border-spacing: 2px; line-height:1.5em;"> | <table class="infobox" cellspacing="5" style="background-color: #FFFFFF; width:27em; text-align:left; border-spacing: 2px; line-height:1.5em;"> | ||
| + | <tr> | ||
| + | <td>[[File:Ic_description_black_24dp.png|link=Newton User Guide#Policy]] Newton User Guide: [[Newton User Guide#Policy|Policy]]</td> | ||
| + | </tr> | ||
<tr> | <tr> | ||
<td>[[File:Ic_info_black_24dp.png]] Required Software Version: [[:Category:Release Notes|Spring 2017]]</td> | <td>[[File:Ic_info_black_24dp.png]] Required Software Version: [[:Category:Release Notes|Spring 2017]]</td> | ||
| Line 33: | Line 36: | ||
=== Before You Begin === | === Before You Begin === | ||
Access to edit Policies or Binders requires the current operator to have [[Security System|Security System: AR -> Policy Transaction -> Edit]] access. | Access to edit Policies or Binders requires the current operator to have [[Security System|Security System: AR -> Policy Transaction -> Edit]] access. | ||
| − | |||
| − | |||
[[File:Ic_info_black_24dp.png]] See: [[Security System]] for more information. | [[File:Ic_info_black_24dp.png]] See: [[Security System]] for more information. | ||
Latest revision as of 21:03, 7 May 2018
| Related Pages |
| Related Categories |
The steps below outline the process of reinstating a policy that has been previously cancelled.
Before You Begin
Access to edit Policies or Binders requires the current operator to have Security System: AR -> Policy Transaction -> Edit access.
![]() See: Security System for more information.
See: Security System for more information.
Reinstate A Policy
Cancelled policies are displayed in red and move to the expired policies section the day after the cancellation date.
![]() See: Policy: Cancel A Policy to cancel the policy prior to entering the reinstatement.
See: Policy: Cancel A Policy to cancel the policy prior to entering the reinstatement.
The Policy Dashboard is typically opened from the Client Dashboard, however it can also be opened directly from the Policy Keyword Search, the User Dashboard Tab, the Company Tab, the Management Tab, or from Policy & Billing.
- Search for and load the client or prospect.
- On the Client Dashboard tab select the (+) next to Policies. (To expand the band by default, see: Preferences)
- Left-Click the desired policy number to open the Policy Dashboard. (If not listed, select the (+) next to Expired Policies.)
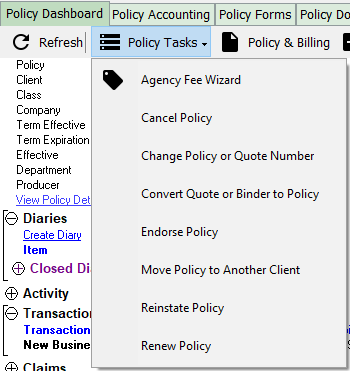
- Select Policy Tasks -> Reinstate Policy.
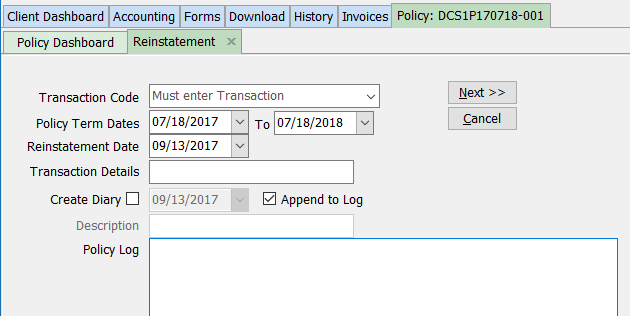
- Select Transaction -> Reinstatement, typically REI.
- Verify the Policy Term Dates display the original term effective and expiration dates.
- Enter the Reinstatement Date, typically the date of the prior cancellation displayed within the right-hand panel.
- Optional Items:
- Enter a short description in the Transaction Details field.
- To create a follow up Diary item, select the Create Diary option.
- Enter any additional activity details in the Policy Log field.
- Select Next.
- Select any Forms to bring forward to the new reinstatement transaction. This will copy the existing forms to the new transaction so they can be modified according to the reinstatement.
- Select Next.
- The reinstatement policy transaction will be added with the selected effective date, and any selected forms will be copied to the new transaction.
Invoice Processing
![]() See Invoice: Create An Invoice to enter the Reinstatement invoice premium.
See Invoice: Create An Invoice to enter the Reinstatement invoice premium.

