Forms: Configure Agency Address by Department (Location)
| Related Pages |
| Related Categories |
Some agencies have multiple locations with different servicing addresses that need to display on printed or emailed forms. When the policies for all locations are combined into a single agency code, different departments denote where the business took place.
Newton can be configured to default the policy department name and address on forms, instead of the default agency address.
Contents
Before you begin
Access to edit the Agency Profile requires the current operator to have Security System: Profiles -> Agency -> Edit access.
Access to the Department Profile requires the current operator to have Security System: Profiles -> Department -> Entry and Edit access.
![]() See: Security System for more information.
See: Security System for more information.
Enable printing forms by department
The agency profile can be configured to use the department address on forms by default. Regardless of the default value, individual forms can be reassigned to a department address. The system default only needs to be configured once for the entire agency.
- From the Main Menu, select Setup -> Agency. (Requires Security System: Profiles -> Agency -> Edit access.)
- Select the Forms/Numbering Setups tab.
- Change Address on Forms to Department.
- Select Save then Exit.

![]() See: Agency Profile for more information.
See: Agency Profile for more information.
Configure department codes for locations
If you have multiple locations within a single agency code, departments will denote where the business took place. Any form that displays an agency name and address can display the assigned department information instead.
- From the Main Menu, select Setup -> Department.
- Select Find.
- Select the desired department number and select OK.
- Enter or modify any desired values. (Examples: Department name and department address).
- Select Save. (Requires Security System: Profiles -> Department -> Edit access.)
- Select Exit.
![]() See: Department Profile for more information.
See: Department Profile for more information.
Create a form with a department address
A department code is assigned to each Policy, Invoice, Cash, Check, Journal, or Voucher. When a form is created for a policy, the form will default to use the policy department name and address based on the agency profile setting. The default agency setting can also be edited and saved for each individual form.
- Search for and load the client or prospect.
- On the Client Dashboard tab select the (+) next to Policies. (To expand the band by default, see: Preferences)
- Left-Click the desired policy number to open the Policy Dashboard.
- Select Create Item -> Form within the policy dashboard toolbar.
- Select the desired form and select OK.
- The list can be filtered by typing the name of a form, or the number of a form.
- Enter "truck" for trucking application, or "25" for the ACORD 25 Certificate of Liability. The entered filter can be viewed in the title bar of a window.
- To clear the filter, press <backspace>.
- An empty form will open with the policy department details pre-filled. (If the policy department did not default, verify the setup section above.)
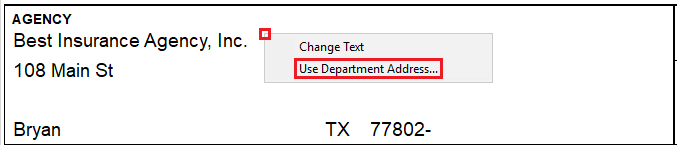
- To modify the assigned department, Right-Click on the agency section and choose Use Department Address...
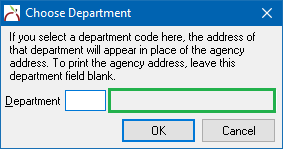
- Enter the department code, or left-click the description field to choose from a list. Select OK.
- Enter or import data onto the form using the schedule buttons or by importing from another form. (See: Forms: Import data on a form for more information)
- Optionally enter a form description within the top toolbar for easy identification within Newton. The description does not print on the form.
- Select Save.
- Optionally add the form to a Form Bundle.
- Select Preview, Print, or Batch Send to generate the form. Batch Send provides a single interface to select multiple forms and send the package of forms to a printer, a .PDF file, My Insurance Dashboard, a fax printer, or as an email attachment.


![]() See: Forms for more information.
See: Forms for more information.