Difference between revisions of "Policy: Cancel A Policy"
(updated for 2017) |
|||
| Line 35: | Line 35: | ||
=== Before You Begin === | === Before You Begin === | ||
Access to edit Policies or Binders requires the current operator to have [[Security System|Security System: AR -> Policy Transaction -> Edit]] access. | Access to edit Policies or Binders requires the current operator to have [[Security System|Security System: AR -> Policy Transaction -> Edit]] access. | ||
| − | |||
| − | |||
[[File:Ic_info_black_24dp.png]] See: [[Security System]] for more information. | [[File:Ic_info_black_24dp.png]] See: [[Security System]] for more information. | ||
Revision as of 20:20, 13 September 2017
| Related Pages |
| Related Categories |
The steps below outline the process of cancelling a policy and optionally creating the ACORD 35 - Cancellation Request/Policy Release.
Before You Begin
Access to edit Policies or Binders requires the current operator to have Security System: AR -> Policy Transaction -> Edit access.
![]() See: Security System for more information.
See: Security System for more information.
Cancel A Policy
Cancelled policies are displayed in red and move to the expired policies section the day after the cancellation date.
The Policy Dashboard is typically opened from the Client Dashboard, however it can also be opened directly from the Policy Keyword Search, the User Dashboard Tab, the Company Tab, the Management Tab, or from Policy & Billing.
- Search for and load the client or prospect.
- On the Client Dashboard tab select the (+) next to Policies. (To expand the band by default, see: Preferences)
- Left-Click the desired policy number to open the Policy Dashboard.
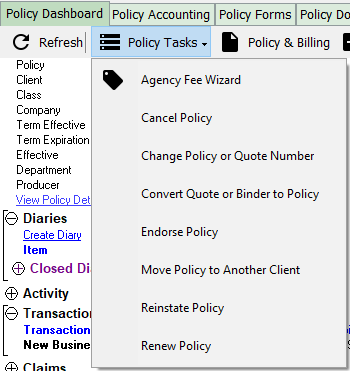
- Select Policy Tasks -> Cancel Policy.
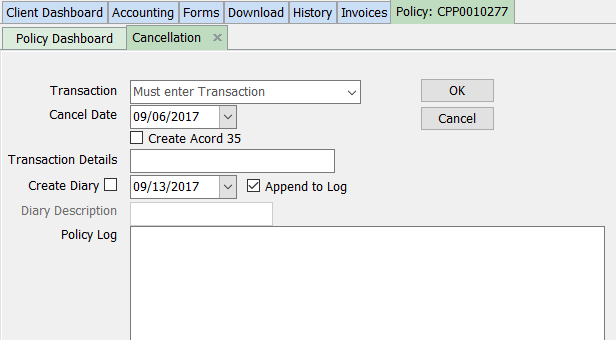
- Select Transaction -> Cancellation.
- Select the Cancel Date.
- This will create a policy sequence effective and expiration date of the cancellation.
- It will also change the policy term expiration date to the date of the cancellation.
- Optionally select Create Acord 35.
- Optionally enter a short description in the Transaction Details field.
- To optionally create a follow up Diary item, select the Create Diary option.
- Enter any additional activity details in the Policy Log field and select OK.
- If the ACORD 35 form was created, it will automatically open and allow for changes. After the changes are complete select Save and close the form.
Invoice Processing
![]() See: Create and Process Return Premium Invoice Due to Cancellation or Endorsement for more information.
See: Create and Process Return Premium Invoice Due to Cancellation or Endorsement for more information.

