Client Refund on Overpayment or Credit Balance
| Related Pages |
| Related Categories |
Use the procedure below when you have received a cash payment over the amount of the invoiced items, and you wish to create a check for the overpaid amount. The process will apply the extra cash to the invoice, and create a refund check to the client/agent.
If the refund check is due to a cancellation or credit endorsement, see: Create and Process Return Premium Invoice Due to Cancellation or Endorsement.
If the refund check will be placed on account, and not applied to an invoice, see: Create Client Refund Check - On Account (Optional).
Contents
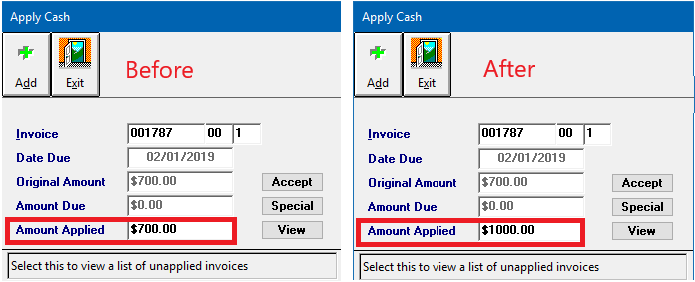
Overapply On-Account Cash to an Invoice
To skip this step and place the refund amount on account, see Create Client Refund Check - On Account (Optional) below.
- Load a client on one of the client tabs.
- Select the Accounting tab.
- Double-Click to expand the Cash Receipt. (If the invoice viewed from the client's account tab already shows the credit balance, skip to creating the client refund check.)
- Left-Click the Cash Receipt number.
- Note the total Unapplied Amount of the Cash Receipt.
- Select View and Left-Click any one of the invoices listed that the cash item is already paying.
- When the Choose Action box appears select Edit.
- <TAB> to the Amount Applied field and enter the new Combined Amount.
- Combined Amount = Current Amount Applied + Unapplied Amount of cash receipt. (From Example: 700.00 + 300.00 = 1000.00)
- Select Accept. Answer Yes to Re-apply Cash to invoice.
- Select Exit then Close.
- The unapplied amount for the cash transaction should now be zero.
- Exit the cash transaction screen and refresh the account tab. The credit will now be applied to the invoice.


Create Client Refund Check
A client refund check to GL-1120 will be created through Reconcile Client Receivables.
- Load a client on one of the client tabs.
- Select the Accounting tab. The return premium invoice will be listed with a credit balance.
- Select Reconcile Receivables on the top toolbar.
- Verify the date range includes the overapplied premium invoice.
- Deselect Create or use existing cash transaction since we will be creating a check transaction.
- Select Ok.
- Right-Click on the invoice, and select Pay This Invoice In Full.
- Select Payment Details at the bottom of the reconcile window.
- Change the action to Create A New Check Transaction To Pay.
- Enter the details for the check transaction, and select Ok.
- Select Perform Reconciliation to create the check and pay the client balance.
Create Client Refund Check - On Account (Optional)
A client refund check to GL-1120 can also be created through Express Checks. The Express Checks interface allows the operator to place the refund amount on account, without needing to apply the balance to a specific invoice.
- Load a client on one of the client tabs.
- Make a note of the client number in the client drop-down box.
- Select Accounting -> Express Checks.
- Enter the Bank Code for the check.
- Change the check type from Regular to Wire or Don't Print if desired.
- Select the Date for the check.
- Enter the GL 1120 by keying the code, or selecting the drop-down.
- Enter the Sub GL as the client number noted above.
- Enter a short Description.
- Select the Manual button within the toolbar at the middle of the window. .
- Change Apply To -> On-Account.
- Select the Department Code.
- Enter the Amount.
- Select Ok.
- To add additional department distributions, repeat the steps above. When finished, select Cancel.
- The check is now complete.
- Select Print to print the check, then Exit when finished.
See: Express Checks: Create an On-Account Check for additional details.