Difference between revisions of "Client Payment: Agency Bill Cash"
Jump to navigation
Jump to search
(initial save) |
(added video) |
||
| Line 28: | Line 28: | ||
</tr> | </tr> | ||
</table> | </table> | ||
| − | + | {{#ev:youtube|ITEzYwEGfjU|300|right|Client Payment Processing for Agency Bill Policies}} | |
This procedure outlines how to receive a client payment on an [[:Category:Agency Bill|agency bill policy]]. This will create a [[:Category:Cash|cash receipt]], and apply the payment to [[#Create an Agency Bill Payment - One Invoice|an invoice]], [[#Create an Agency Bill Payment - Multiple Invoices|multiple invoices]], or [[#Create an Agency Bill Payment - No Invoice|left on-account for the client]]. | This procedure outlines how to receive a client payment on an [[:Category:Agency Bill|agency bill policy]]. This will create a [[:Category:Cash|cash receipt]], and apply the payment to [[#Create an Agency Bill Payment - One Invoice|an invoice]], [[#Create an Agency Bill Payment - Multiple Invoices|multiple invoices]], or [[#Create an Agency Bill Payment - No Invoice|left on-account for the client]]. | ||
Revision as of 15:41, 23 September 2014
| Related Pages |
| Related Categories |
This procedure outlines how to receive a client payment on an agency bill policy. This will create a cash receipt, and apply the payment to an invoice, multiple invoices, or left on-account for the client.
For instructions taking a payment on direct bill policies, see Client Payment: Direct Bill Cash Transmittal.
Create an Agency Bill Payment - One Invoice
- Load the client on one of the four client tabs.
- Select the Account tab at the bottom to view the client's current balance. (GL 1120 - Client Receivables)
- Verify the account balance shows a single outstanding Agency Bill invoice.
- If more than one invoice is listed, see Create an Agency Bill Payment - Multiple invoices
- If no invoices are listed, see Create an Agency Bill Payment - No Invoice
- Right-Click on the invoice and select Attach Payment.
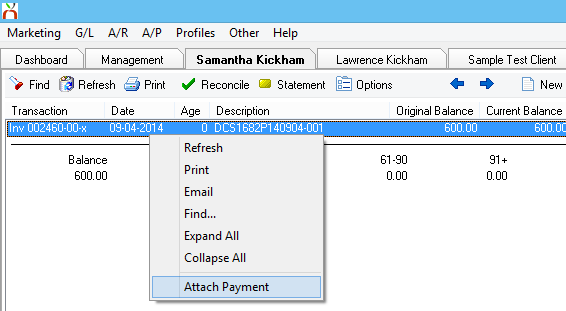
- (If "You must select an invoice item" is displayed, verify the invoice is highlighted in blue, and that the top record for the invoice is selected.)
- Enter a Check Number or select F2 to display "<CASH>". (Check number refers to the client's check number.).
- Enter the Amount for the payment.
- Verify the Date and the Bank code. (The bank will auto-fill based on your Agency Profile.)
- Select Ok and Yes to print if desired.


Create an Agency Bill Payment - Multiple Invoices
- Load the client on one of the four client tabs.
- Select the Account tab at the bottom to view the client's current balance. (GL 1120 - Client Receivables)
- Verify the account balance shows multiple outstanding Agency Bill invoices.
- If one invoice is listed, see Create an Agency Bill Payment - One Invoice
- If no invoices are listed, see Create an Agency Bill Payment - No Invoice
- Select Reconcile on the top toolbar.
- Verify the date range will include all invoices displayed on the client's account tab.
- Select Ok.
- Verify the cash transaction details:
- Bank Code. (The bank will auto-fill based on your Agency Profile.)
- Department code for the cash transaction.
- Cash transaction Effective date.
- Check Number or select F2 to display "<CASH>". (Check number refers to the client's check number.).
- Cash transaction Description.
- Cash transaction Amount.
- Select Ok.
- Right-Click and select Pay All In Full to pay all listed invoices. (To pay individual invoices, Right-Click on each invoice and select Pay This Invoice In Full.)
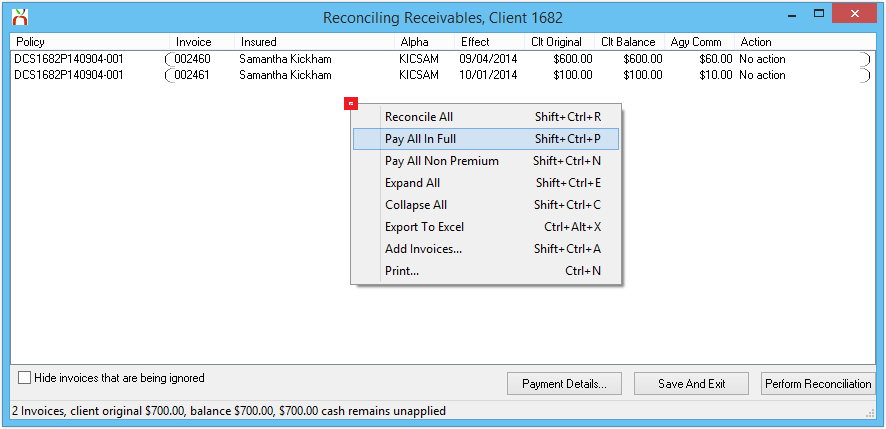
- See Reconcile Client Receivables for additional options and instructions.
- Select Perform Reconciliation to create the cash transaction, and apply the payment to each invoice.
- Select Ok.


Create an Agency Bill Payment - No Invoice
- Load the client on one of the four client tabs.
- Select the Account tab at the bottom to view the client's current balance. (GL 1120 - Client Receivables)
- Verify the account balance shows no outstanding Agency Bill invoices.
- If one invoice is listed, see Create an Agency Bill Payment - One Invoice
- If more than one invoice is listed, see Create an Agency Bill Payment - Multiple Invoices
- After verifying there are no outstanding invoices, return to the client's Basic Tab.
- Right-Click on the policy number and select Attach Payment.
- Enter a Check Number or select F2 to display "<CASH>". (Check number refers to the client's check number.).
- Enter the Amount for the payment.
- Select Cash Type -> Regular.
- Verify the Date and the Bank code. (The bank will auto-fill based on your Agency Profile.)
- Select Ok and Yes to print if desired.

