MyInsuranceDashboard.com Integration
MyInsuranceDashboard.com provides a 24/7 web portal for your customers to access their policy related information that integrates directly with Newton by Agency Systems. Your customers will be able to review schedule items, generate published certificates with updated holder information, and view published documents to their dashboard. They will also be able to interact with your agency by requesting changes to schedule items, and upload supporting documents to your office. These items will flow directly to your management system with minimal effort by your staff. Below you will find specific information about these individual tasks.
Contents
- 1 How do I Enroll Customers in MyInsuranceDashboard.com?
- 2 What do my Customers see on MyInsuranceDashboard.com?
- 3 How do my customers use MyInsuranceDashboard.com?
- 4 How do I Select or Publish a Certificate of Insurance to MyInsuranceDashboard.com?
- 5 How do I Publish Documents to MyInsuranceDashboard.com?
How do I Enroll Customers in MyInsuranceDashboard.com?
MyInsuranceDahsboard is an opt in system. This means that you, the agency, select who you want to allow access to MyInsuranceDashboard. There are a few methods that you may use to enroll your customers. In all methods MyInsuranceDashboard will send the contact selected an email with notification that they have been enrolled with a link to setup their account on MyInsuranceDashboard.com
Method One:
From the Basic Tab in Agency Systems select Edit on the contact you want to send the MyInsuranceDashboard Email to, and select Enroll.
NOTE: To use this method an email address must be saved to the contact before enroll.
Method Two:
When completing a Certificate of Insurance (Acord 25), you may go to Other -> "Publish Cert to MyInsuranceDashboard.com." If the customer is not enrolled already you will get a select contact window. Highlight the contact you want to send the enroll email to, and select Send Form. After the enroll is complete it will set the Certificate that the enroll was set from as the published Certificate. If the customer is already enrolled the system will bypass the select contact window, and will automatically publish the Certificate.
Method Three:
From the MyInsuranceDashboard.com portal under the Clients tab you may add a client at the top of the page. First select the proper Agency Code from the drop down box -> type the corresponding client number from Agency Systems -> select "Add Client” The client will now show in the listing for enrolled clients. You may choose to send the enroll email directly from the MyInsuranceDashboard Portal. Once you hit "Notify" you will receive a window that will allow you select which client contact to send the email to. You may also input an alternate email address in the free form email box.
What do my Customers see on MyInsuranceDashboard.com?
MyInsuranceDahsboard is an opt in system. This means that you, the agency, select what you want to allow access to MyInsuranceDashboard. In general this is a representation of the client basic tab in Newton by Agency Systems. Your customers will also have access to Certificates of Insurance if you make them available by publishing the certificate.
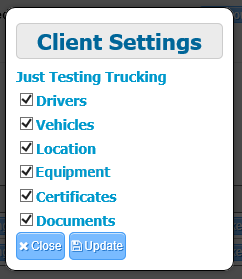
From the Agent Side of the MyInsuranceDashboard.com portal each client will have a settings button. This will allow you to specify by client what they have the ability to see.
During your initial MyInsuranceDashboard setup you will set the default tabs to be visible once the client is enrolled. From this section you may refine the settings by client for your particular needs, and select Update.
How do my customers use MyInsuranceDashboard.com?
MyInsuranceDashboard is designed to allow your customers to review their scheduled items you give them access to, and make request. These request may include adding a schedule item, removing a schedule item Your customers may also generate a published Certificate of Insurance, and download published documents.
Contacts
The contacts section will show all current contacts on file. To edit an existing contact select the name of the person you wish to edit. Once your changes are complete hit Submit. There may be a contact that is no longer valid. You may hit the Delete button to remove them from your list. To add a new contact select the New Contact button. Once your changes are complete hit Submit. The Download CSV button will download a spreadsheet file including all contact information, which can be opened in Excel or any other spreadsheet program. The Refresh button will check for new information and update listing.
Schedule Items: Drivers / Vehicles / Location / Equipment
Edit
To edit an existing schedule item select the name of the item. This will give you the Edit Request window to update existing data. When done editing select the "Submit Request" button. Once you select the "Submit Request" button you will receive a message from the Insurance Agency. After you fully read the message you will need to select "I understand" and select "Submit Request" one additional time. This request is then sent to the Insurance Agency for review. If the item is approved you will receive an email notification that your item has been processed.
NOTE: All items with a red star are required fields.
The New button will take you to the New Request window to submit a schedule item for review. When all fields are filled out select the "Submit Request" button. Once you select the "Submit Request" button you will receive a message from the Insurance Agency. After you fully read the message you will need to select "I understand" and select "Submit Request" one additional time. This request is then sent to the Insurance Agency for review. If the item is approved you will receive an email notification that your item has been processed.
NOTE: All items with a red star are required fields.
Download CSV
Download a spreadsheet file including all schedule information, which can be opened in Excel or any other spreadsheet program compatible with the .csv format.
Check for new information and update listing.
Active / Inactive Request
NOTE: The listing selected will show the button in blue. If not selected the button will show gray.
The active button selector will show you how many items are active.
The inactive button shows any items that are inactive at the time of the page view.
The request button will show any request that are pending approval from the insurance agency.
Delete
The Delete button is visible under the active button listing. This will submit to the insurance agency a request to remove the item from the active list. You will receive a secondary prompt asking if you are sure you want the item to be deleted.
Make Active
The Make Active button is visible under the inactive button listing. This will submit to the insurance agency a request to add the item to the active list. You will receive a secondary prompt asking if you are sure you want the item to be deleted.
Certificates
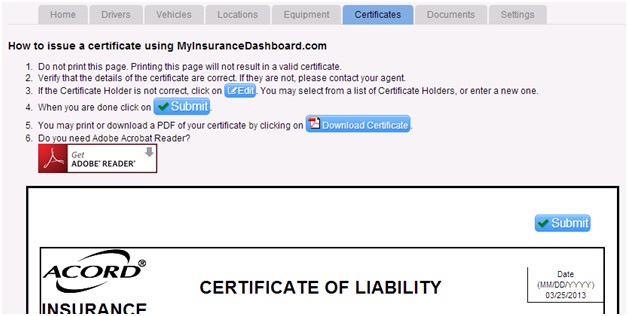
The role of the Certificates Tab is to allow your customer to print a Certificate of Insurance via the Internet without having to contact the insurance agency. They may add or edit the Certificate Holder information, but cannot change the rest of the form.
How to issue a certificate using MyInsuranceDashboard.com
NOTE: Do not print this page. Printing this page will not result in a valid certificate.
NOTE: The buttons in the above text at the top of the screen are not active. The actual buttons are further down the page, on the certificate section itself.
- Verify that the details of the certificate are correct. If they are not, please contact your agent.
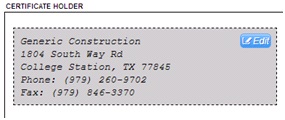
- If the Certificate Holder is not correct, click on Edit. You may select from a list of Certificate Holders, or enter a new one.
- When you are done click on Submit.
- You may print or download a PDF of your certificate by clicking on Download Certificate.
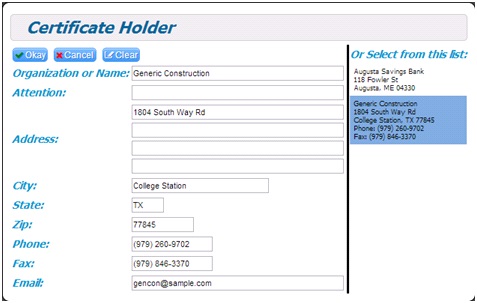
Edit Certificate Holder
The customer may need to add or edit a holder. To select or add someone different select Edit.
They may select from previously entered holders from the list on the right. To start with a clean slate hit the Clear button. Once they have filled out the proper information select Okay. This holder will now appear in the holder box, and is ready to be submitted.
Documents
How do I Select or Publish a Certificate of Insurance to MyInsuranceDashboard.com?
When completing a Certificate of Insurance (Acord 25), you may go to Other -> "Publish Cert to MyInsuranceDashboard.com." If the customer is not enrolled already you will get a select contact window. Highlight the contact you want to send the enroll email to, and select Send Form. After the enroll is complete it will set the Certificate that the enroll was set from as the published Certificate. If the customer is already enrolled the system will bypass the select contact window, and will automatically publish the Certificate.
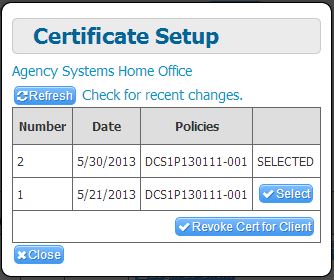
From Agent Side of the MyInsuranceDashboard.com portal each client will have a certificates button. This displays all certificates that are eligible in MyInsuranceDashboard.com. For a certificate to be eligible all polices on the certificate must be active. This means that the expiration date is set to today or the future for the policies.
Only one certificate is viewable on the client side at a time. This section allows you to select what version you want to be active. The item marked as "SELECTED" is the version currently in viewable by the client. You may toggle other eligible certificates by hitting the "Select" button. To remove certificates all together from the client side select "Revoke Cert for Client."
How do I Publish Documents to MyInsuranceDashboard.com?
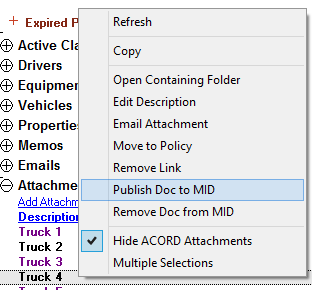
From Newton by Agency Systems you have the ability to publish documents from the Client's Basic Tab. To do so you will want to Expand the Attachments band, and Right Click on the attachment of choice. Then Select Publish Doc to MID. You will then receive a status message indicating Item successfully published. The attachment now published will change to a purple color indicating to others in the office that this item has been published.
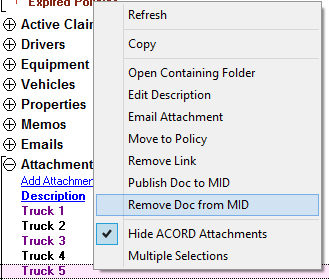
You may unpublish items in two different ways. From the Client's Basic Tab you will want to Expand the Attachments band, and Right Click on the attachment of choice. Then Select Remove Doc from MID. You will then receive a status message indicating Item successfully unpublished. The attachment now will change back to black indicating to others in the office that this item is not published.
From Agent Side of the MyInsuranceDashboard.com portal each client will have a documents button. This will show you a listing of all documents that are currently published.
To unpublish the document of choice Select Rescind Access. This will immediately unpubish the document and will change the attachment in Newton By Agency Systems back to black indicating to others in the office that this item is not published.


