Difference between revisions of "Attachments"
| Line 34: | Line 34: | ||
Although attachments and emails are both created through drag-and-drop, the [[Email Integration|email integration]] process is different. | Although attachments and emails are both created through drag-and-drop, the [[Email Integration|email integration]] process is different. | ||
=== Create a Client Attachment === | === Create a Client Attachment === | ||
| − | #Load the client on | + | #Load the client on a [[Client Tab|client tab]]. |
#'''Left-click''' the mouse on the document (on your desktop) and '''hold down the mouse button'''. | #'''Left-click''' the mouse on the document (on your desktop) and '''hold down the mouse button'''. | ||
#Drag the selected document onto the '''Basic tab''' and '''release the mouse button'''. | #Drag the selected document onto the '''Basic tab''' and '''release the mouse button'''. | ||
| Line 40: | Line 40: | ||
#Select''' Okay'''. | #Select''' Okay'''. | ||
=== Create a Policy Attachment === | === Create a Policy Attachment === | ||
| − | #Load the client on | + | #Load the client on a [[Client Tab|client tab]]. |
#'''Left-Click''' on the policy number listed under the '''Active Policies''' band to open [[Policy Express]]. | #'''Left-Click''' on the policy number listed under the '''Active Policies''' band to open [[Policy Express]]. | ||
#'''Left-Click''' the mouse on the document (on your desktop) and '''hold down the mouse button'''. | #'''Left-Click''' the mouse on the document (on your desktop) and '''hold down the mouse button'''. | ||
| Line 47: | Line 47: | ||
#Select''' Okay'''. | #Select''' Okay'''. | ||
=== Create a Company Attachment === | === Create a Company Attachment === | ||
| − | #Load the company on | + | #Load the company on a [[Company Tab|company tab]]. |
#'''Left-click''' the mouse on the document (on your desktop) and '''hold down the mouse button'''. | #'''Left-click''' the mouse on the document (on your desktop) and '''hold down the mouse button'''. | ||
#Drag the selected document onto the '''Company tab''' and '''release the mouse button'''. | #Drag the selected document onto the '''Company tab''' and '''release the mouse button'''. | ||
Revision as of 19:05, 19 August 2015
| Related Pages |
| Related Categories |
Newton provides you with the ability to attach electronic documents to your management system. Emails, PDF documents, and other scanned images can all be attached to Newton through drag-and-drop to be shared. A document can be attached to a given client, to a specific policy or submission, or to a company.
Contents
Create an Attachment
Although attachments and emails are both created through drag-and-drop, the email integration process is different.
Create a Client Attachment
- Load the client on a client tab.
- Left-click the mouse on the document (on your desktop) and hold down the mouse button.
- Drag the selected document onto the Basic tab and release the mouse button.
- Edit the Description for the file when prompted.
- Select Okay.
Create a Policy Attachment
- Load the client on a client tab.
- Left-Click on the policy number listed under the Active Policies band to open Policy Express.
- Left-Click the mouse on the document (on your desktop) and hold down the mouse button.
- Drag the selected document onto Policy Express and release the mouse button.
- Edit the Description for the file when prompted.
- Select Okay.
Create a Company Attachment
- Load the company on a company tab.
- Left-click the mouse on the document (on your desktop) and hold down the mouse button.
- Drag the selected document onto the Company tab and release the mouse button.
- Edit the Description for the file when prompted.
- Select Okay.
Create Private Attachment
See Management Tab for details.
Attachment Types and User Tags
In addition to being saved to a policy, Attachments can be assigned a Type and User-Defined Tag. View filters can be applied for the types, similar to Activity Filters.
Attachment Type and Tag columns are displayed in the following locations:
- Dashboard Tab -> Attachments
- Management Tab -> Operator -> Attachments
- Management Tab -> Company -> Attachments
- Client Tab -> Attachments
- Policy Express -> Attachments
- Company Tab -> Attachments
- Vendor Tab -> Attachments
Attachment Type Setup
Attachment types can be manually assigned to user-created attachments, in addition to being automatically set for system-generated attachments.
| Type | Automatically Assigned To |
|---|---|
| Accounting | Client/Company Reconcile Reports, Commission Download/Commission Builder Reports |
| Document | Printed Memo Writer documents. |
| ACORD/Forms | Previewed or Printed ACORD forms. |
| Picture | |
| Other | |
| Packages | Batch print generated PDF packages. |
Attachment Type profiles cannot be modified.
Attachment Tag Setup
Attachment tag profiles are user-defined, created by office administrators. (Requires Other -> Security System -> AR -> Policy Transaction -> Global Access)
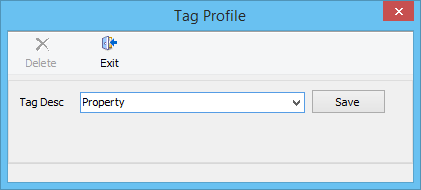
Create an Attachment Tag
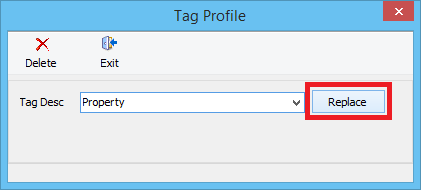
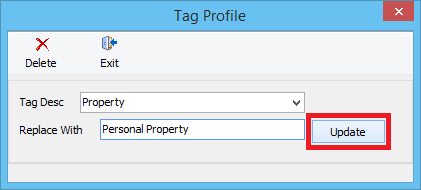
Rename an Attachment Tag
- Select Profiles -> Attachment Tag Setup.
- Select the existing Tag Desc from the drop-down.
- Select Replace.
- Enter the new Attachment Tag Name.
- Select Update.
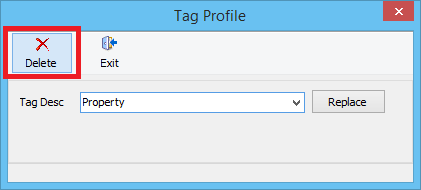
Delete an Attachment Tag
You cannot recover a deleted Attachment Tag. All previously associated attachments will no longer have an Attachment Tag set.
- Select Profiles -> Attachment Tag Setup.
- Select the existing Tag Desc from the drop-down.
- Select Delete.
- Confirm when prompted.
Add Attachment Type and/or Tag to New Attachment
New attachments with common file extensions (.jpg, .docx, .pdf) will automatically be assigned an Attachment Type.
Add Attachment Through Drag+Drop
- Drag+Drop the attachment onto either a Client Tab, Policy Express, or the Company Tab. See: Attachment Integration
- Select the desired Type and/or Tag.
- Select OK.
Add Attachment Through Browse
- Open the Client on one of the four client tabs.
- Do one of the following:
- Expand the Attachments band. Select Add Attachment.
- Right-Click on the policy number listed under Active Policies and select Add Attachment.
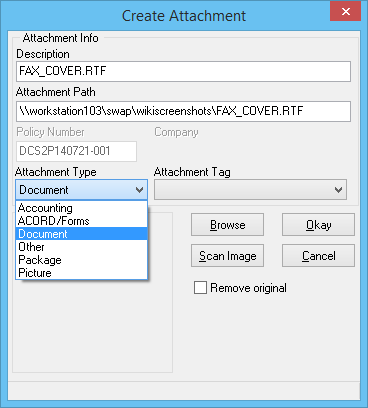
- Select Browse and choose the attachment.
- Select the desired Type and/or Tag.
- Select Okay.
Add Attachment Type and/or Tag to Existing Attachment
- Load the Client on one of the four client tabs.
- Expand the Attachments Band.
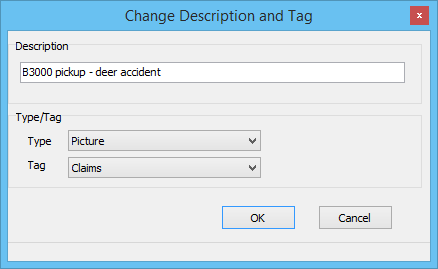
- Right-Click on the attachment and select Edit Description.
- Select the desired Type and/or Tag.
- Select OK.
Filter Attachment List by Type
- Load the Client on one of the four client tabs.
- Expand the Attachments Band.
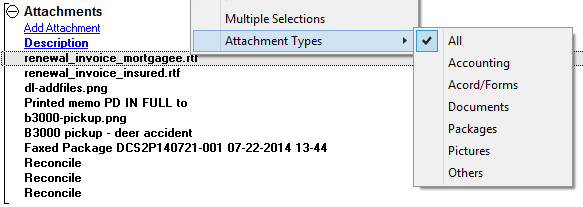
- Right-Click on the attachment and select Attachment Types. (By default, All will be selected).
- Select the desired Attachment Type from the list.
- The attachment list will be automatically filtered to only include attachments saved as the selected Attachment Type.
- Multiple attachment types can be selected by choosing additional types.

