Difference between revisions of "Express Checks"
(Updated how to access and removed this outdated / not necessary but can add back later. File:menu-ap-checktransaction-expresschecks.png) |
(updated screen shots / menu options) |
||
| Line 76: | Line 76: | ||
|} | |} | ||
=== Check Navigation Buttons === | === Check Navigation Buttons === | ||
| + | [[File:accounting-expresschecks-toolbar.png]] | ||
| + | |||
{| class="wikitable" | {| class="wikitable" | ||
| − | + | |- | |
| + | |Find | ||
| + | |[[#View an Existing Check by Searching|Search for checks by bank or G/L Account]] | ||
|- | |- | ||
|Create New | |Create New | ||
|[[#Create A Check|Create a new check]] | |[[#Create A Check|Create a new check]] | ||
|- | |- | ||
| − | | | + | |Print |
| − | |[[ | + | |[[Print a Check or Range of Checks|Print the current check]] |
|- | |- | ||
|Issue | |Issue | ||
|Issue the current check | |Issue the current check | ||
| − | |||
| − | |||
| − | |||
|- | |- | ||
|Reconcile | |Reconcile | ||
|Reconcile/Unreconcile the current check | |Reconcile/Unreconcile the current check | ||
| − | |||
| − | |||
| − | |||
|- | |- | ||
|History | |History | ||
|View the current check activity | |View the current check activity | ||
| + | |- | ||
| + | |Void | ||
| + | |[[#Void A Check|Void the current check]] | ||
| + | |- | ||
| + | |Reports | ||
| + | |Shortcuts to the Check Register and Check Summary | ||
|- | |- | ||
|Options | |Options | ||
|Print the transaction details<br>[[#Void, Erase, and Reissue a Check With the Same Number|Erase the current check]]<br>Un-issue current check<br>Verify check's data<br>Verify all check data<br>[[#Void and Reissue A Check with a new Number or Bank|Autonumber check]]<br>''Call support for assistance with any of the above options.'' | |Print the transaction details<br>[[#Void, Erase, and Reissue a Check With the Same Number|Erase the current check]]<br>Un-issue current check<br>Verify check's data<br>Verify all check data<br>[[#Void and Reissue A Check with a new Number or Bank|Autonumber check]]<br>''Call support for assistance with any of the above options.'' | ||
| + | |- | ||
| + | |Wiki | ||
| + | |Opens the help documentation on the Newton Wiki for the check transaction screen | ||
|- | |- | ||
|Exit | |Exit | ||
| Line 119: | Line 126: | ||
#Select '''Accounting -> Express Checks'''. | #Select '''Accounting -> Express Checks'''. | ||
#Enter the '''Bank Code''' for the check. | #Enter the '''Bank Code''' for the check. | ||
| + | #Change the check type from '''Regular''' to '''Wire''' or '''Don't Print''' if desired. | ||
#Select the '''Date''' for the check. | #Select the '''Date''' for the check. | ||
#Enter the GL by keying the code, or selecting the drop-down. ''(From Example, 2110)'' | #Enter the GL by keying the code, or selecting the drop-down. ''(From Example, 2110)'' | ||
#Enter the Sub GL. ''(From Example, AET)'' | #Enter the Sub GL. ''(From Example, AET)'' | ||
#Enter a short '''Description'''. | #Enter a short '''Description'''. | ||
| − | # | + | #Select '''Manual'''. |
| − | + | #:[[File:Accounting-Expresschecks-create-type-onaccount.png]] | |
| − | |||
| − | #:[[File:Expresschecks-create-type- | ||
#Change '''Apply To -> On-Account'''. | #Change '''Apply To -> On-Account'''. | ||
#Select the '''Department Code'''. | #Select the '''Department Code'''. | ||
#Enter the '''Amount'''. | #Enter the '''Amount'''. | ||
#Select '''Ok'''. | #Select '''Ok'''. | ||
| − | #:[[File: | + | #:[[File:accounting-expresschecks-editdist-onaccount.png]] |
#To add additional distributions, repeat the steps above. When finished, select '''Cancel'''. | #To add additional distributions, repeat the steps above. When finished, select '''Cancel'''. | ||
#The check is now complete. | #The check is now complete. | ||
| − | #:[[File:expresschecks | + | #:[[File:accounting-expresschecks-onaccount-finished.png]] |
#Select '''Exit'''. | #Select '''Exit'''. | ||
| Line 152: | Line 158: | ||
#Select '''To Apply Transmittals'''. | #Select '''To Apply Transmittals'''. | ||
#Select the '''Company Code''' and select '''List'''. ''Change the date range if necessary''. | #Select the '''Company Code''' and select '''List'''. ''Change the date range if necessary''. | ||
| − | #:[[File:expresschecks-applytransmittals-list.png]] | + | #:[[File:accounting-expresschecks-applytransmittals-list.png]] |
#Select the invoices to pay and select '''Apply'''. | #Select the invoices to pay and select '''Apply'''. | ||
| − | #:[[File: | + | #:[[File:accounting-Expresschecks-applytransmittals-apply.png]] |
== View or Edit an Existing Check == | == View or Edit an Existing Check == | ||
| Line 171: | Line 177: | ||
#Select the correct '''Bank Code'''. Select '''Search''' to display the results. | #Select the correct '''Bank Code'''. Select '''Search''' to display the results. | ||
#:To view the results by general ledger account instead, choose '''Select By -> Account'''. Select the '''GL''' and optionally '''Sub GL'''. | #:To view the results by general ledger account instead, choose '''Select By -> Account'''. Select the '''GL''' and optionally '''Sub GL'''. | ||
| − | #:[[File:expresschecks-search-byaccount.png]] | + | #:[[File:accounting-expresschecks-search-byaccount.png]] |
#'''Double-Click''' on the desired check to load the check details. | #'''Double-Click''' on the desired check to load the check details. | ||
| Line 177: | Line 183: | ||
#[[#View an Existing Check|Load the desired check]] using one of the methods above. | #[[#View an Existing Check|Load the desired check]] using one of the methods above. | ||
#'''Right-Click''' in the view distributions area and select '''Show Register'''. | #'''Right-Click''' in the view distributions area and select '''Show Register'''. | ||
| − | #:[[File:expresschecks-showregister.png]] | + | #:[[File:accounting-expresschecks-showregister.png]] |
#A [[Report: Check Register|Check Register report]] will automatically display. | #A [[Report: Check Register|Check Register report]] will automatically display. | ||
| Line 195: | Line 201: | ||
#Select '''Override Payee''' if deselected. ''The option is not available if the check has been marked issued''.'' | #Select '''Override Payee''' if deselected. ''The option is not available if the check has been marked issued''.'' | ||
#Enter the payee details or select the '''Search Icon''' | #Enter the payee details or select the '''Search Icon''' | ||
| − | #:[[File:expresschecks-override-payee.png]] | + | #:[[File:accounting-expresschecks-override-payee.png]] |
#Select the '''Lookup Type''', then select the correct sub-type. | #Select the '''Lookup Type''', then select the correct sub-type. | ||
| − | #:[[File:expresschecks | + | #:[[File:accounting-expresschecks-payee-setoverride-companies.png]] |
#Select '''Ok''' | #Select '''Ok''' | ||
#Select '''Accept''' | #Select '''Accept''' | ||
| Line 211: | Line 217: | ||
#Select '''Single Check''' or '''Check Range''' under '''Reconcile Type'''. | #Select '''Single Check''' or '''Check Range''' under '''Reconcile Type'''. | ||
#:''Date range is not recommended because it will change the reconcile status on all checks in all banks for the date range selected.'' | #:''Date range is not recommended because it will change the reconcile status on all checks in all banks for the date range selected.'' | ||
| − | #:[[File:expresschecks-reconcile-unreconcile.png]] | + | #:[[File:accounting-expresschecks-reconcile-unreconcile.png]] |
#Select '''Un-Reconcile''' and select '''Ok'''. | #Select '''Un-Reconcile''' and select '''Ok'''. | ||
#Select '''Exit'''. | #Select '''Exit'''. | ||
| Line 233: | Line 239: | ||
#Enter the '''Check Number'''. Select '''Tab''' to load the check details. | #Enter the '''Check Number'''. Select '''Tab''' to load the check details. | ||
#Select '''Options -> Autonumber Check'''. | #Select '''Options -> Autonumber Check'''. | ||
| − | #:[[File: | + | #:[[File:accounting-expresschecks-options-autonumber check.png]] |
#Enter the new '''Bank Code''' if desired, and the new '''Check Number'''. To automatically number the new check, leave the default of AUTO. | #Enter the new '''Bank Code''' if desired, and the new '''Check Number'''. To automatically number the new check, leave the default of AUTO. | ||
| − | #:[[File: | + | #:[[File:accounting-expresschecks-autonumcheck-auto.png]] |
#Select '''Ok'''. | #Select '''Ok'''. | ||
| Line 245: | Line 251: | ||
#Select '''Void''' then '''Yes''' to confirm. | #Select '''Void''' then '''Yes''' to confirm. | ||
#Select '''Options -> Erase the Current Check'''. Select '''Yes''' to confirm. | #Select '''Options -> Erase the Current Check'''. Select '''Yes''' to confirm. | ||
| − | #:[[File: | + | #:[[File:accounting-expresschecks-options-erasecurrentcheck.png]] |
#Select '''Exit'''. | #Select '''Exit'''. | ||
You can now [[#Create A Check|create a check]] with the same check number. | You can now [[#Create A Check|create a check]] with the same check number. | ||
| Line 252: | Line 258: | ||
If the general ledger period is closed, additional steps are required to show the check as void, without changing the prior general Ledger balances. The steps below will void the check and replace it with journal entries. After voiding the check you can issue a replacement check in the current period. | If the general ledger period is closed, additional steps are required to show the check as void, without changing the prior general Ledger balances. The steps below will void the check and replace it with journal entries. After voiding the check you can issue a replacement check in the current period. | ||
| − | Example: Check # | + | Example: Check #5060 in the amount of $100 for Bank 101 was entered February 01, 2019 to Client 678. |
The Client has misplaced the check, so you will need to issue a replacement check for the current period. | The Client has misplaced the check, so you will need to issue a replacement check for the current period. | ||
| Line 272: | Line 278: | ||
==== Create a Set of Journal Entries In Prior Period ==== | ==== Create a Set of Journal Entries In Prior Period ==== | ||
#Select '''Accounting -> Journal Entry'''. | #Select '''Accounting -> Journal Entry'''. | ||
| − | #Enter the '''Date of the Voided Check'''. ''(From example, | + | #Enter the '''Date of the Voided Check'''. ''(From example, 2-1-2019)'' |
#Enter '''G/L Number 1100'''. | #Enter '''G/L Number 1100'''. | ||
#For '''Sub G/L Code''', enter the Bank Code. ''(From example, 101)'' | #For '''Sub G/L Code''', enter the Bank Code. ''(From example, 101)'' | ||
#Enter the '''Department''' code. | #Enter the '''Department''' code. | ||
#Enter the voided check # in the Description field. | #Enter the voided check # in the Description field. | ||
| − | #In the Amount field, enter the amount of the check as a '''negative (-)'''. ''(From example, -$ | + | #In the Amount field, enter the amount of the check as a '''negative (-)'''. ''(From example, -$100.00)'' |
| − | # | + | #Press '''TAB>''' to create offset journal. |
| − | |||
| − | |||
#Enter '''G/L Number'''. ''(From Example, 1120)'' | #Enter '''G/L Number'''. ''(From Example, 1120)'' | ||
| − | #Enter '''Sub G/L Code'''. ''(From Example, | + | #Enter '''Sub G/L Code'''. ''(From Example, 678)'' |
#Enter in the '''Department''' code. | #Enter in the '''Department''' code. | ||
| − | + | #Enter the check Amount as a '''positive amount'''. ''(From Example, $100.00)'' | |
| − | #Enter the check Amount as a '''positive amount'''. ''(From Example, $ | + | #Select '''Save''' then '''Exit''' to close the Journal Transaction screen. |
| − | + | #:[[File:Voidcheck-closedperiod-journalbundle1.png]] | |
| − | #Select ''' | + | |
==== Close the Month for Voided Check ==== | ==== Close the Month for Voided Check ==== | ||
| Line 302: | Line 306: | ||
#Enter the '''Department Code'''. | #Enter the '''Department Code'''. | ||
#Enter the voided check # for the Description. | #Enter the voided check # for the Description. | ||
| − | #The Amount is the amount of the original check as a '''positive'''. ''(From Example, $ | + | #The Amount is the amount of the original check as a '''positive'''. ''(From Example, $100.00)'' |
| − | # | + | #Press '''TAB>''' to create offset journal. |
| − | |||
#Enter the '''G/L Number'''. ''(From Example, 1120)'' | #Enter the '''G/L Number'''. ''(From Example, 1120)'' | ||
| − | #Enter the '''Sub G/L Code'''. ''(From Example, | + | #Enter the '''Sub G/L Code'''. ''(From Example, 678)'' |
#Enter the '''Department Code'''. | #Enter the '''Department Code'''. | ||
#Enter the voided check # for the Description. | #Enter the voided check # for the Description. | ||
| − | #In the Amount field, enter the amount of the check as a '''negative (-)'''. ''(From Example, -$ | + | #In the Amount field, enter the amount of the check as a '''negative (-)'''. ''(From Example, -$100.00)'' |
| − | + | #Select '''Save''' then '''Exit''' to close the Journal Transaction screen. | |
| − | #Select ''' | + | #:[[File:Voidcheck-closedperiod-journalbundle2.png]] |
You can now [[#Create A Check|recreate a new check]] transaction as normal. | You can now [[#Create A Check|recreate a new check]] transaction as normal. | ||
Revision as of 16:53, 18 March 2019
| Related Pages |
| Related Categories |
Although Express Checks can be used to issue checks, most policy-related checks will be issued using Reconcile Company Payables or Reconcile Producer Payables.
Express Checks allows you to easily view the distributions on existing checks, and apply, unapply, or re-apply them to invoices.
Express Checks is a replacement for Policy Related Checks starting from the July 2013 release.
Contents
Express Checks Interface
Select Accounting -> Express Checks.
Check Information Fields
| The Check Information | |
|---|---|
| Bank | The Bank account from which the check is issued. |
| Check number | New checks will be auto-numbered. Wire checks start with a letter 'W' to indicate that they are not printed. |
| Date | The GL date of the check. |
| G/L | The General Ledger account to which the check is applied, e.g. Producer Payables. |
| Payable Date | Payable date range of invoices for the check. |
| Check Type | Regular, Regular-Don't Print, or Wire check. |
| Override Payee | Override the printed payee on the check. |
Distribution and Apply Tabs

| The Distribution and Apply tabs | |
|---|---|
| View Distributions | This tab is only visible on issued checks. Displays current distributions, including "on-account": Any amount that is not applied to a specific invoice, but applies to the company or client balance. |
| To Apply Invoices | This tab allows you to search for, list, and select invoices to which to apply the check. |
| To Apply Transmittals | This tab is only visible for GL 1120. It lists open cash transmittals by company to create a single check offsetting each payment. |

| Find | Search for checks by bank or G/L Account |
| Create New | Create a new check |
| Print the current check | |
| Issue | Issue the current check |
| Reconcile | Reconcile/Unreconcile the current check |
| History | View the current check activity |
| Void | Void the current check |
| Reports | Shortcuts to the Check Register and Check Summary |
| Options | Print the transaction details Erase the current check Un-issue current check Verify check's data Verify all check data Autonumber check Call support for assistance with any of the above options. |
| Wiki | Opens the help documentation on the Newton Wiki for the check transaction screen |
| Exit | Exit Express Checks |
Create A Check
Although Express Checks can be used to issue checks, most policy-related checks will be issued using Reconcile Company Payables or Reconcile Producer Payables.
Expense or Multi-GL checks are created using Non-Policy Related Checks.
To transfer money between bank accounts, use the Bank Transfer Wizard.
Create an On-Account Check
Creating an on-account check follows the same process regardless of the general ledger code used.
Example: On-account check to GL 2110: Company Payables Sub GL AET.
- Select Accounting -> Express Checks.
- Enter the Bank Code for the check.
- Change the check type from Regular to Wire or Don't Print if desired.
- Select the Date for the check.
- Enter the GL by keying the code, or selecting the drop-down. (From Example, 2110)
- Enter the Sub GL. (From Example, AET)
- Enter a short Description.
- Select Manual.
- Change Apply To -> On-Account.
- Select the Department Code.
- Enter the Amount.
- Select Ok.
- To add additional distributions, repeat the steps above. When finished, select Cancel.
- The check is now complete.
- Select Exit.


Create a Check Paying Specific Invoices
Most policy-related checks will be issued using Reconcile Company Payables, however Express Checks can also pay specific invoices.
Batch Transmittals - One Company Check for Multiple Clients
Normally, on cash transmittals, the offset check to the company is created each time you enter the cash receipt.
If you are sending physical checks to the company, and have a high volume of transmittals, you can create a single check for the day’s or week's transmittals.
To use the process below, the client payment must be attached to an invoice.
- Select Accounting -> Express Checks.
- Enter the Bank Code for the check.
- Enter GL 1120.
- Select To Apply Transmittals.
- Select the Company Code and select List. Change the date range if necessary.
- Select the invoices to pay and select Apply.


View or Edit an Existing Check
View an Existing Check
If applicable, a check can be opened directly from a client's account tab, or from within the payment screens in Express Billing.
Any check can be opened directly from Express Checks, including Non-Policy Related Checks.
View an Existing Check by Check Number
- Select Accounting -> Express Checks.
- Enter the Bank Code of the check.
- Enter the Check Number. Select Tab to load the check details.
View an Existing Check by Searching
- Select Accounting -> Express Checks.
- Select Find.
- Select the correct Bank Code. Select Search to display the results.
- To view the results by general ledger account instead, choose Select By -> Account. Select the GL and optionally Sub GL.
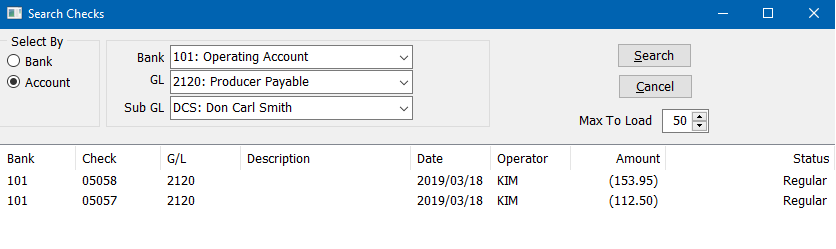
- Double-Click on the desired check to load the check details.

Print a Detailed Report for an Existing Check
- Load the desired check using one of the methods above.
- Right-Click in the view distributions area and select Show Register.
- A Check Register report will automatically display.

Edit an Existing Check
Unissued checks in an open period can be modified including the total dollar amount of the check.
Checks in a closed period and issued checks can have their distributions adjusted, but the total dollar amount cannot be altered.
A check with and incorrect bank, number, date, check type, or GL cannot be edited and must be voided.
- Click here to void a check.
- Click here to change the check number of bank number.
- Click here to void, erase, and reissue a check with the same number.
- Click here to void a check in a closed GL period.
Edit the Payee On an Existing Check
- Load the desired check using one of the methods above.
- Select Override Payee if deselected. The option is not available if the check has been marked issued.
- Enter the payee details or select the Search Icon
- Select the Lookup Type, then select the correct sub-type.
- Select Ok
- Select Accept
- Select Exit


Edit the Distributions on an Existing Check
Click play to watch a video showing the full process of unapplying and reapplying invoice distributions on a check.
Un-Reconcile a Check or Range of Checks
- Load the desired check using one of the methods above.
- Select Reconcile.
- Select Single Check or Check Range under Reconcile Type.
- Date range is not recommended because it will change the reconcile status on all checks in all banks for the date range selected.
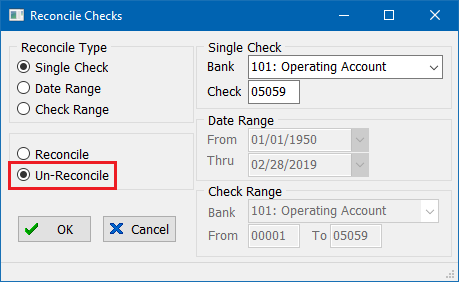
- Select Un-Reconcile and select Ok.
- Select Exit.

Void A Check
Both policy related and non-policy related checks can be voided from within Express Checks. When a check is voided, all distributions are automatically removed from the system. For example, if the check was paying a list of company payable invoices, once the check has been voided, each invoice will regain a payable balance.
- Select Accounting -> Express Checks.
- Enter the Bank Code of the check.
- Enter the Check Number. Select Tab to load the check details.
- Select Void then Yes to confirm.
- Select Exit.
Void and Reissue A Check with a new Number or Bank
A check an be automatically numbered to a different number, or a different bank code.
The process will void the old check number, and create a duplicate of the original check to the new bank and check number. The check type will be retained from the original check of either regular / wire.
- Select Accounting -> Express Checks.
- Enter the Bank Code of the check.
- Enter the Check Number. Select Tab to load the check details.
- Select Options -> Autonumber Check.
- Enter the new Bank Code if desired, and the new Check Number. To automatically number the new check, leave the default of AUTO.
- Select Ok.


Void, Erase, and Reissue a Check With the Same Number
Checks posted to an incorrect GL cannot be edited. Instead, the check can be voided, erased, and reissued with the same number.
- Select Accounting -> Express Checks.
- Enter the Bank Code of the check.
- Enter the Check Number. Select Tab to load the check details.
- Select Void then Yes to confirm.
- Select Options -> Erase the Current Check. Select Yes to confirm.
- Select Exit.
You can now create a check with the same check number.
Void A Check in a Closed GL Period
If the general ledger period is closed, additional steps are required to show the check as void, without changing the prior general Ledger balances. The steps below will void the check and replace it with journal entries. After voiding the check you can issue a replacement check in the current period.
Example: Check #5060 in the amount of $100 for Bank 101 was entered February 01, 2019 to Client 678.
The Client has misplaced the check, so you will need to issue a replacement check for the current period.
Open General Ledger For Original Check Date
- From the main Agency Systems screen select Accounting -> Open/Close Month.
- Enter the Check Date in the Date field.
- Select Open Month twice to open the month and days.
- Exit the Open/Close Month screen.
Void The Check Transaction
For additional details see void a check.
- Select Accounting -> Express Checks.
- Enter the Bank Code of the check.
- Enter the Check Number. Select Tab to load the check details.
- Select Void then Yes to confirm.
- Select Exit to close.
Create a Set of Journal Entries In Prior Period
- Select Accounting -> Journal Entry.
- Enter the Date of the Voided Check. (From example, 2-1-2019)
- Enter G/L Number 1100.
- For Sub G/L Code, enter the Bank Code. (From example, 101)
- Enter the Department code.
- Enter the voided check # in the Description field.
- In the Amount field, enter the amount of the check as a negative (-). (From example, -$100.00)
- Press TAB> to create offset journal.
- Enter G/L Number. (From Example, 1120)
- Enter Sub G/L Code. (From Example, 678)
- Enter in the Department code.
- Enter the check Amount as a positive amount. (From Example, $100.00)
- Select Save then Exit to close the Journal Transaction screen.

Close the Month for Voided Check
- Select Accounting -> Open/Close Month.
- Enter the Check date in the Date field.
- Select Close Month twice. Select Yes to confirm closing all days.
- Select Exit.
Create a Set of Journals in Current Period
- Select Accounting -> Journal Entry.
- The Date is the current date.
- Enter the G/L Number 1100.
- Enter the Sub G/L Code. (From Example, 101)
- Enter the Department Code.
- Enter the voided check # for the Description.
- The Amount is the amount of the original check as a positive. (From Example, $100.00)
- Press TAB> to create offset journal.
- Enter the G/L Number. (From Example, 1120)
- Enter the Sub G/L Code. (From Example, 678)
- Enter the Department Code.
- Enter the voided check # for the Description.
- In the Amount field, enter the amount of the check as a negative (-). (From Example, -$100.00)
- Select Save then Exit to close the Journal Transaction screen.

You can now recreate a new check transaction as normal.