Client Payment: Agency Bill Cash
Jump to navigation
Jump to search
| Related Pages |
| Related Categories |
This procedure outlines how to receive a client payment on an agency bill policy. This will create a cash receipt, and apply the payment to an invoice, multiple invoices, or left on-account for the client.
- To apply an existing payment to invoices, see Apply Client Cash Balance to an Invoice.
- For instructions taking a payment on direct bill policies, see Client Payment: Direct Bill Cash Transmittal.
Contents
Frequently Asked Questions (FAQ)
- Why doesn't my invoice #99968 show in reconcile receivables?
- How do I track clients who have not paid?
Create an Agency Bill Payment - One Invoice
- Load a client on one of the client tabs.
- Select the Accounting tab at the top to view the client's current balance. (GL 1120 - Client Receivables)
- Verify the account balance shows a single outstanding Agency Bill invoice.
- If more than one invoice is listed, see Create an Agency Bill Payment - Multiple invoices
- If no invoices are listed, see Create an Agency Bill Payment - No Invoice
- Right-Click on the invoice and select Attach Cash to Inv XXXXXX.
- Enter a Check Number or select F2 to display "<CASH>". (Check number refers to the client's check number.).
- Enter the Amount for the payment.
- Verify the Date and the Bank code. (The bank will auto-fill based on the Agency Profile.)
- Select Ok and Yes to print if desired.


Create an Agency Bill Payment - Multiple Invoices
- Load a client on one of the client tabs.
- Select the Accounting tab at the top to view the client's current balance. (GL 1120 - Client Receivables)
- Verify the account balance shows multiple outstanding Agency Bill invoices.
- If one invoice is listed, see Create an Agency Bill Payment - One Invoice
- If no invoices are listed, see Create an Agency Bill Payment - No Invoice
- Select Reconcile on the top toolbar.
- Verify the date range will include all invoices displayed on the client's account tab.
- Select Ok.
- Verify the cash transaction details:
- Bank Code. (The bank will auto-fill based on the Agency Profile.)
- Department code for the cash transaction.
- Cash transaction Effective date.
- Check Number or select F2 to display "<CASH>". (Check number refers to the client's check number.).
- Cash transaction Description.
- Cash transaction Amount.
- Select Ok.
- Right-Click and select Pay All In Full to pay all listed invoices. (To pay individual invoices, Right-Click on each invoice and select Pay This Invoice In Full.)
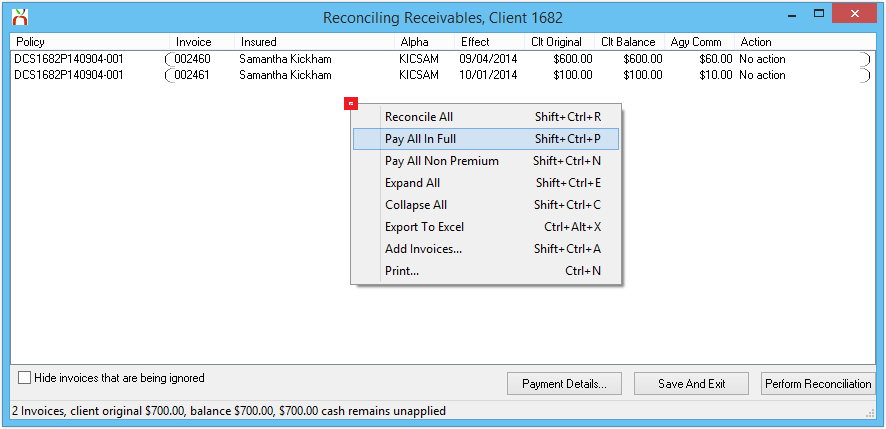
- See Reconcile Client Receivables for additional options and instructions.
- Select Perform Reconciliation to create the cash transaction, and apply the payment to each invoice.
- Select Ok.


Create an Agency Bill Payment - No Invoice
- Load a client on one of the client tabs.
- Select the Accounting tab at the top to view the client's current balance. (GL 1120 - Client Receivables)
- Verify the account balance shows no outstanding Agency Bill invoices.
- If one invoice is listed, see Create an Agency Bill Payment - One Invoice
- If more than one invoice is listed, see Create an Agency Bill Payment - Multiple Invoices
- After verifying there are no outstanding invoices, return to the client's Dashboard Tab.
- Select the (+) next to Policies. (To expand the band by default, see: Preferences)
- Left-Click the desired policy number to open Policy Express. (Optionally, Right-Click and select Attach Payment to skip to step 8.)
- Select Client Payment within the top toolbar.
- Enter a Check Number or select F2 to display "<CASH>". (Check number refers to the client's check number.).
- Enter the Amount for the payment.
- Select Cash Type -> Regular.
- Verify the Date and the Bank code. (The bank will auto-fill based on the Agency Profile.)
- Select Ok and Yes to print if desired.


After creating the on-account cash, the amount will be displayed on the client's account tab, and can be applied to an invoice in the future.

Create an Agency Bill Payment - No Policy
- Load a client on one of the client tabs.
- Select the Accounting tab at the top to view the client's current balance. (GL 1120 - Client Receivables)
- Verify the account balance shows no outstanding Agency Bill invoices.
- If one invoice is listed, see Create an Agency Bill Payment - One Invoice
- If more than one invoice is listed, see Create an Agency Bill Payment - Multiple Invoices
- After verifying there are no outstanding invoices, return to the client's Basic Tab.
- If there are any policies listed under Active Policies see Create an Agency Bill Payment - No Invoice.
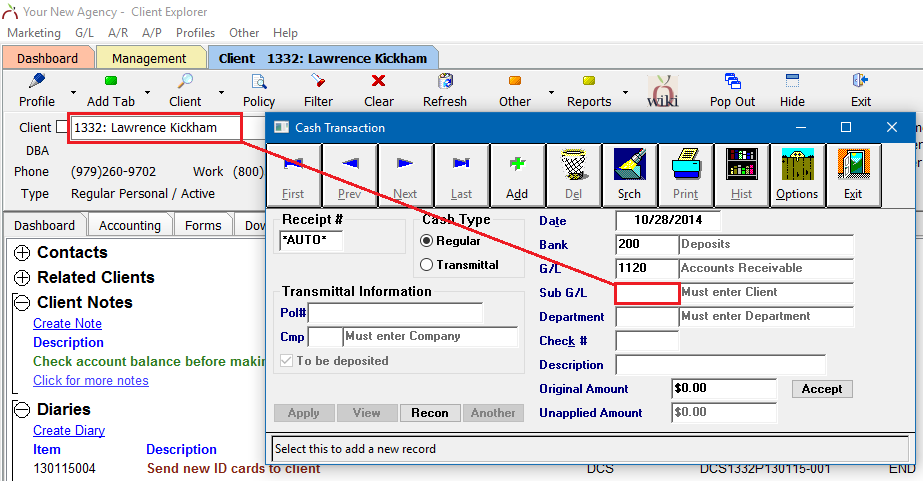
- After verifying there are no active policies listed, select A/R -> Cash Transaction.
- Enter the Bank Code
- Enter G/L -> 1120.
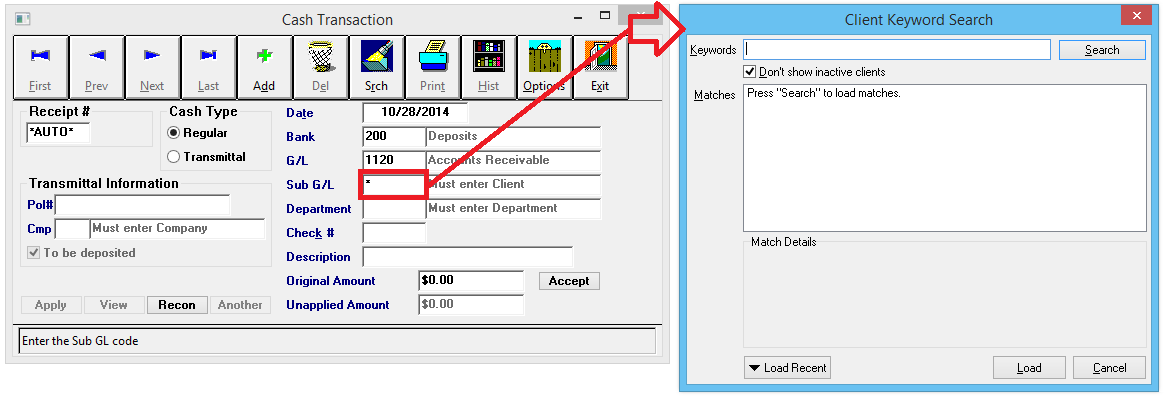
- Enter Sub G/L -> Client Number displayed behind the cash screen on the client's basic tab.
- (Alternatively, enter * then press <Enter> to search using the Client Keyword Search. )
- Enter the Department Code.
- Enter the Check # or press <F2> for cash.
- Enter a short Description.
- Enter the Original Amount, and select Accept.
- Select Print, or Exit to close.


After creating the on-account cash, the amount will be displayed on the client's account tab, and can be applied to an invoice in the future.
